Table tools add-in

Based on an idea by fellow Excel MVP Frédéric le Guen I have created a new small Excel add-in which makes your life using tables in Excel slightly easier. It sports a ribbon tab which contains a drop-down containing all tables in your worksheet so you can quickly jump to them and another one which displays all columns in the current table. Both items are also available in the cell right-click menu. The former when you right-click on a cell not in a table, the latter when you click on a cell within a table.
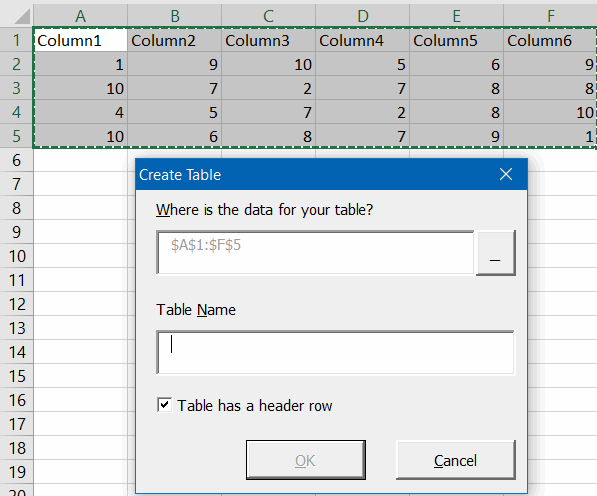
It also has an enhanced “Insert table” dialog which enables you to enter the name of the table and has the Headings checkbox turned on by default no matter what:
Insert table dialog

Check out a slightly more elaborate description and a download link

Enjoy!

Jan Karel Pieterse

Monthly Report Tutorial

As posted on my blog yesterday.

At a former client, I was asked to submit monthly reports that show details of work performed in 15 minute increments.

My line of thought went something like this,

“Let’s see, a monthly calendar, something like the one on my fridge door comes to mind and making one in Excel should be easy…”
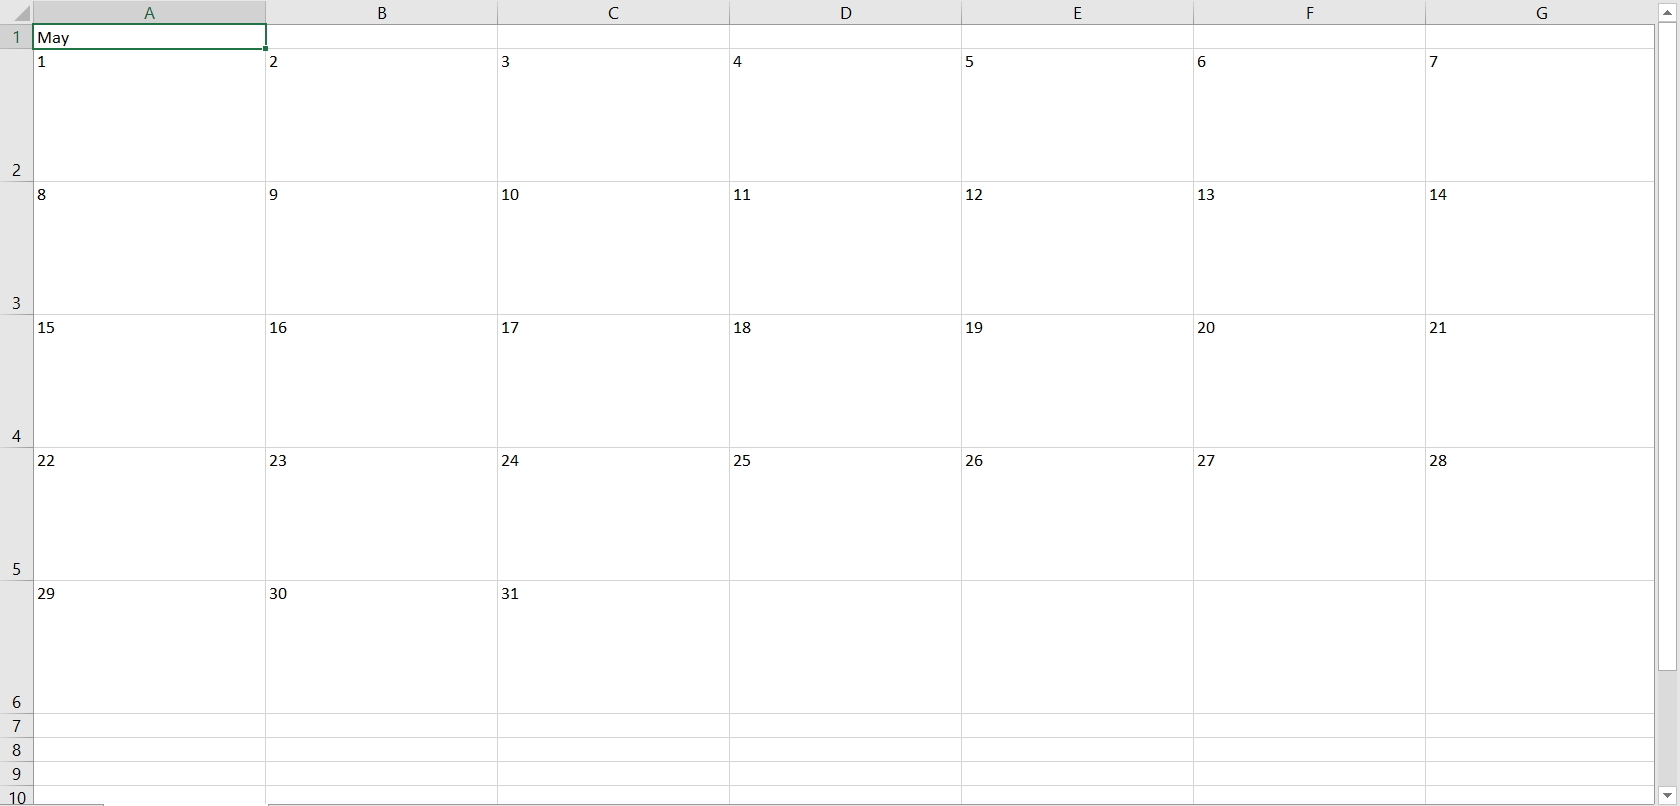
One problem is space. If I do several tasks in one day, do I use tiny font to make the details fit, or do I make the calendar larger to the point that I have to scroll copiously?

Also, just how practical is that style of calendar going to be when it comes to adding up total time per task? Something along the lines of a regular timesheet would be better.

I can easily fit 32 rows on my laptop screen. That’s a good start. So here’s how to do the same thing I did, if you are interested.

Leave the first row for your headers. In cells A1 and B1, enter “Date” and “Day”, then change the orientation. Right click the cells, select Format Cells, Alignment, and change Orientation to 90 degrees.
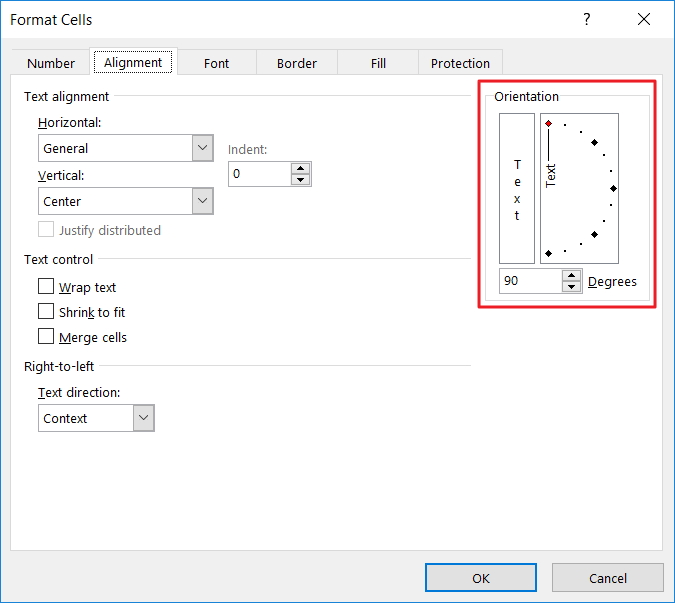
(You might want to change the Alignment too. Choose from the options on the Alignment Group on the Home Tab)

Enter the first day of the month in cell A2. Select range A2:A32, then change the format to either “d/m” or “m/d” as you prefer. Right click the cells, select Format Cells, Number, and enter the format in the Type text box in the Custom section.
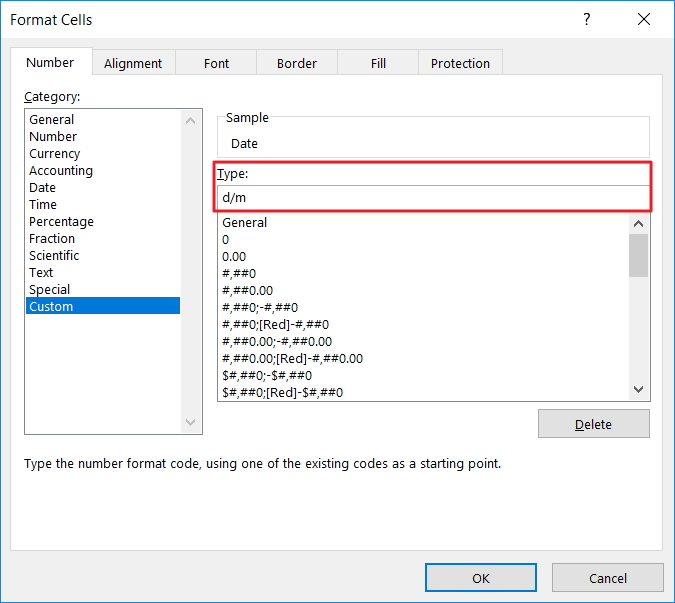
Now enter =A2+1 into Range A3:A32 and click your Ctrl and Enter keys simultaneously to enter the formula into all selected cells.

In the same way, enter =CHOOSE(WEEKDAY(A2,1),"Su","Mo","Tu","We","Th","Fr","Sa") into Range B2:B32.

Adjust the width of both of these columns and set the alignment to suit.

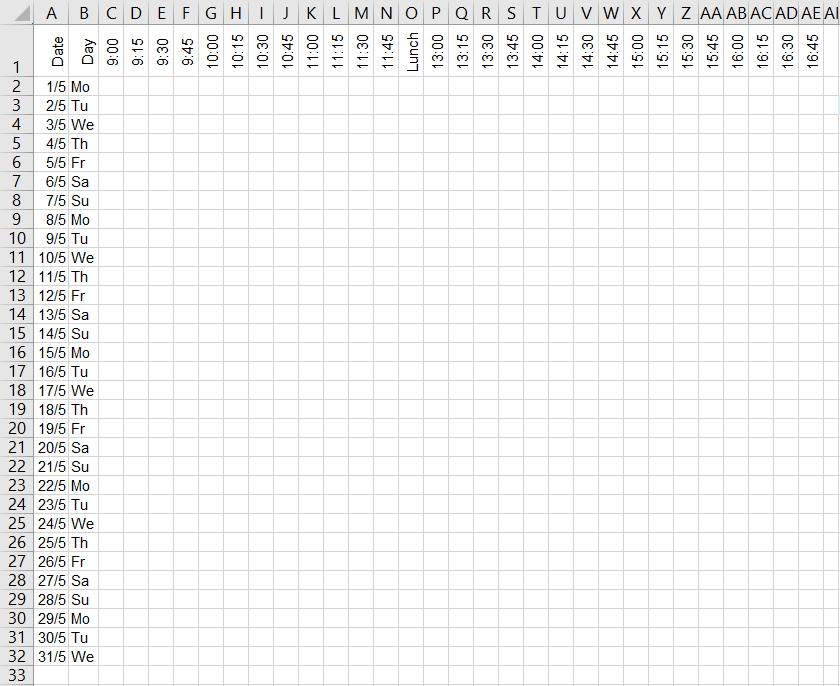
You should have something like this.

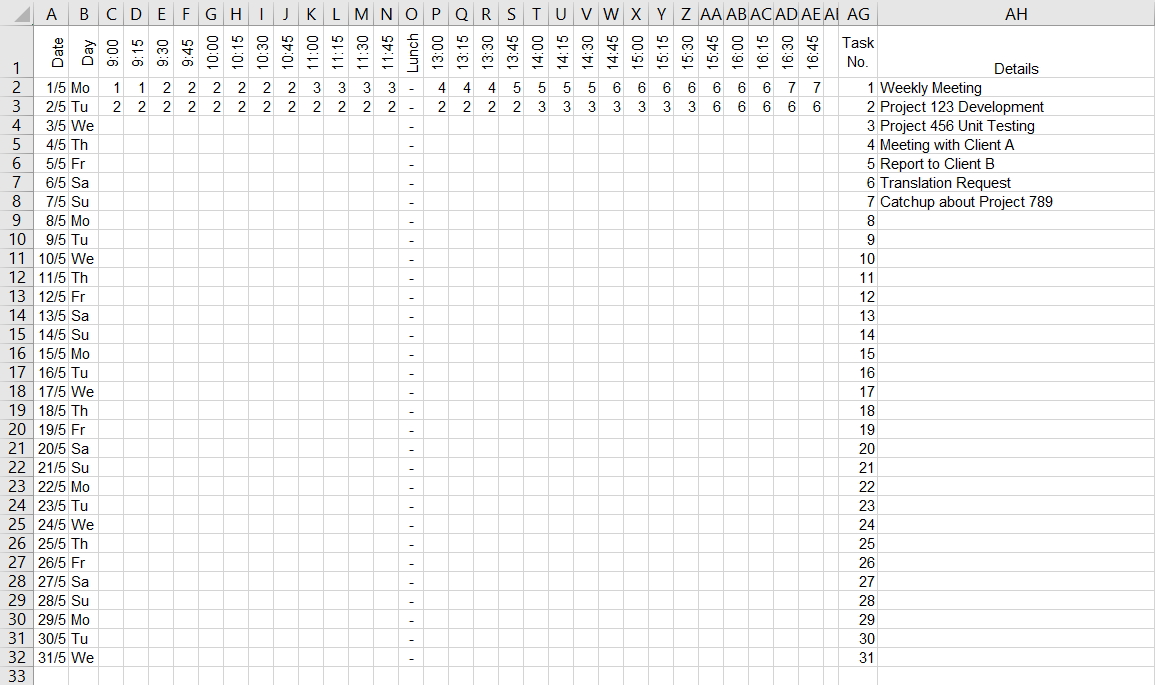
And now for the details. Long descriptions take up space, so let’s use numbers instead. Keep in mind that longer tasks won’t be completed in 15 minutes, and recurring tasks will be duplicated so that’s going to cut down the number of tasks in total. With any luck, we can keep things within double digits.

Start times allotted for the 15 minute intervals go in Row 1. Adjust the Orientation to 90 degrees. “h:mm” is a suitable format.
The task descriptions that match the numbers can go on the right. But note the numbers to their left to perform a lookup.
Important: adjust the following ranges to suit your requirements. Use Named Ranges if you prefer.

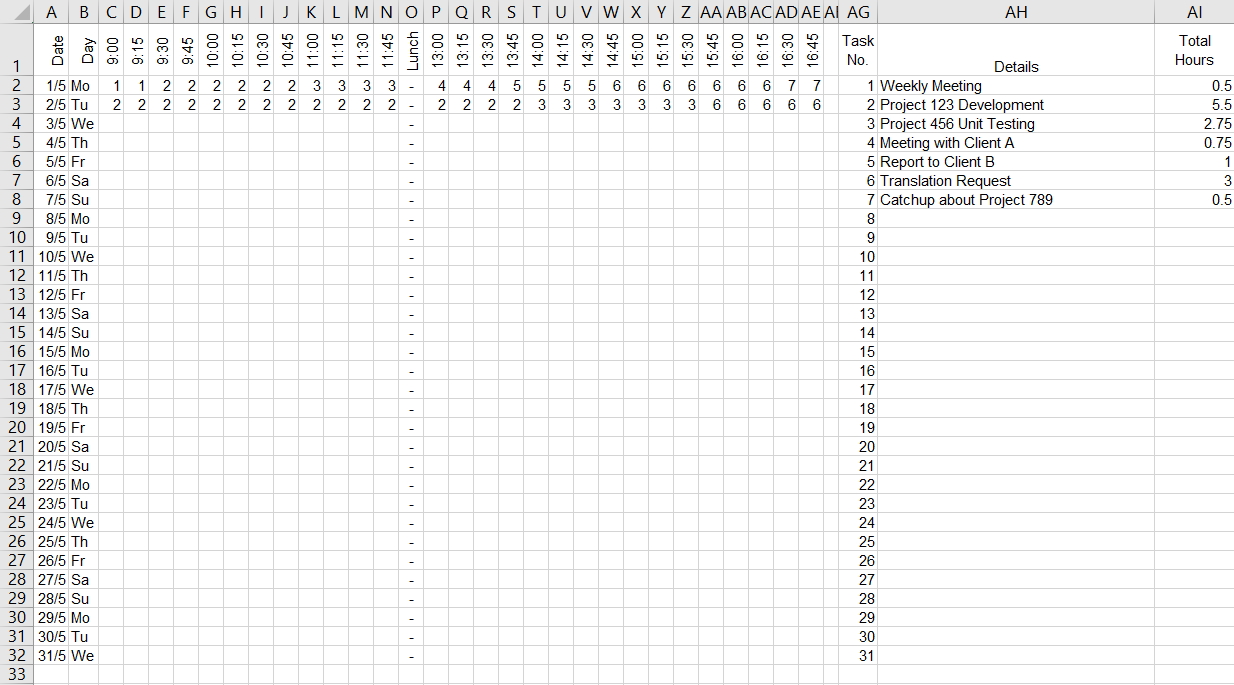
Enter formulas to add up the time. Type the following formula into Cell AI2, and drag down to the end of your list.

=IF(COUNTIF($C$2:$AE$32,AG2)=0,"",COUNTIF($C$2:$AE$32,AG2)/4)

You should have something like this.
You can freeze the first row if the number of tasks exceed the number of visible rows on your screen. (View Tab, Windows Group, Freeze Panes, Freeze Top Row)

Now for some extra features to enhance visibility. Why not add some Conditional Formatting to highlight the weekends? With Range A2:AE32 selected, click the Home Tab, Styles, Conditional Formatting, New Rule, then “Use a formula to determine which cells to format” and enter this formula. (Click the Format button to choose a suitable format)
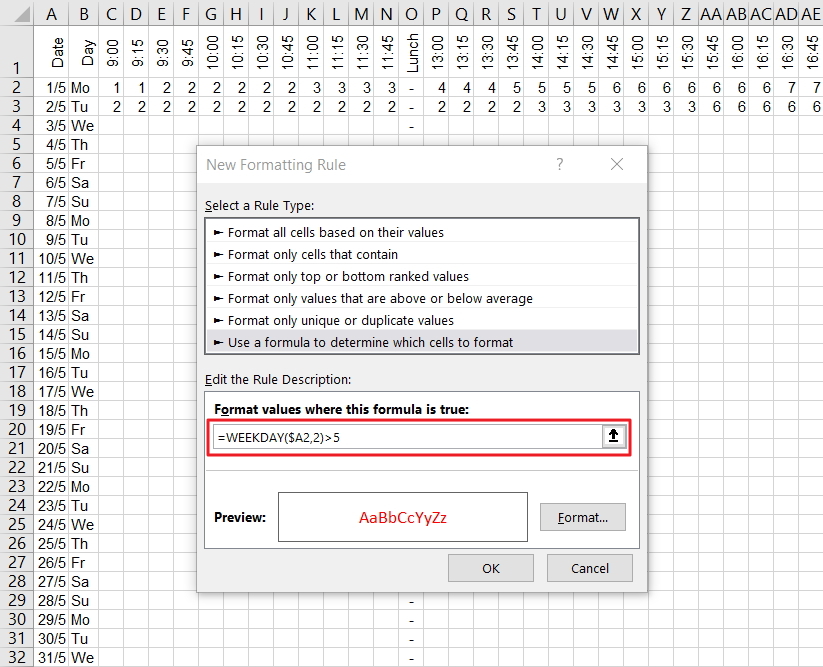
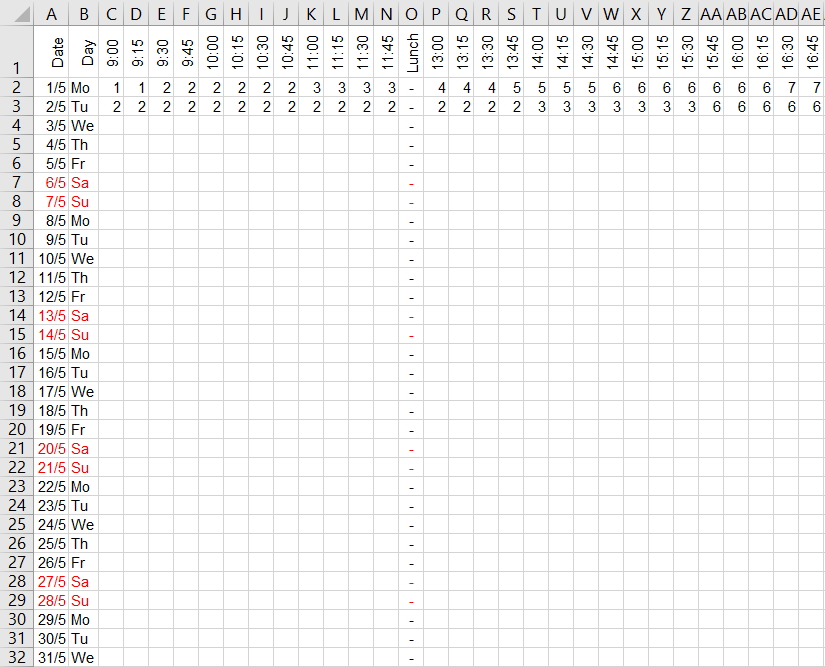
Here’s the result.
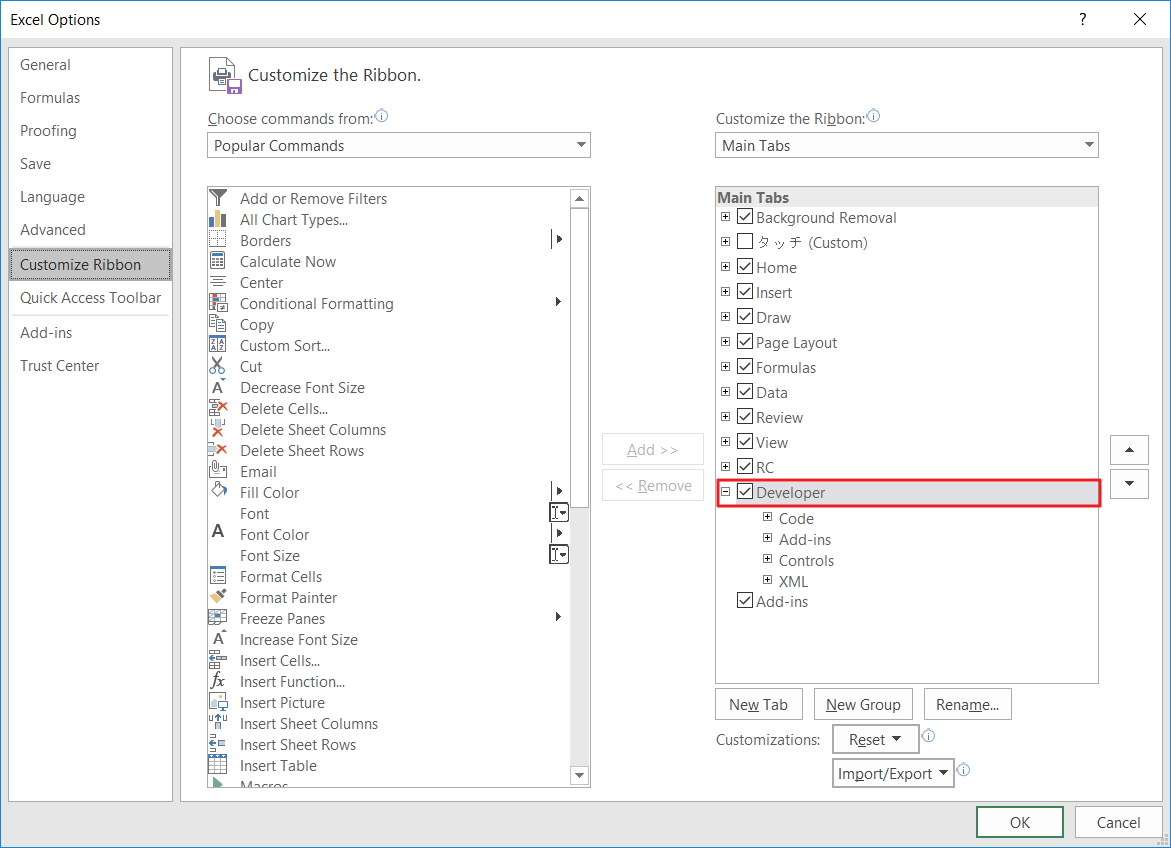
An ActiveX Combo Box and a bit more Conditional Formatting makes it easy to see when the work was done. If you can’t see the Developer Tab on the Ribbon, select the File Tab, Options, Customize Ribbon, then tick “Developer” on the list to the right and click the OK button.
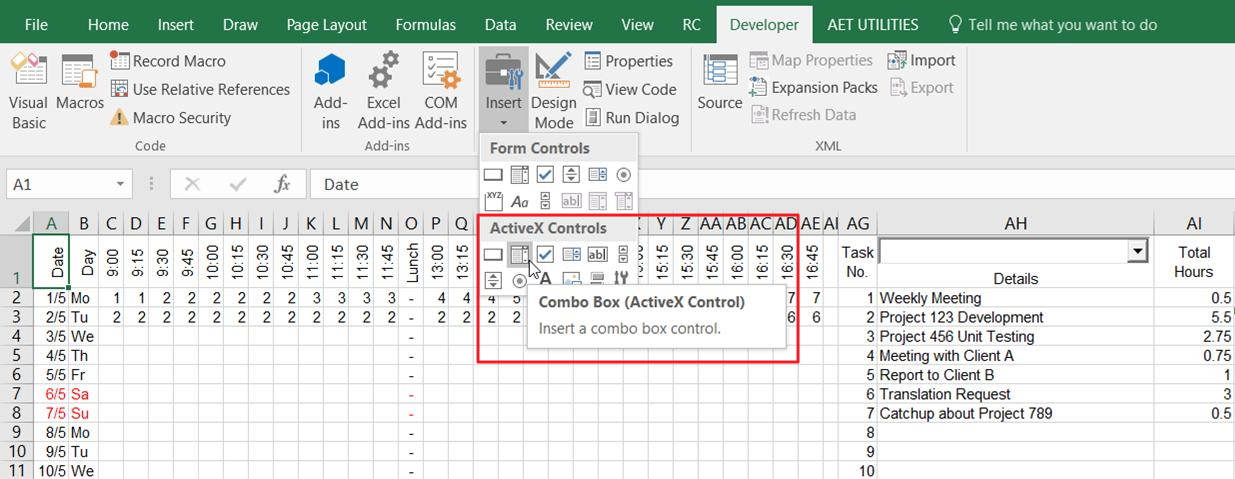
On the Developer Tab, select Insert from the Control Group to add an Active X Combo Box. (I’ve already added one to Cell AH1)
Right click the Combo Box and select Properties. Set the LinkedCell and ListFillRange properties. I’ve hard-coded my ListFillRange range reference but you can use Named Ranges too, as in “=Tasks” without the quotation marks.
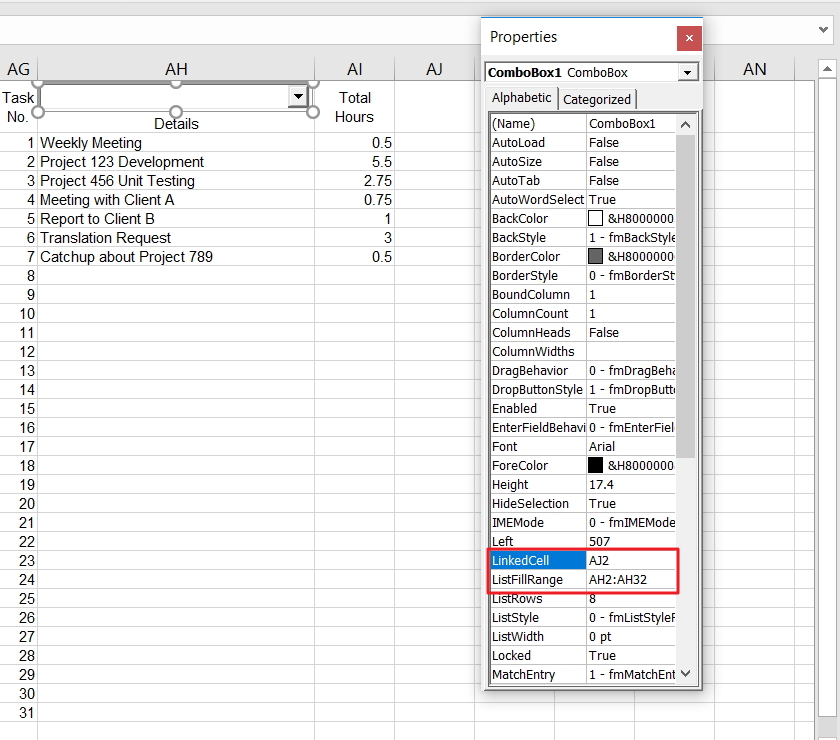
When finished, toggle off Design Mode on the Developer Tab.

Note the linked cell. That gives me the selected item of the list. Now I use another formula to get the reference number which I have put in the cell below the linked cell (In this case, Cell AJ3).

=MATCH(AJ2,AH:AH,0)-1

If I select the first item on the Combo Box, Cell AJ3 will show 1.
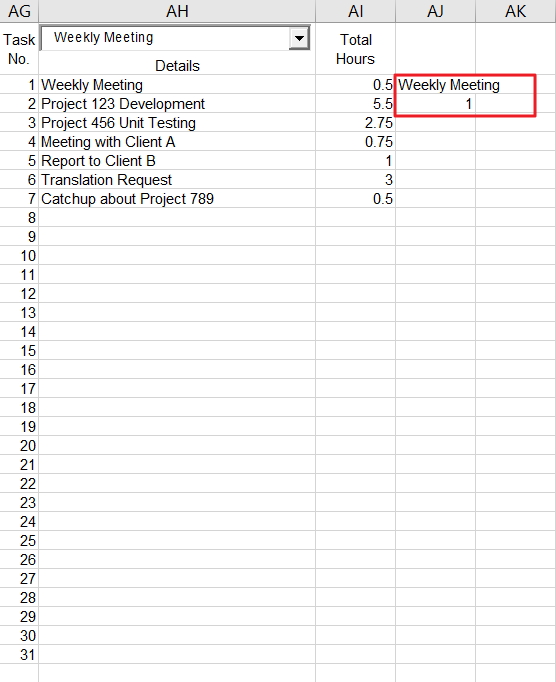
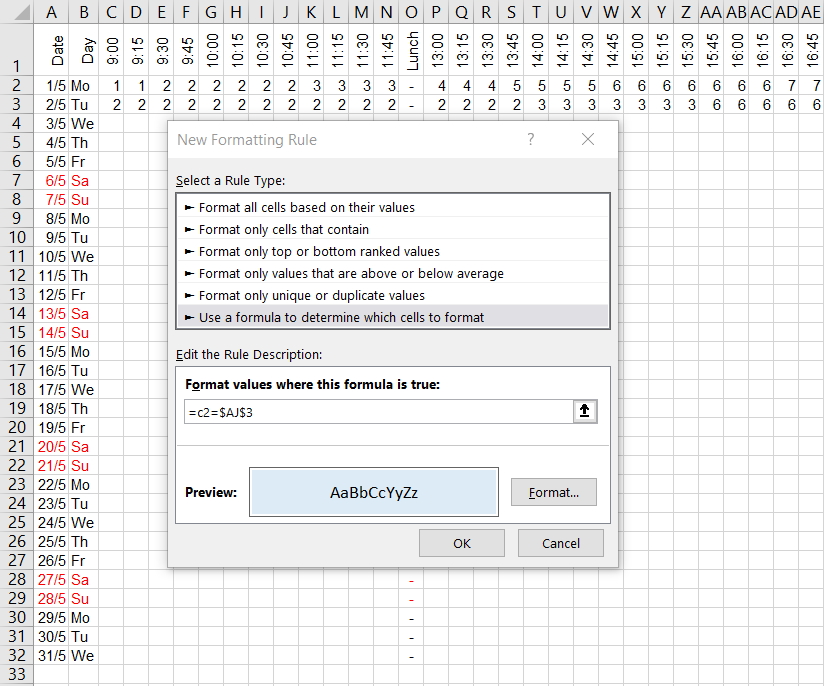
Here’s the Conditional Formatting for the details part of the report. (Range C2:AI32)
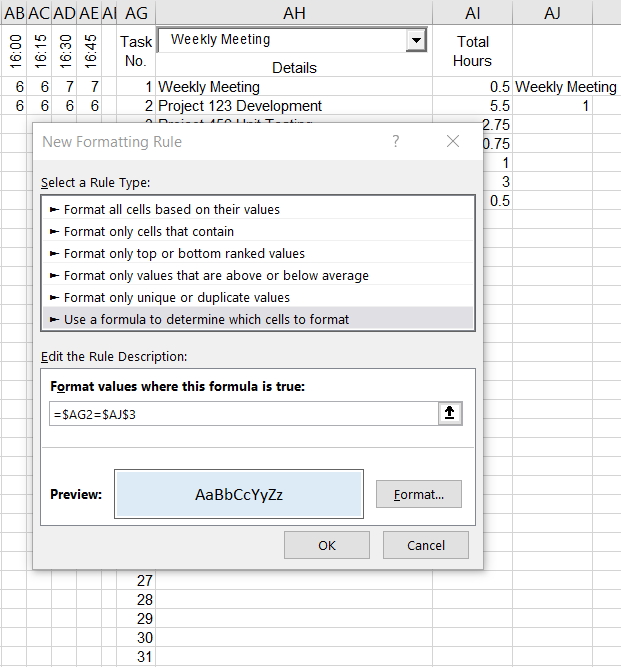
And here’s the Conditional Formatting for the list. (Range AG2:AH32)
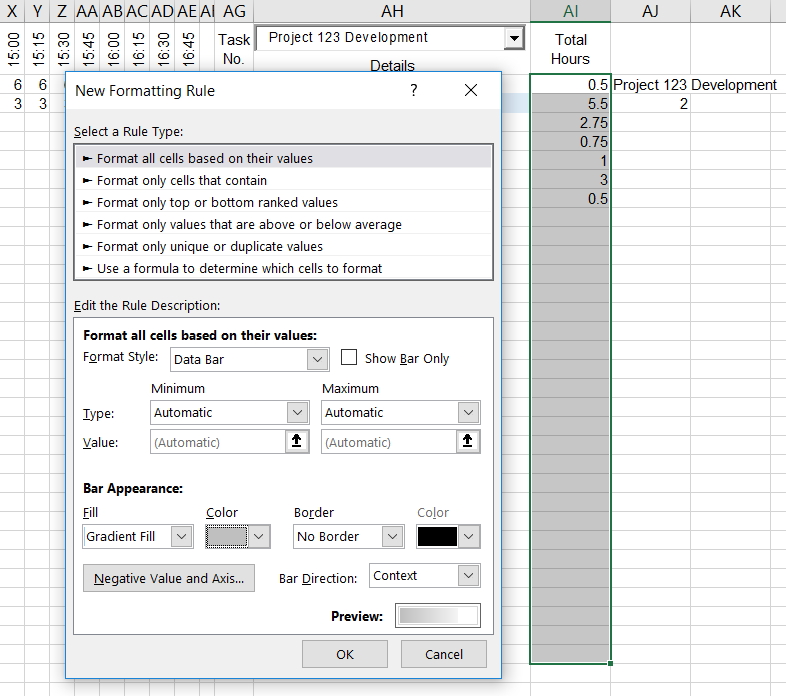
I also added some Data Bars to the hours.
And we’re done.
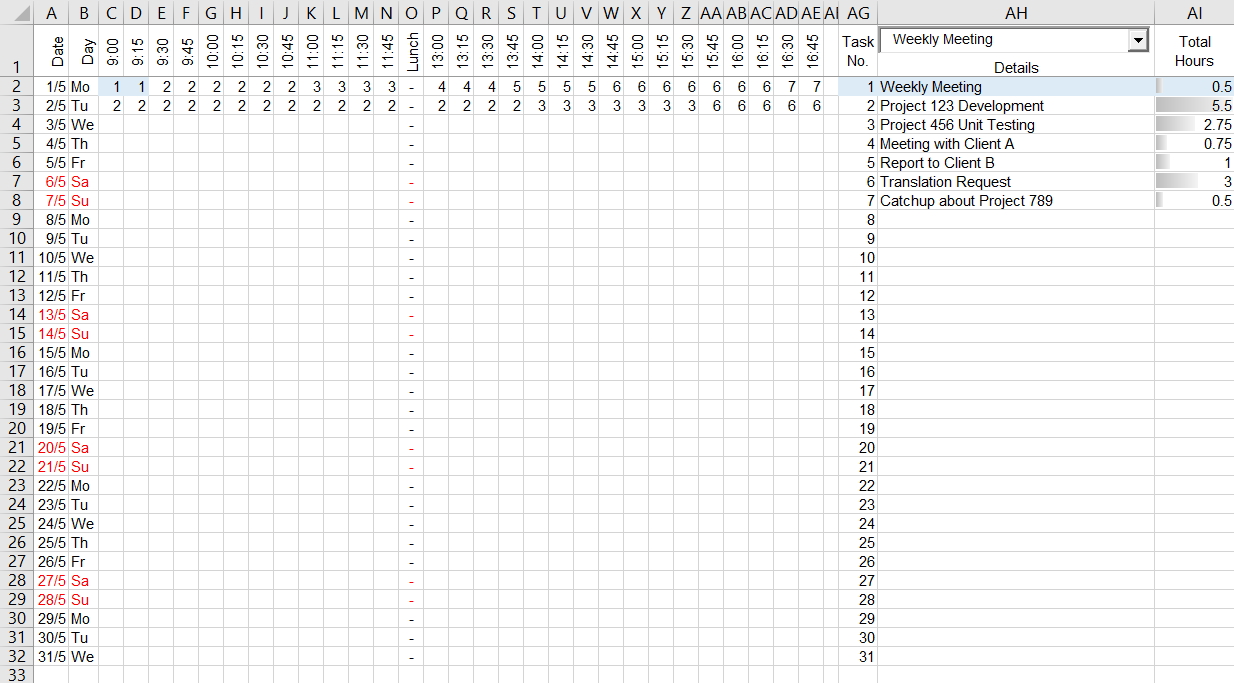
No VBA was used so you can send the file without explaining the need to enable macros.

Here’s a download link if you want to skip making one yourself.
Happy birthday Excel!

September 30, 1985 Excel was launched and I therefore wish Excel a very happy birthday and many healthy years to come!

Debra Dalgleish over at the contextures blog has gathered a nice set of stories on how people first “met” Excel.

To celebrate this great event, I’m offering a 30 percent discount on my products for 30 days.
Redeem your discount on RefTreeAnalyser and The Excel File Remediation tool by entering this coupon code: EXCEL30

So have a piece of cake with your coffee today and have one of those “those were the days” moments.

Jan Karel Pieterse

www.jkp-ads.com

Recent Update of Office causes problems with ActiveX controls

Hi,

Yesterday, I installed a host of updates, including some of Office.
As it happens, I tried to add an ActiveX control to a worksheet and received an error.
After some research I discovered the cause of the error to be two-fold:

1. The controls were updated by the update
2. Excel did not clean up after itself properly and left some temporary files behind.

The solution is to:
– Quit Excel
– Open Explorer
– Select C: drive
– Search for *.exd
– Remove all files found.

Hope this helps other people who might be suffering from the same problem.

Regards,

Jan Karel Pieterse
www.jkp-ads.com

#####UPDATE Dec 22, 2014#####
Microsoft has published a so-called Fixit to make resolving this matter easier:
https://support.microsoft.com/kb/3025036/EN-US?wa=wsignin1.0

Generate random numbers in MS Excel

A common requirement is to generate a set of random numbers that meet some underlying criterion. For example, a set of numbers that are uniformly distributed from 1 to 100. Alternatively, one might want random numbers from some other distribution such as a standard normal distribution.

While there are specialized algorithms to generate random numbers from specific distributions, a common approach relies on generating uniform random numbers and then using the inverse function of the desired distribution. For example, to generate a random number from a standard normal distribution, use =NORM.S.INV(RAND())

Another common requirement is the generation of integer random numbers from a uniform distribution. This might be to select people for something like, say, training, or a drug test. Or, it might be to pick a winner for a door prize at a social event. It might also be to assign players to groups for a sport tournament such as golf.

For a version in a page by itself (i.e., not in a scrollable iframe as below) visit http://www.tushar-mehta.com/publish_train/xl_vba_cases/0806%20generate%20random%20numbers.shtml

Tushar Mehta

Do consumers prefer the ease of an EXE installer or the transparency of a ZIP file?

For all the various add-ins available from my website, I have supported two downloadable formats, an EXE and a ZIP file. The EXE is easier to install and includes an uninstall capability. The ZIP hopefully provides the consumer greater transparency and control over what is on their computer.

In addition to the software downloadable from my website, I also develop custom solutions through my consulting work. Most of my projects are sponsored by senior executives in companies or otherwise people with substantial decision making authority. It turns out that even a Managing Director or an Executive Vice President is subject to the automated IT protocols in effect in their organization (e.g., Group Policy).

Small and midsize companies are more tolerant of the kinds of files their employees can download. So, it is my larger clients who prefer — actually, require — a solution acceptable to their respective corporate IT filters. That means no EXE and no MSI, not even inside a ZIP file.

That has been a major stumbling block in my migration to .Net. For all the advantage of the platform, providing an add-in inside a ZIP file is not one of them.

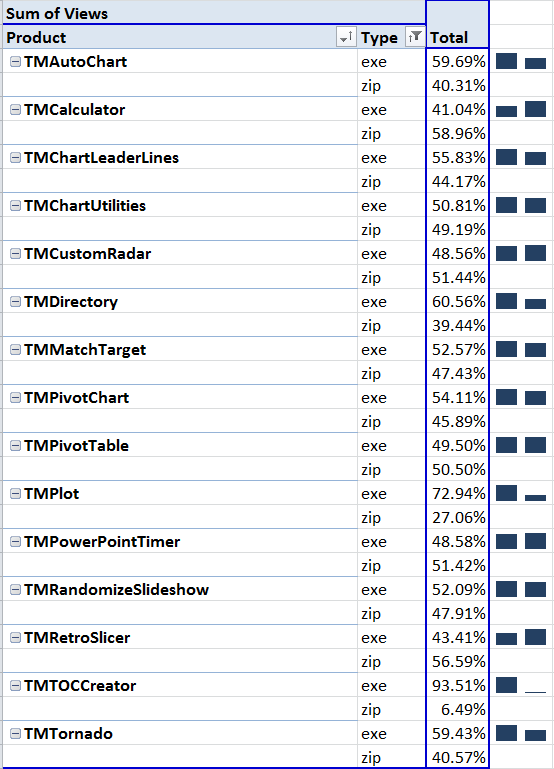
I wondered if that inability (or reluctance) to download an EXE extended to those who download software from my website. Using Google Analytics I decided to check their download preference/requirement. Would the data indicate a strong preference for EXE over ZIP or the other way around? Turns out the result is decidedly mixed! As the table below shows, with the exception of TM Plot and TM TOCCreator, the download choice is about 50-50!

The table below is a PivotTable based on Google Analytics data for my website. For each add-in the table lists the EXE and the ZIP download percentages together with a sparkline for the two formats.

Incrementing Dates in Excel Cells

I complete a timesheet every 14 days. I got tired of doing math in my head, so around August 13, 2010 I put a stop to it. Here’s what the date cell on my timesheet looks like now.


F2 to edit the cell, “+14” and enter. It’s nowhere near too long as formulas go, but it’s starting to bother me. Time to consolidate. Select the 14s.


Press Control+= (F9 works too, but my muscle memory is control and equal sign)


Enter. Next pay period, my timesheet will look like this