Amazon Linkerator

Since I can’t install JPSoftwareTech’s Amazon link generator, I decided to write my own. Fewer features, less choice because that’s how I roll. I recommend JP’s version – it’s very well done.

My tastes and habits are very quirky, so this “utility” is very specialized to the way I like to work. There may be some good stuff in there even if it’s not something you’d use yourself. It looks like this:
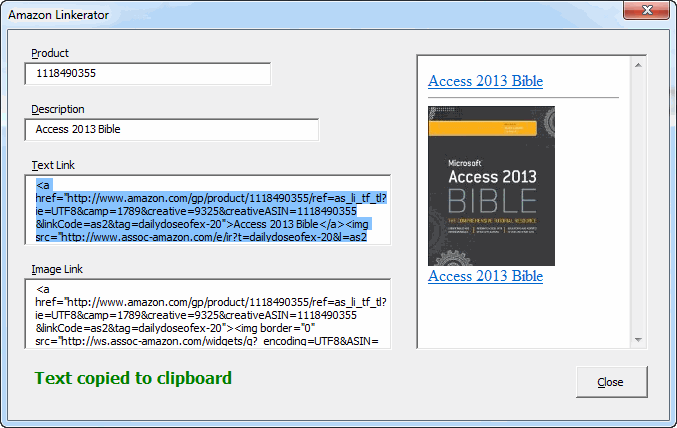
amazon link generator

The normal workflow is to find the product on Amazon.com, launch the utility, tab to whichever link I want, and press Esc. I guess I’ll have to edit the Description field most of the time too.

Here’s how it works:

  • If the clipboard has a URL in it that matches this regular expression, the form is prefilled with the ASIN and description
  • The ASIN goes in the Product field, the hyperlink text goes in the Description field
  • Changes to either Product or Description updates the two link textboxes
  • Exiting either Product or Description refreshes the web browser control
  • Entering either link textbox puts that link in the clipboard
  • Esc closes the form

One shortcoming you may have noticed is that my Amazon Associates ID isn’t on the form. It’s in a constant in the code. It’s not intended to be a general purpose utility, but if you have the chops you can modify it for yourself. The other omission is that there are only two links. I only ever need a text link or a large image with a text link underneath it. I’m just boring that way.

Let’s look at some code for goodness sake.

Since you devoured that RegEx post from earlier this week, I’m sure that part needs no explanation. When there’s a match, here’s what the regMatch variable looks like.
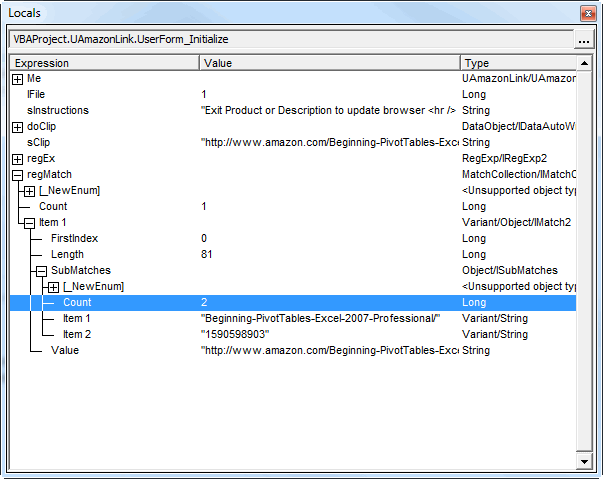
vba regular expression object

I only have two groups in my regex pattern that store substrings. The other groups start with ?: so nothing is saved, only matched. That guarantees that I’ll have a SubMatch.Count of exactly two, even if both are Empty.

The Change events for Product and Description call the UpdateLinks procedure.

This procedure builds up a couple of strings, sticks them in the textboxes, and sticks them in an html file. There are three things that I’m forcing myself to do: use Join with arrays instead of strings of ampersands and line continuation characters (easier to maintain, I tell myself); use Space(1) instead of ” “; and use vbNullString instead of “”.

The Exit events for Product and Description update the web browser control for a preview of what the links look like. The Change events actually build the HTML file in the user’s temp directory and the Exit events navigate to that.

Not much to that. If msFile is somehow not initialized, UserForm_Initialize will put up the instruction template.

Lastly, both of the link textboxes contents are copied to the clipboard using the Enter event. Here’s the Image one:

I have a textbox at the bottom to alert the user that something has happened. I should probably add a Copy To Clipboard button, a Refresh Preview button and a settings dialog so you could personalize it without changing code. But that’s for next version. If you want the rough version, you can have it.

You can buy Amazon Linkerator
An MSForms Treeview

If you have ever used the Treeview control from the “Additional controls” section, then you know what a versatile control this is to show hierarchically organized data.

There are a couple of problems with this Treeview control:

  1. Compile errors due to a difference in how the control libraries are registered in 32 bits Windows’ System32 and 64 bit Windows’ SysWOW32 folders. If you distribute a file that was saved in 64 bit Windows, containing one of the “Microsoft Windows Common Controls 6.0” (The Treeview control is one of them) and with the reference set to “mscomctl.ocx”, people using 32 bit Windows will almost certainly have problems. At best it could entail removing both the control and the reference and replacing both, but at worst the user’s Excel can crash when trying to load the file and run the app.
  2. The standard Treeview control, like all non built-in ActiveX controls, cannot be used in 64 bit versions of Office.

Especially the second point convinced me it is time to develop a custom-made Treeview “control”, that only uses the native Office forms controls. I started building this a couple of weeks ago and after some time I tricked Peter Thornton into helping me with it :-)

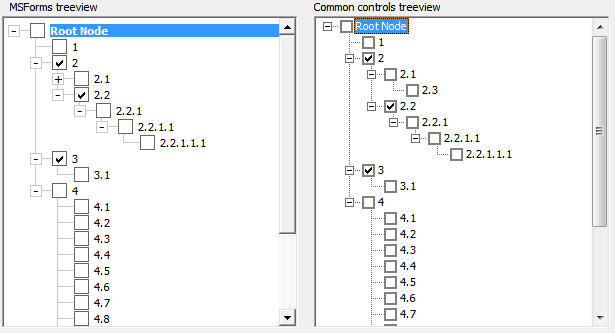
The screenshot below shows both our new Treeview (left) and the Windows one (right) side-by-side:

Not bad, right?

Both Treeviews allow for checkboxes:

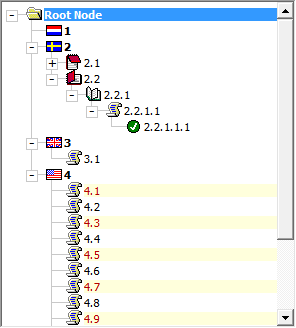
And both allow icons (windows Treeview not shown here):

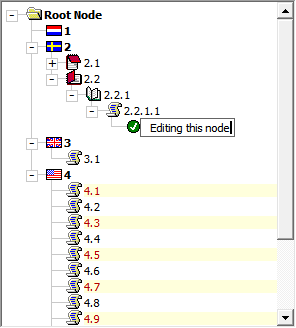
You can also edit a node:

And expand and collapse nodes and navigate the tree using your arrow keys.

We built the custom Treeview using just two class modules. Using it in your project will require nothing more than copying the two classes and adding a bit of plumbing to your userform: some code and an empty frame which will hold the Treeview and possibly a frame with pictures for the icons.

We’re currently doing some cleaning up (like removing obsolete debugging stuff, adding comments and the like), so the “control” is not quite ready to be released to the outside world. Keep an eye on this blog, once we’re done we’ll post here.

Well, what do you think, is this useful or what? What functionality would be critical for you? Let us know!

Regards,

Jan Karel Pieterse

Excel 2013, SDI and modeless userforms

Hi Everyone,

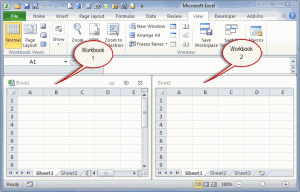
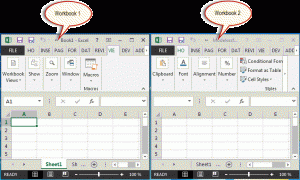
With Excel 2013 we also got new document windowing in Excel; Microsoft decided to make Excel behave the same as Word:

from MDI:

Excel 2010 MDI interface showing two workbooks
The Excel 2010 MDI interface

to SDI:

Excel 2013 SDI interface showing two workbooks
The new SDI interface of Excel 2013

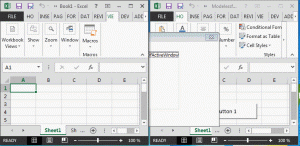
This causes havoc when one shows a modeless userform which should stay on top of all Excel windows:

Excel 2013 SDI can cause a userform to disappear

I’ve devised a way to prevent this problem and written an article about how this was done.

Enjoy!

Regards,

Jan Karel Pieterse

www.jkp-ads.com


Noughts and Crosses

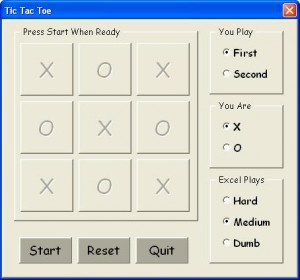
Last month I read an article about a job interviewer who played TicTacToe with his applicants. It was like an instant shared round of golf, and the interviewer put great store in the correlation of good hires with good players. So in case any DDoE readers might run into that guy, here is TicTacToe (or Noughts and Crosses as it’s known across the pond) in a user form suitable for practice.


There are several XL versions out there in the wide world of web (though not too many in a user form) and this is just the latest. It’s a refresh of my first XL code that wasn’t a tutorial, written in XLM too many moons ago.

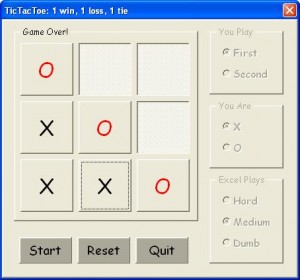
You can set if you go first or second, set if you are X or O, and set if XL plays hard (don’t know if it can be beat), medium (can be beat), or dumb (as in very dumb—makes random legal moves). It’ll keep score. If you play well, you can’t lose. If XL plays well, you can’t win.


Start refreshes the game, and Reset takes you back to where you can adjust the mode of play. It looks different, but it works fine on a Mac with XL 2011. Its default is the Comic Sans MS font. If you’re playing second, you can control the start square for XL by clicking Start until XL randomly picks the square you want it to use.

The form is available here. After importing, it needs just a one-line macro to run.

Sub TicTacToe()
frmTicTacToe.Show
End Sub

Presumably, that guy giving the interview plays TicTacToe well, so you won’t win. I don’t think you want to lose, either. Or maybe just lose one out of three. I think I read about it on the BBC’s iPad service. If you remember where it was, please comment. And if you beat it with XL playing hard, please say how. Your game is captured in the VBE’s Immediate Window.

Provided as a public service to Dick’s readers. :roll:

…mrt
©¿©¬

In an userform list all available fonts

The motivation for this tip was to share how to

1) dynamically add controls to a userform
2) respond to events for these controls, and
3) specifically respond to events using a callback procedure that is located in another class module!

Since this may come across as a fairly technical topic, this tip utilizes the above capabilities to provide a functional solution:

1) list in an userform the names of all available fonts with each name shown using that font,
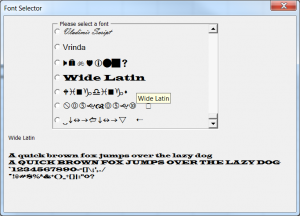
2) hover over the option button associated with a font to see a sample of every English keyboard character in that font,
3) click on the option button to select the font, and, finally,
4) use this capability to programmatically get the user’s selection, if any.

Below is an example of the font selector in action. Each OptionButton shows the name of one available font using the font itself. At the same time, the control tool tip shows the font name in English (see the Wide Latin tip). A sample of how every keyboard character will look in that font appears below the font selector frame.

The motivation for this example was a Daily Dose of Excel blog post by Michael (http://www.dailydoseofexcel.com/archives/2012/03/14/getting-a-font-list-to-a-combo-box-2/). He used a combo box to list the fonts available to Excel leveraging a technique shown in a tip by John Walkenbach (http://www.j-walk.com/ss/excel/tips/tip79.htm).

For a version in a page by itself (i.e., not in a scrollable iframe as below) visit http://www.tushar-mehta.com/publish_train/xl_vba_cases/1054%20show%20fonts%20in%20userform.shtml

Tushar Mehta

Getting a Font List to a Combo Box

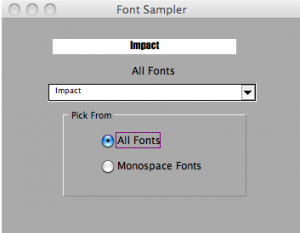
The other day a reader asked about how to get a font list to a combo box so his users could have a choice to specify. Borrowing shamelessly from John Walkenbach’s Tip 79, this is one way to do it. I use this approach when I take a spreadsheet to a web table and want to specify the font.

Font Sampler Image

From top to bottom, the form has:

  • A label, named lblFontcboOverLabel
  • A label, named lblFontcbo
  • A combo box, named cboFontOther
  • A frame, named Frame1
  • An option button, named btnAllFonts
  • An option button, named btnMonoFonts

This is the code behind the form:

Option Explicit
Private Fface As String, FaceNdx As Long
Private InstalledFonts As String

Public Property Get FontFace() As String
FontFace = FFace
End Property

Private Sub btnMonoFonts_Click()
Call AddFontBox(1)
Me.lblFontcbo = "Monospace Fonts"
End Sub

Private Sub btnAllFonts_Click()
Dim i As Long
Dim TempFonts As Variant

Me.cboFontOther.Clear

TempFonts = Split(InstalledFonts, ",")
For i = LBound(TempFonts) To UBound(TempFonts)
Me.cboFontOther.AddItem TempFonts(i)
Next i
Me.cboFontOther.Text = "Comic Sans MS"
Me.lblFontcbo = "All Fonts"
End Sub

Private Sub cboFontOther_Change()
Me.lblFontcboOverLabel = Me.cboFontOther.Text
Me.lblFontcboOverLabel.Font = Me.cboFontOther.Text
Me.lblFontcboOverLabel.Font.Size = 12
Fface = Me.cboFontOther.Text
End Sub

Private Sub UserForm_Initialize()
Dim FontList As CommandBarControl
Dim Tempbar As CommandBar, i As Long
'http://www.j-walk.com/ss/excel/tips/tip79.htm

Set FontList = Application.CommandBars("Formatting").FindControl(Id:=1728)
If FontList Is Nothing Then
Set Tempbar = Application.CommandBars.Add
Set FontList = Tempbar.Controls.Add(Id:=1728)
End If
Me.cboFontOther.Clear

For i = 1 To FontList.ListCount
If Left$(FontList.List(i), 1) Like "[A-Za-z0-9]" Then
Me.cboFontOther.AddItem FontList.List(i)
InstalledFonts = InstalledFonts & FontList.List(i)
If i <> FontList.ListCount Then InstalledFonts = InstalledFonts & ","
End If
Next i
Me.lblFontcbo = "All Fonts"

Me.cboFontOther.Text = "Impact"

On Error Resume Next
Tempbar.Delete
End Sub

Private Sub AddFontBox(i As Long)
Dim MonoFont As Variant
'etc

Dim TempFont As Variant, TempStr As String, Str1 As String, Str2 As String

MonoFont = "Monaco,Courier New,Courier,Lucida Sans Typewriter," & _
"Lucida Console,Nimbus Mono L,DejaVu Sans Mono,Andale Mono," & _
"Liberation Mono,Consolas,Courier 10 Pitch,FreeMono," & _
"Menlo Bold,Menlo Bold Italic,Menlo Italic,Menlo Regular," & _
"OCR A Extended,Tlwg Typist,TlwgMono,TlwgTypewriter," & _
"Tlwg Typo,Bitstream Vera Sans Mono"

Select Case i
Case 1: TempFont = Split(MonoFont, ",")
'etc
End Select

Me.cboFontOther.Clear

For i = LBound(TempFont) To UBound(TempFont)
Str1 = TempFont(i) & ","
Str2 = "," & TempFont(i)
If InStr(1, InstalledFonts, Str1, vbTextCompare) Or _
InStr(1, InstalledFonts, Str2, vbTextCompare) Then
TempStr = TempStr & TempFont(i)
If i <> UBound(TempFont) Then TempStr = TempStr & ","
End If
Next i
TempFont = Split(TempStr, ",")

For i = LBound(TempFont) To UBound(TempFont)
Me.cboFontOther.AddItem TempFont(i)
Next i

Me.cboFontOther.Text = TempFont(0)
End Sub

It has the “Get Property” at the top. I screen the installed fonts to filter the Asian fonts from my list. Remove the “Like” operator if you need them. I capture the the installed fonts as a global string variable in a comma-delimited list. The list of monospaced fonts came from here, and represents the fonts installed as a minimum on ⅓ of all Windows, Mac, and Unix computers. They’re listed in percentage order irrespective of machine and not by installation count.

As I use the full form, the Over Label lies atop the combo box. But if you want to see more than the font’s name in its own font, modify the combo box change to something like this:

Private Sub cboFontOther_Change()
Me.lblFontcboOverLabel = "Jackdaws love my big sphinx of quartz."
Me.lblFontcboOverLabel.Font = Me.cboFontOther.Text
Me.lblFontcboOverLabel.Font.Size = 12
Fface = Me.cboFontOther.Text
End Sub

…mrt
©¿©¬

Userform Dependent Listboxes

I often have a requirement to display Parent-Child-Grandchild relationships in a userform. That usually takes the form of listboxes where lesser listboxes are populated based on selections of greater listboxes. The other day I created a generic one. I was thinking that it would be nice to plop this into a project and replace some variable names. Maybe it would eliminate some of the drudgery of creating userforms. I question whether it will be better than just starting from scratch, but time will tell. In the mean time, here’s what I did.

Sub Main()

Dim clsParents As CParents
Dim ufRelations As URelations

Set clsParents = New CParents
clsParents.FillFromRange Sheet1.Range("A2:B17")

Set ufRelations = New URelations
Set ufRelations.Parents = clsParents

ufRelations.Initialize
ufRelations.Show

Unload ufRelations
Set ufRelations = Nothing

End Sub

The top level class, CParents, is held in a variable and passed to the userform via a Public Property. Every CParent, CChild, and CGrandchild can be accessed through that one top level collection class. The Intialize method calls the FillParents procedure and does nothing else. There’s a FillParents, a FillChildren, and a FillGrandchildren procedure that populate the respective listboxes. They all follow pretty much the same pattern.

Private Sub FillParents()

Me.lbxParents.List = Me.Parents.List

If Me.lbxParents.ListCount > 0 Then
Me.lbxParents.ListIndex = 0
End If

End Sub

The List property of the listbox is assigned the List property of the class, which returns a zero based array specifically to fill the listbox. Then, as long as there’s something there, the first parent is selected (ListIndex = 0). That selection triggers the lbxParents_Change event.

Private Sub lbxParents_Change()

If Me.lbxParents.ListIndex >= 0 Then
Set Me.ActiveParent = Me.Parents.ParentByDescription(Me.lbxParents.Value)
Else
Set Me.ActiveParent = Nothing
End If

FillChildren

End Sub

The userform class has two properties, ActiveParent and ActiveChild, that should hold a reference to the class instance matching what’s selected in the listbox. In this code, if something is selected, ActiveParent is assigned, otherwise it’s set to Nothing. Then FillChildren is called. Notice my use of Me.lbxParents.Value as I have something to say about that later.

Private Sub FillChildren()

Me.lbxChildren.Clear

If Not Me.ActiveParent Is Nothing Then
If Me.ActiveParent.Children.Count > 0 Then
Me.lbxChildren.List = Me.ActiveParent.Children.List
Me.lbxChildren.ListIndex = 0
End If
End If

End Sub

I’m sure you can see the pattern: Set the List property of the control to the List property then select the first one in the list. That triggers a Change event that calls the next level down. I like for something to always be selected in a listbox. That is, I never want to listbox with a ListIndex of -1. To my amazement, there are people who don’t agree with me. They prefer a Null state and I prefer to limit the Null states as much as possible.

The obvious reason is that it simplifies the code. If you can count on a certain state, it means less checking down the line. Another reason, which may be the same reason, is that the code that populates the listboxes initially is the same code that accounts for changes to the listbox. I know the code works when I initialize because I’m exercising it.

I’m not going to show you the rest of the code because it’s not much different than what I’ve already shown. You can see it all in the download at the bottom of this post if you like. But I do want to discuss one other issue: Using the Value property of the lisbox. Here’s the change event for the Children listbox

Private Sub lbxChildren_Change()

If Me.lbxChildren.ListIndex >= 0 Then
Set Me.ActiveChild = Me.ActiveParent.Children.ChildByDescription(Me.lbxChildren.List(Me.lbxChildren.ListIndex))
Else
Set Me.ActiveChild = Nothing
End If

FillGrandchildren

End Sub

In the change event for the parent listbox, I used the Value property to locate the selected parent. Here I’m using something different. The Value property of lbxParents worked every time I ran the code. The Value property of lbxChildren worked about 25% of the time. I thought I knew everything there was to know about the Value property, but clearly I don’t. I understood that Value would return the text in the BoundColumn of the ListIndex row. In 75% of the cases, it was returning an empty string. The errors only occurred in the Initialize procedure. Once the form was up and running, it never failed. When I put a break point in the code to debug it, it worked more often (the uncertainty principle in action). To fix the problem, I used the construct above. Using the List(ListIndex) method failed 0% of the time. I don’t have an explanation, but I’ll be forever nervous about using Value.

If I really want this to be a drop-in module, I need to make one major change. I need to make all of the listboxes with a hidden first column for the ID of the object. In this example, I use the Description property to find the correct object instance but I wouldn’t do that in real life if I didn’t have to. I have the feeling I don’t “reuse” code as much as other people. I’m happy to use some APIs or error handling code by dropping it in. But most of the code I write from scratch – until it doesn’t work, then I go see how I did it before. There are some advantages to writing from scratch, such as doing it better than I did it before. And of course there are advantages to reusing, such as reliable, tested code. Hooking up controls on a userform has to be one of my least favorite activities, so I will be happy if I can find some reusable code framework to minimize it.

You can download ParentChildUserform.zip

P.S. I started using the Public folder of my Dropbox account to host downloads. It’s easier than uploading via ftp and creating a link. I can’t think of any downside to that. A little less control I guess.