ListObjects (Tables in Excel’s UI) are structured ranges. I use them constantly. I love the built-in named ranges and referring to them in VBA without a lot of hullabaloo. It’s as close to a database as you’re going to get in Excel. Recently I decided to automate a process of adding some payroll records to the end of a table. If I were using just a range, I would find the next available row like
|
|
Set rStart = wshSalaries.Cells(wshSalaries.Rows.Count,1).End(xlUp).Offset(1,0) |
That works most of the time for ListObjects too. It returns the row right below the last row of the ListObject. In most cases, when you add some data to that row, the ListObject expands. In the case where there is no data in the ListObject and there is only a blank row, however, it doesn’t work. The ListObject doesn’t expand, and even if it did, you would have a blank row.
The ListObject object has a InsertRowRange property that returns a Range object. When a ListObject has no data, it has a header row and a blank row[1] ready to accept data.
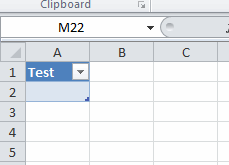
When you enter something into that row, it doesn’t give you a new insert row, it just sits there.
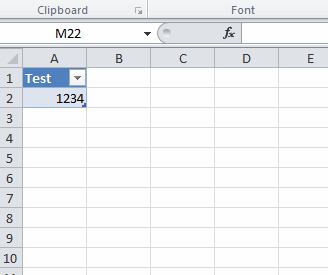
When I’m trying to write something to the end of a ListObject, I test to see if InsertRowRange is nothing[1]. Here’s a snippet
|
|
Set lo = wshSalaries.ListObjects(1) If lo.InsertRowRange Is Nothing Then Set rStart = lo.HeaderRowRange.Cells(1).Offset(lo.ListRows.Count + 1) Else Set rStart = lo.InsertRowRange.Cells(1) End If |
If InsertRowRange is Nothing, then table isn’t empty and I offset down however many rows there are plus one. The old method of End(xlup) works in this situation too. I don’t find top down better or worse than bottom up, so use whatever you like. If InsertRowRange isn’t Nothing, that means there’s no data in the table. In that case, I can insert starting in InsertRowRange.
Here’s the whole procedure, if you’re looking for context.
1 2 3 4 5 6 7 8 9 10 11 12 13 14 15 16 17 18 19 20 21 22 23 24 25 26 27 28 29 30 31 32 33 34 35 36 |
Public Sub ProcessWageFile() Dim clsEmployees As CEmployees Dim clsActives As CEmployees Dim clsEmployee As CEmployee Dim aOutput() As Variant Dim lCnt As Long Dim lo As ListObject Dim rStart As Range Set clsEmployees = New CEmployees clsEmployees.FillFromRange wshEmployee.ListObjects(1).DataBodyRange clsEmployees.FillCompsFromRange ActiveSheet.UsedRange.Offset(1) Set clsActives = clsEmployees.FilterByActive(True).FilterByHasComps ReDim aOutput(1 To clsActives.Count, 1 To 5) For Each clsEmployee In clsActives lCnt = lCnt + 1 aOutput(lCnt, 1) = clsEmployee.FullName aOutput(lCnt, 2) = clsEmployee.Comps.Period aOutput(lCnt, 3) = clsEmployee.Comps.TotalWages aOutput(lCnt, 4) = clsEmployee.TotalBenes aOutput(lCnt, 5) = clsEmployee.Comps.TotalTaxes Next clsEmployee Set lo = wshSalaries.ListObjects(1) If lo.InsertRowRange Is Nothing Then Set rStart = lo.HeaderRowRange.Cells(1).Offset(lo.ListRows.Count + 1) Else Set rStart = lo.InsertRowRange.Cells(1) End If rStart.Resize(UBound(aOutput, 1), UBound(aOutput, 2)).Value = aOutput End Sub |
[1]: Now you get the disclaimer. There’s a lot you can do with Tables in Excel. You can have a header row or now header row. You can have a totals row or not. And you can have a bunch of other stuff that makes this code not work. I use Tables a lot from a UI perspective and sometimes I have various features on or off. But the way I’m using a ListObject in this example is as a datastore. It’s not meant to be messed with – only for the VBA to read from and write to. In those cases, I make the Table the only thing on the sheet, it always has a header, and it never has a total row. If you want to use Tables differently, you’ll have to modify the code to accommodate the differences.
