Hyperlink Formula Events

I like to use hyperlinks as user interface elements. They sit nicely in a cell, blend nicely with the surrounding data, and are well understood by users (blue underline means click here). Typically I’ll create a hyperlink that points to itself and then use the FollowHyperlink event to do stuff when it’s clicked.
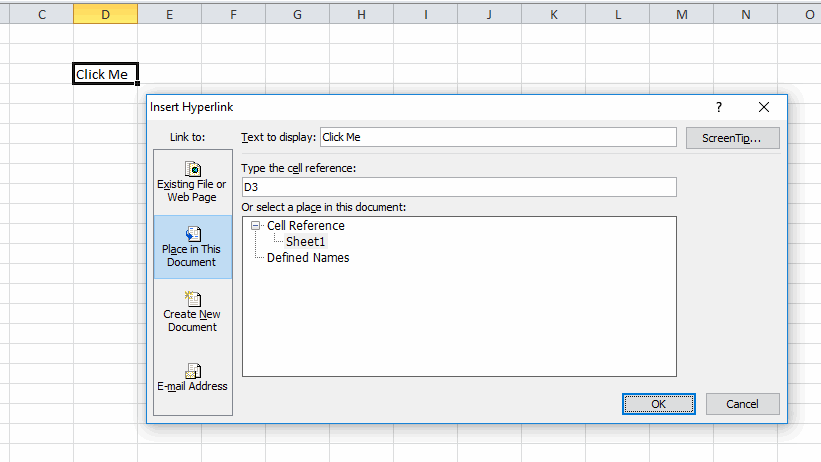
If a user were to insert rows or columns the hyperlink moves but not the cell it refers to. That is, inserting a column to the left will move the hyperlink to E3, but it will still point to D3. I don’t like it, but it’s not a deal breaker. It means that I can’t use the location of the link to determine which hyperlink was clicked. This is bound to fail:

I tend to use the caption, which, unlike the example above, is generally meaningful and unique. But not always.

If each link points to a different place, I could use the SubAddress property

If there’s a space in the sheet name, there needs to be quotes around it. And if someone changes the sheet name, it mucks up the whole hyperlink. So there are a few things that can go wrong.

My biggest pet peeve is that I can’t use the HYPERLINK() function and the FollowHyperlink event together. That event only responds to inserted hyperlinks, not to links created by a formula. The use case for this is that I could add a column to a Table that had the HYPERLINK() function in it and that formula would automatically expand as the table expanded. Here’s a really contrived example.
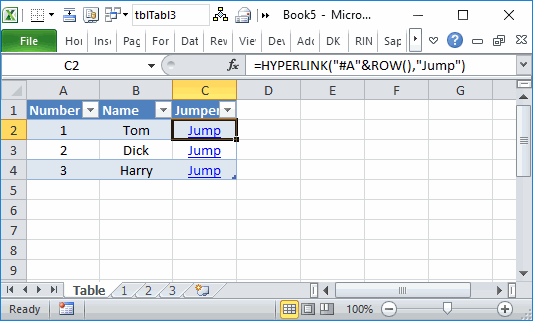
When the user clicks a Jump link, it should go to that page. So in the case, the data I need is in the first column (the name of the sheet). Here’s a method I’ve been working on using the SheetChange event. When the user clicks on C2, that cell is selected. Then the link takes the user to A2 and that cell is selected. So I’m looking for a combination of column C then column A.

The module-level variable holds the last cell that was selected. If the currently selected cell is in the first column of the Table and the last cell was two cells to the right, it’s a match. If you’re wondering why I included the seemingly meaningless data in the second column, I’ll tell you. This method fails a lot if the two columns are adjacent because any time you arrow to the left through the table, you’d fire off the code. Having a column B in between fixes that.

You’ve probably already guess that there are a few problems with this. You could arrow to somewhere in the Jumper column and then click in the Number column and trigger the code when you didn’t expect to. Plus whenever you’re dealing with selections, you need to account for multi-cell selections, which I don’t here. But I’m going to try it out and see how it goes.

One side effect of this was that it broke my keyboard hyperlink clicker. It used to look like this.

When you use a ROW() function in the hyperlink address, the Evaluate returns a Variant array and this results in a Type Mismatch error. The relevant parts have been changed to

Now if the result is a Variant array, it pulls the first element.
Todo.txt TDD Part 3

As mentioned at the end of Part 2, after the creation date, the rest of the string is called the Description. It can contain projects that start with a plus sign(+) or contexts that start with an at symbol(@) or key/value pairs with a colon(:). We’ll test the projects piece now.

I’m testing zero, one, and two projects. Now let’s update Raw to make this pass

This loops through the rest of the elements of the split array and looks for a plus sign at the start. If it finds one, it creates a Project instance and adds it to the Projects collection class. The contexts will be handled similarly.

The final special case inside the description is key/value pairs.

Again I’m testing zero, one, and two instances.

Everything else is the description

Here are the changes to the bottom of Raw

And that’s it. A properly parsed Todo.txt string ready to be used in your application. And if I make an changes to my app, I can run these tests to make sure I didn’t break anything.

You can download TodoTxt.zip

Series:
Series:

  1. todo-txt-tdd-part-1/
  2. todo-txt-tdd-part-2/
  3. todo-txt-tdd-part-3/

Todo.txt TDD Part 2

In Part I, I started writing tests and then writing code to make them pass. Let’s continue with more tests.

The next test will be for an incomplete todo with no priority and a completion date.

Hey, it already passes. Let’s add some tests for when there’s a priority and a completion date

I expected these would already pass as a result of my refactoring, and they did. The next part of the spec says “Optional Creation Date, must be specified if completion date is”. First, I just want to test that it exists. That is, if there’s a completion date, there must be a creation date.

This fails because I haven’t parsed the creation date yet. So let’s do that.

My test passes, but I broke a previous one. In my prior completion date testing, I didn’t include a creation date because I wasn’t that far in the spec yet. I need to rewrite those tests

I added a creation date to the Raw for each of those tests, and now all tests pass. Now I can move on to testing what the creation date actually is.

This test already passes. Once I get past the creation date, the rest of the string is called the Description. It can contain projects that start with a plus sign(+) or contexts that start with an at symbol(@) or key/value pairs with a colon(:). We’ll test those in the next part.

You can download TodoTxt.zip

Series:
Series:

  1. todo-txt-tdd-part-1/
  2. todo-txt-tdd-part-2/
  3. todo-txt-tdd-part-3/

Todo.txt TDD Part 1

Earlier, I wrote a post inviting you to try your hand at test-first development. This post is the first in a series of how I did it. In the previous post, I had all the tests written, but here I’m starting from scratch and writing the tests as I go. Well, I’m not starting from scratch in that the classes are already set up. If you want to see what the classes look like, download the workbook from the previous post or the one at the bottom of this post.

First, create the property in CTodo that will parse the string. There’s nothing in it, but we’ll get to that shortly.

Write a test. This test will determine if the todo item is complete. Per the spec, the first thing in the string is an “x” if it’s complete

Now write the simplest code to make the test pass. I probably could have written simpler code than this, but don’t get too hung up on that. Just write simple code and don’t try to solve the next test – only this test.

When I split the string on a space, the Complete property is set to whether the first element is “x”. The test runs successfully. Next, write a test for incomplete todos.

Oh goodness, that test already runs successfully. There’s no “x”, so Complete is set to False. Next, write a test for a completed todo with a priority. Per the spec, the first element after the optional “x” is a capital letter in parentheses.

This test fails on Debug.Assert clsTodo.Priority = "A", so it’s time to write the simplest code to make it pass.

The Priority property is set to the second character of the second element. The test passes. Did we break anything? Let’s see.

Nope, everything passes so far. Time for the next test. Check the priority for an incomplete todo.

It fails, so let’s write some code

If my fist element is an “x”, get the second element, otherwise get the first element. Pretty simple and the test passes. Every test I write, I add to the TEST_All() procedure to make sure I don’t break any prior tests. The next part of the spec is an optional completion date. Let’s start with a completed todo with no priority and a completion date.

My new test passes, but I get an error in one of my old ones. Plus this code is getting pretty ugly. When your code is ugly or repetitive, it’s time to refactor. Instead of a bunch of nested If’s, I’ll just move a pointer down the line.

I use lNext to keep track of where I am in the array. If the first element is an “x”, I advance the pointer. Then I check vaSplit(lNext) rather than a specific element number. All my tests pass.

In the next installment, I keep writing tests, writing code, and refactoring.

The below workbook has all the tests and the completed Raw property. It also has a userform, but it’s not complete.

You can download TodoTxt.zip

Series:

  1. todo-txt-tdd-part-1/
  2. todo-txt-tdd-part-2/
  3. todo-txt-tdd-part-3/

Test First Todo.txt

In my ongoing struggle to find a todo list app I like, I took a look at Todo.txt. I ended up going back to GoodTodo, but I was intrigued by the text based system. I wanted to build something in Excel to be an interface to Todo.txt and I used a test-first methodology to parse the file. You may remember my first foray into test-first development when I converted numbers into words.

Later this week, I’ll post how I wrote the parser using tests. If you’ve ever wanted to try to write code using test-first, here’s your chance. Download the workbook below. I’ve setup all the classes and the tests. I even wrote enough code to make the first test pass. If you’re interested in this exercise, follow these steps:

  1. Download, unzip, and open the workbook
  2. Go to the MTest module and run the TEST_All sub and see that it passes
  3. Uncomment each link in TEST_All one at a time
  4. Run TEST_All to see that it doesn’t pass. If it passes, uncomment the next test
  5. If it doesn’t pass, go to the Raw property in the CTodo module and write just enough code to get the test to pass
  6. When your code looks cumbersome or you see a pattern emerge, refactor Raw
  7. Repeat until all the lines in TEST_All are uncommented

Check back later this week to see what I came up with.

You can download TodoTxtTestFirst.zip

Renumbering Arrays in Code

I’ve got this bit of code where I’m listing table fields that I’m going to eventually Join into a SELECT statement.

As you can see, I needed to add a new field in position 1. Now I’m faced with renumbering the rest of the array. Terrible. So I wrote this:

Now I can copy the code, run this procedure, and paste the results.

Ahhh. Satisfying. Here’s how the stuff inside the loop works.

This splits the line into:

vaLine
0 fields(17
1 = “BOLState”

This results in:

vaLineStart
0 fields
1 17

Then I just concatenate the relevant parts back together with a different number.

Applications Settings v2

I made a new version of my Application Settings addin as per Sébastien’s comments in my last post.

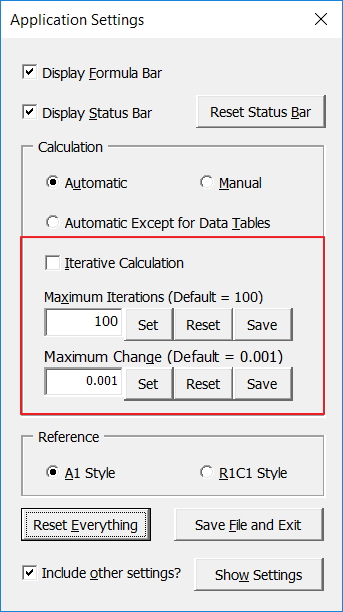
Application Settings Version 2

As you can see, there are new settings for the following.

Application.Iteration

Application.MaxIterations

Application.MaxChange

In the case of the last 2 settings, you’ll notice that there are Set, Reset and Save buttons. This is how they work,

Set: Set to the number that is entered in the text box.

Reset: Reset to the real default or “alias” default.

Save: Save an “alias” default instead of Excel’s real default. For example, if you prefer 120 instead of 100 for Max Iterations, you can set the “alias” default so that the form does not appear when opening or saving the active workbook if Application.MaxIterations is set to 120. Also, clicking the Reset button thereafter will reset Application.MaxIterations to 120. And using the Set button to set Application.MaxIterations to any other value than 120 will show the value in red font to indicate it is not the “alias” default.

Hope this is useful. Download the new version here.

Application Settings

As posted on my blog a few days earlier,

Back in 2005, I noticed something that worried me.

You may know already that switching Application.Calculation to xlCalculationManual can make various code run faster. It can be a big time saver.

The problem, as I see it, is not switching it back to xlCalculationAutomatic. Given that some people for whatever reasons might use Manual Calculation all the time, most people don’t, especially the vast majority of average users who probably haven’t heard of this setting. With Calculation still set to Manual, they might be looking at values that haven’t be updated. Even experienced programmers might be temporarily confused until they figure out what’s going on. Imagine someone in a sales department quoting incorrect pricing to a customer or doing a faulty presentation at an important meeting. Not good.

And now for what really worries me – saving files with this setting. Let’s try something. Close all Excel files, except one to use for testing. Now switch to Manual Calculation. If you don’t know how to do it in code, you can click Calculation Options on the Formulas tab, then select Manual. Now save in that setting, close Excel, and reopen the file. If that file is the first one to be opened, Excel Calculation will be set to Manual by default, and all other files opened thereafter will be affected too. Save any of them with this setting, and the same thing will happen if they happen to be the first file opened…

So, how do you know Calculation is set to Manual without specifically checking?

You can’t. (Actually there is a way to make it more obvious. See the comment from Jake Collins)

Now, imagine sending one of these files to colleagues or customers, then realizing something is amiss days later. Again, not good. In fact, downright scary.

So, also in 2005(?), I made an addin called Calculation Checker. It checks Calculation when you save and prompts you to do so as Automatic if set as otherwise (including Automatic Except for Data Tables).

I’ve found it useful, but since then I’ve thought there’s room for improvement, so I made something new.

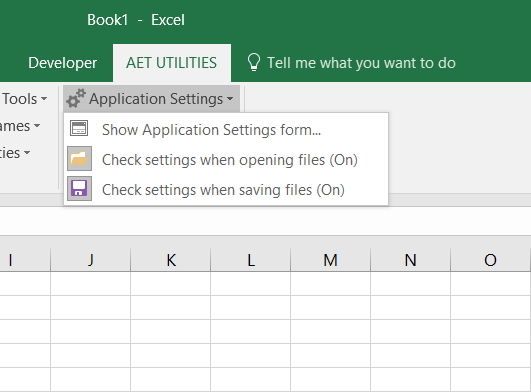
As you can see there’s 3 menu items. The bottom 2, when toggle to “On”, check files when opened/saved for the following settings.

Application.DisplayFormulaBar

Application.DisplayStatusBar

Application.Calculation

Application.ReferenceStyle

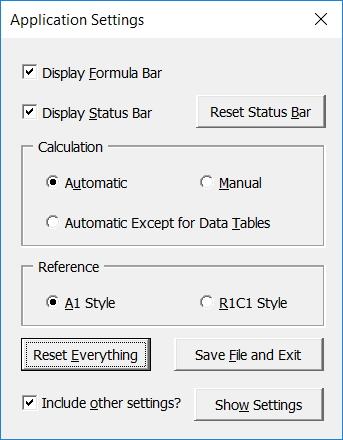
If any of those settings are not at their default, the Application Settings form will be displayed. Non-default settings are displayed in red. (Yes, the first 3 should be obvious, but easy enough to miss if you’re busy, tired or both!)

Click the form’s controls to reset them individually, or just click the Reset Everything button, then the Save File and Exit button if you choose to. Alternatively, click the X button not to save the file. Note that any other file that are open will also be saved with these settings (unless you change them later), because they are Application settings, not Workbook settings.

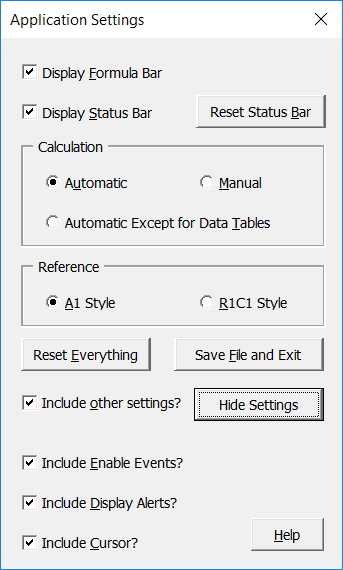
And because the form can be opened directly from the Ribbon, you can easily change any of the settings at any time for whatever reason. Click the Show Settings button and you can see other settings that can also be reset when clicking the Reset Everything button, if the Include other settings checkbox is ticked.

Note
Keep in mind that these additional settings aren’t checked automatically. The form only resets them if you click the Reset Everything button as mentioned above. Also, if Application.EnableEvents is set to False by VBA code, my addin won’t check files when opening or saving as these are the events that trigger it. In fact, you should be setting this False if any of your code does open or save workbooks to prevent my code from running, then set it back to True before the code ends.

Hopefully this tool will be of use. You can download it here.

PS. I’m going on holidays for a few days so I’ll reply to comments (if there be any!) when I get back.