In an userform list all available fonts

The motivation for this tip was to share how to

1) dynamically add controls to a userform
2) respond to events for these controls, and
3) specifically respond to events using a callback procedure that is located in another class module!

Since this may come across as a fairly technical topic, this tip utilizes the above capabilities to provide a functional solution:

1) list in an userform the names of all available fonts with each name shown using that font,
2) hover over the option button associated with a font to see a sample of every English keyboard character in that font,
3) click on the option button to select the font, and, finally,
4) use this capability to programmatically get the user’s selection, if any.

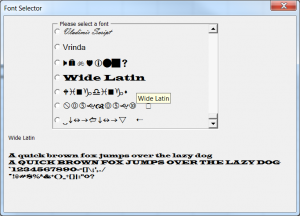
Below is an example of the font selector in action. Each OptionButton shows the name of one available font using the font itself. At the same time, the control tool tip shows the font name in English (see the Wide Latin tip). A sample of how every keyboard character will look in that font appears below the font selector frame.

The motivation for this example was a Daily Dose of Excel blog post by Michael (http://www.dailydoseofexcel.com/archives/2012/03/14/getting-a-font-list-to-a-combo-box-2/). He used a combo box to list the fonts available to Excel leveraging a technique shown in a tip by John Walkenbach (http://www.j-walk.com/ss/excel/tips/tip79.htm).

For a version in a page by itself (i.e., not in a scrollable iframe as below) visit http://www.tushar-mehta.com/publish_train/xl_vba_cases/1054%20show%20fonts%20in%20userform.shtml

Tushar Mehta

Monitor Worksheet Changes via RSS

I love RSS. If you have a website and don’t have a feed, I don’t follow it. I monitor stuff via Google Reader and it’s a great way to keep up on a lot of sites. So it should only follow that monitoring spreadsheet changes via RSS would be great too. Right? Well, not really, but that never stopped me before.

First some caveats. This is just an experiment and not meant for general use. There may actually be some bugs in it, if you can believe that. If you want to modify the code for your own use, be warned that if you monitor too many cells it might be slow. Or you might get so much information that it’s worthless. OK, now that that’s over.

An RSS feed is an XML file that sits on a web server. This blog has such an XML file. When I post this blog entry, WordPress will update the XML file with an entry for this post. Occasionally Google Reader will check the XML file and see if there’s anything new. If there is, it will display the new stuff for anyone who has subscribed to the feed.

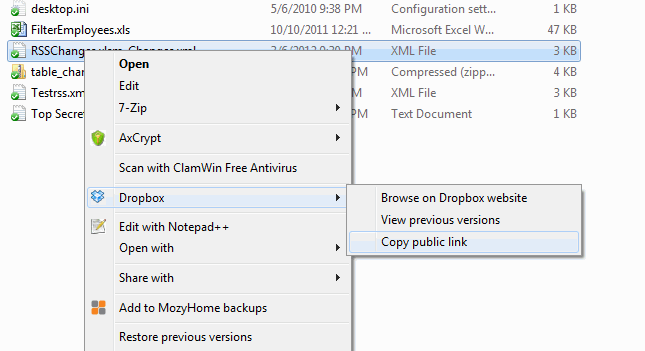
It’s fairly trivial to create an XML file, even from Excel. The potentially difficult part is putting that file on a web server. Oh, except for one little thing. I have a webserver right on my computer and you might too. Mine is called “C:\Users\dick\Dropbox\Public\”. Did I trick you? Dropbox has a Public folder and you can get a “public link” from any file in that folder, including the XML file we’re about to create. What a simple way to publish something to the intertubes. Here’s how you get that public link.
Alright, enough screwing around. Let’s get to the code.

I start with a class module called CChange (and its parent CChanges). CChange has the following read/write properties:

Address - the cell address we're watching for changes and a way to uniquely identify the instance.
OldValue - the value in the cell before it changed.
NewValue - the value in the cell after it changed.
Modified - a time stamp when the changed occurred.

I’ve named a range on the sheet called RSSWatch. When the workbook opens, a CChange object is created for every cell in that range.

Sub Auto_Open()

Set gclsChanges = New CChanges

gclsChanges.Initialize

End Sub

Public Sub Initialize()

Dim clsChange As CChange
Dim rCell As Range

For Each rCell In Sheet1.Range(gsNAMEDRNG).Cells
Set clsChange = New CChange
With clsChange
.Address = rCell.Parent.Name & "!" & rCell.Address
.OldValue = rCell.Value
.NewValue = .OldValue
End With
Me.Add clsChange
Next rCell

End Sub

These CChange objects are just sitting out there waiting to record any changes. They all have a Modified date of 12:00:00 AM (because I didn’t set anything) and in this state they won’t be written to the XML file. In the ThisWorkbook module, I use the Workbook_SheetChange event to monitor my range for changes. You might notice that I switch pretty liberally between sheet-specific references and general references. For instance, in the above Initialize method, I limit my range to Sheet1. When I went to code the event, I thought that someday I would want this to monitor different ranges on different sheets, so I used a Workbook level event. It’s totally inconsistent, but it will be helpful if you just ignore it.

Private Sub Workbook_SheetChange(ByVal Sh As Object, ByVal Target As Range)

Dim clsChange As CChange
Dim rCell As Range
Dim rRng As Range

On Error Resume Next
Set rRng = Sh.Range(gsNAMEDRNG)
On Error GoTo 0

If Not rRng Is Nothing Then
If Not Intersect(Target, rRng) Is Nothing Then
For Each rCell In Target.Cells
Set clsChange = gclsChanges.Change(Sh.Name & "!" & rCell.Address)
If Not clsChange Is Nothing Then
clsChange.NewValue = rCell.Value
clsChange.Modified = Now
End If
Next rCell
End If
End If

End Sub

For every cell that has changed, I find it’s CChange brother and change the NewValue and Modified properties. I haven’t written the XML file yet. I still just have a bunch of CChange objects, except that at least one of them has a Modified property that will make it eligible to be included in the file. Changes get made and recorded and only the last value and time are saved. Then, when the workbook is saved, any eligible CChange objects are written to the file.

Private Sub Workbook_BeforeSave(ByVal SaveAsUI As Boolean, Cancel As Boolean)

If Not gbDEBUG Then
gclsChanges.WriteRSS
End If

End Sub

And that’s pretty much all there is. Just kidding, there’s lots more. Before we look at more code, let’s take a look at what the file might look like after a few changes.
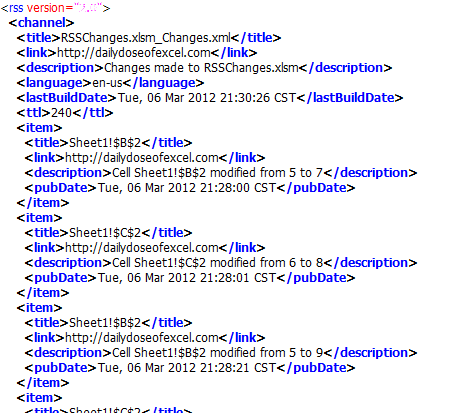
I’m sure you’re all experts on XML, so I’ll spare you the details, but the general hierarchy goes like this

rss
channel
title
link
description
language
lastBuildDate
ttl
item - one or more of these guys
title
link
description
pubDate
/item
/channel
/rss

Now that you know what the file looks like, let’s write one. I called the WriteRSS method from the Workbook_BeforeSave event.

Public Sub WriteRSS()

Dim xmlDoc As MSXML2.DOMDocument
Dim xmlChannel As MSXML2.IXMLDOMElement
Dim xmlLastBuild As MSXML2.IXMLDOMElement
Dim xmlItem As MSXML2.IXMLDOMElement
Dim clsChange As CChange
Dim dtMax As Date

10 If Me.HasChanges Then
20 If Not Me.FileExists Then Me.CreateFile

30 Set xmlDoc = New MSXML2.DOMDocument
40 xmlDoc.Load gsPATH & Me.Filename
50 Set xmlChannel = xmlDoc.SelectSingleNode(gsXRSS).SelectSingleNode(gsXCHANNEL)
60 Set xmlLastBuild = xmlChannel.SelectSingleNode(gsXBUILD)
70 Me.LastBuildDate = ConvertDate(xmlLastBuild.Text)
80 dtMax = Me.LastBuildDate

90 For Each clsChange In Me
100 If clsChange.ShouldWrite Then
110 Set xmlItem = clsChange.xmlItem(xmlDoc)
120 xmlChannel.appendChild xmlItem

130 If clsChange.Modified > dtMax Then dtMax = clsChange.Modified
140 End If
150 Next clsChange

160 Me.LastBuildDate = dtMax
170 xmlLastBuild.Text = Format(Me.LastBuildDate, gsFMTDATE)
180 FormatXMLDoc xmlDoc
190 xmlDoc.Save gsPATH & Me.Filename
200 End If

End Sub

Generally, I’m creating an XML file if it doesn’t exist, reading that file in, appending Items to it for any changes, and writing that file back out. The first thing I do is make sure there’s something to write. In line 10, I call the HasChanges property, which loops through all the CChange instances to see what’s eligible. If nothing has changed, there’s no need to create the XML file.

Line 20: If there isn’t already a file, I need to make one. I check to see if it’s out there.

Public Property Get FileExists() As Boolean

FileExists = Len(Dir(gsPATH & Me.Filename)) > 0

End Property

Public Sub CreateFile()

Dim xmlDoc As MSXML2.DOMDocument
Dim xmlRss As MSXML2.IXMLDOMElement
Dim xmlVer As MSXML2.IXMLDOMAttribute
Dim xmlChannel As MSXML2.IXMLDOMElement
Dim xmlNode As MSXML2.IXMLDOMElement

Set xmlDoc = New MSXML2.DOMDocument

Set xmlRss = xmlDoc.createElement(gsXRSS)
Set xmlVer = xmlDoc.createAttribute(gsXVER)
xmlVer.Value = gsRSSVERSION
xmlRss.Attributes.setNamedItem xmlVer

Set xmlChannel = xmlDoc.createElement(gsXCHANNEL)

Set xmlNode = xmlDoc.createElement(gsXTITLE)
xmlNode.Text = Me.Filename
xmlChannel.appendChild xmlNode

Set xmlNode = xmlDoc.createElement(gsXLINK)
xmlNode.Text = gsLINK
xmlChannel.appendChild xmlNode

Set xmlNode = xmlDoc.createElement(gsXDESC)
xmlNode.Text = "Changes made to " & ThisWorkbook.Name
xmlChannel.appendChild xmlNode

Set xmlNode = xmlDoc.createElement(gsXLANG)
xmlNode.Text = gsLANG
xmlChannel.appendChild xmlNode

Set xmlNode = xmlDoc.createElement(gsXBUILD)
xmlNode.Text = Format(Now - 1, gsFMTDATE)
xmlChannel.appendChild xmlNode

Set xmlNode = xmlDoc.createElement(gsXTTL)
xmlNode.Text = glTTL
xmlChannel.appendChild xmlNode

xmlRss.appendChild xmlChannel

xmlDoc.appendChild xmlRss

xmlDoc.Save gsPATH & Me.Filename

End Sub

You’ll need to set a reference to Microsoft XML, v6.0 or similar. CreateFile sets up everything in the file that’s not an Item, like the title, link, description, language, etc. The basics of XML generation are 1) create a new node and 2) append it to its parent node.

Line 40: I read in the existing file or the one I just created. The Load method populates the XMLDOMDocument with all the hierarchies and data. Line 50 and 60 go find specific nodes in the file that I’m interested in. I want the Channel node because I’ll be appending Items to it. I want the lastBuildDate node so I can compare that to CChange Modified properties and only write new changes.

Line 70: The RSS example I got off the web showed dates formatted like Tue, 06 Mar 2012 21:28:01 CST. Neither Excel’s CDate or Datevalue functions can convert that to a date, so I have to strip off the day and the timezone, which I do in a separate function.

Line 80: Ultimately I want to make my lastBuildDate in the XML file equal to the latest date of all the CChange objects. I’m initializing the maximum variable here. If I don’t, every cell’s Modified would be greater than this date.

Line 100: For every CChange, I check to see if it needs to be written to the file.

Public Property Get ShouldWrite() As Boolean

ShouldWrite = Me.Modified >= gclsChanges.LastBuildDate

End Property

If it’s been modified since the last time I wrote the file, it gets written this time. I really should also check to see if OldValue is different than NewValue. Right now if you change a cell and then change it back, it will still show up as a change. Sounds like a V2 enhancement.

The rest of the loop creates an Item, appends it to the Channel, and updates the maximum Modified date. The xmlItem property returns an object that can be appended.

Public Property Get xmlItem(xmlDoc As MSXML2.DOMDocument) As MSXML2.IXMLDOMElement

Dim xmlReturn As MSXML2.IXMLDOMElement
Dim xmlSubItem As MSXML2.IXMLDOMElement

Set xmlReturn = xmlDoc.createElement(gsXITEM)

Set xmlSubItem = xmlDoc.createElement(gsXTITLE)
xmlSubItem.Text = Me.Address
xmlReturn.appendChild xmlSubItem

Set xmlSubItem = xmlDoc.createElement(gsXLINK)
xmlSubItem.Text = gsLINK
xmlReturn.appendChild xmlSubItem

Set xmlSubItem = xmlDoc.createElement(gsXDESC)
xmlSubItem.Text = Me.Description
xmlReturn.appendChild xmlSubItem

Set xmlSubItem = xmlDoc.createElement(gsXPUBDATE)
xmlSubItem.Text = Format(Me.Modified, gsFMTDATE)
xmlReturn.appendChild xmlSubItem

Set xmlItem = xmlReturn

End Property

Not much to this – make a node and append it. The Description property is a read-only property that makes a nice English sentence describing what happened.

Line 160: I change the LastBuildDate to equal the max, then change that node in the XML file.

Line 180: This code I stole from VB Helper. It adds the line breaks and indentation that, while not necessary, is really helpful when debugging. No, I didn’t write this code perfectly the first time.

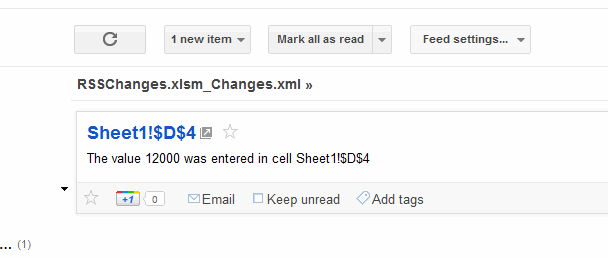
Finally I save the modified XML document. Dropbox publishes to the web and Google Reader reads it. Here’s what the last change looks like in the reader.
If I ever look at this again, here’s what I’d do in version 2

  • Put all the changes in one Item rather than one per cell
  • Check to see if a cell was changed and changed back and exclude it
  • Get the timezone from the Windows API rather than hardcoding it in a constant
  • Modify to use mulitple ranges on multiple sheets
  • Put the code in an add-in and look for workbooks to monitor
  • Change the Description to be easier to read

I like this Public Dropbox folder. I’m thinking of using it as a version control system to keep my add-ins up-to-date from multiple computers. It’s a shame that some companies block it. Oh well, your thoughts on the RSS code are welcome.

You can download RSSChanges.zip

Moving Scanned Files to Folders

Well, I finally done it. I’ve gone “paperless” in the AP department. Those quotes are because I haven’t gone totally paperless, I’m just done filing paid invoices. Instead I’m scanning them. I bought this happy little customer.

Canon 2454B002

And it’s proving to be quite a good scanner. The worst part about scanning paid invoices is renaming the file. There are some sophisticated accounting packages out there than handle this better, but the one that I have access to has it’s problems, not the least of which is that it’s a subscription. The scanner automatically names the file with some string of number representing the date and time. I want the file name to be VendorName_CheckNumber_Date.pdf, but typing that for every scan would be a pain. So I automated it. All scans are manually renamed as CheckNumber.pdf for paper check and eAmount.pdf for electronic transfers. Then I run the below code.

Public Sub RenameScans()

Dim clsPaids As CPaids
Dim clsPaid As CPaid
Dim sFile As String

Const sPATH As String = "\\Server\Company\Accounting\AP\Paid\"
Const sFTYPE As String = "*.pdf"

'Get a list of checks/paid invoices from accounting database
Set clsPaids = New CPaids
clsPaids.Fill

'Look for pdf files in the scan location
sFile = Dir(sPATH & sFTYPE)

Do While Not Len(sFile) = 0
'Find the check information for this scan
Set clsPaid = Nothing
Set clsPaid = clsPaids.PaidByRefNumber(sFile)

If Not clsPaid Is Nothing Then
'Record the old location and flag it to be moved
clsPaid.ToMove = True
clsPaid.OldLocation = sPATH & sFile
End If

'Get the next PDF file in the scan location
sFile = Dir
Loop

'If I move the file in the middle of the Dir loop, the Dir gets all jacked up
'so I flag it above, and actually move it when I've been through all the file
For Each clsPaid In clsPaids
If clsPaid.ToMove Then
Name clsPaid.OldLocation As clsPaid.NewLocation(sPATH)
clsPaid.ToMove = False
End If
Next clsPaid

End Sub

Here are the basics: Get a list of paid invoices from the accounting database. Try to match them up with scanned document. If there’s a match, flag it to be moved. Move and rename all the flagged documents to their proper folder. First, I fill a bunch of CPaid class instances with data from the accounting software. In CPaids:

Public Sub Fill()

Dim adConn As ADODB.Connection
Dim adRs As ADODB.Recordset
Dim clsPaid As CPaid
Dim sSql As String

Const sCONN As String = "Some connection string"

sSql = "SELECT TxnDate, RefNumber, PayeeEntityRef_FullName, Amount FROM billpaymentcheck WHERE TxnDate>=#" & Format$(Date - 90, "m/d/yyyy") & "#;"

Set adConn = New ADODB.Connection
adConn.Open sCONN
Set adRs = adConn.Execute(sSql)

If Not adRs.EOF And Not adRs.BOF Then
adRs.MoveFirst
Do While Not adRs.EOF
Set clsPaid = New CPaid
With clsPaid
.TxnDate = adRs.Fields(0).Value
.RefNumber = adRs.Fields(1).Value
.Payee = adRs.Fields(2).Value
.Amount = adRs.Fields(3).Value
End With
Me.Add clsPaid
adRs.MoveNext
Loop
End If

adRs.Close
Set adRs = Nothing
adConn.Close
Set adConn = Nothing

End Sub

Nothing too fancy here. Get a recordset, loop through it, fill the class. I go back 90 days, which is overkill, but you never know. That hardcoded 90 should really be an argument. Once the classes are all filled, I loop through the PDF files in the designated folder. For every file I find, I try to match it up.

Public Property Get PaidByRefNumber(sRefNumber As String) As CPaid

Dim clsReturn As CPaid
Dim clsPaid As CPaid

For Each clsPaid In Me
If UCase(sRefNumber) Like UCase(clsPaid.ScanFile) Then
Set clsReturn = clsPaid
Exit For
End If
Next clsPaid

Set PaidByRefNumber = clsReturn

End Property

Whenever I try to convince someone to try using class modules, I can never seem to make a compelling argument. It’s one of things you have to force yourself to try to see if you prefer it. But for me, this is a good example of why I like classes. This loops through all the child classes and returns a match if it finds one. The good part is the ScanFile property. I like to break down my logic into an absurd number of properties. You can look at this property’s name and usage and understand what it does, even if you don’t know what the heck ScanFile is. You don’t really need to know what it’s matching to understand that it is matching something. I could put all the logic for the match right in this property, but what the hell fun would that be. If you are interested in what is being matched, you simply drill down to ScanFile.

Public Property Get ScanFile() As String

Dim sReturn As String

If Me.IsCheck Then
sReturn = Me.RefNumber & ".pdf"
Else
sReturn = Me.RefNumber & Me.Amount & "*.pdf"
End If

ScanFile = sReturn

End Propert

The logic to determine if this instance is a check or an electronic payment is really simple. You can see it in the next piece of code. And it might seem stupid to obfuscate that away from this procedure. Everything that’s involved in the IsCheck property could be put on the that one If line. Instead, I have a totally separate property and far more lines that necessary. But there are at least two advantages to doing it the way I did. The first is readability. A well named property like IsCheck tells me everything I need to know about why I have a conditional there in the first place: I do something different for checks. The second reason is maintainability. Right now, anything that starts with an “e” is an electronic payment and doesn’t have a proper check number. If that changes, say because I want to start prefixing them with “ach” instead of “e”, I can modify the code in one place. That should be, and is, the only place in the code where I make that determination so it’s the only place to make the modification.

If I was really a good programmer, I wouldn’t be naming properties names like IsCheck. I would name them IsType(ByVal eType as PaidType) and have a PaidType enum. That way if I want to differentiate between ACH and wire transfers (both currently “e” types) I could do it with less modification. There’s a balance though. If you go down that road too far, you end up writing code that writes code instead of doing actual productive work. Here’s the super-simple IsCheck property whose existence some people might consider superfluous.

Public Property Get IsCheck() As Boolean

IsCheck = Me.RefNumber <> "e"

End Property

At this point, the only thing I need to do is determine where the file goes.

Public Property Get NewLocation(ByVal sPATH As String) As String

Dim sReturn As String
Dim lCnt As Long

sReturn = Me.Folder(sPATH) & Me.Filename

Do Until Len(Dir(sReturn)) = 0
lCnt = lCnt + 1
sReturn = Replace(sReturn, ".pdf", "_" & lCnt & ".pdf")
Loop

NewLocation = sReturn

End Property

This property builds the path and filename, then starts appending integers to the end if there are any conflicts.

Public Property Get Folder(ByVal sPATH As String) As String

Dim sReturn As String

sReturn = Me.CleanPayee

If Len(Dir(sPATH & sReturn, vbDirectory)) = 0 Then
sReturn = UCase(Left$(sReturn, 1))
End If

If Right$(sPATH, 1) <> Application.PathSeparator Then sPATH = sPATH & Application.PathSeparator

Folder = sPATH & sReturn & Application.PathSeparator

End Property

I have more than 26 folders in which to store these scanned files: one for every letter of the alphabet and a few for vendors for whom I’ve determined it would be advantageous to have a separate folder. CleanPayee removes anything from the vendor name that’s not a letter or a number. If there’s a folder that matches that vendor’s cleaned name, it will store it there. If not, it stores it in the folder that matches the first letter of the vendor name.

Public Property Get Filename() As String

Const sUS As String = "_"

Filename = Me.CleanPayee & sUS & Me.RefNumber & sUS & Format(Me.TxnDate, "yyyymmdd") & ".pdf"

End Property

Lastly, I build the file name from properties of the class. And that’s it. On the fifty or so scanned files that I tested it on, it ran so fast that I assumed it didn’t work until I checked the folders. I really thought I was going to have performance problems with the Name statement for renaming and moving files, but it doesn’t seem to be the case. As Jon Peltier once said, don’t optimize until you know you have a problem and you know what’s causing the problem.

You can download RenameScans.zip

Custom Error Object

Ken Puls and I were discussing the merits of custom class modules recently. Shortly after that conversation, I started rewriting a small utility app with the intention of using the Rethrow method mention by Stephen Bullen. If I’m such a class module evangelist, why am I not using a custom error object? Good question.

I decided to rewrite the PED Error Handler using a class. Below is the central error handling function with more comments than are necessary, I think.

Public Function HandleError(ByVal sModule As String, ByVal sProc As String, _
Optional ByVal sFile As String, _
Optional ByVal bEntryPoint As Boolean = False) As Boolean

Dim bReturn As Boolean

'First call, the object will be nothing so it's created
'and the number and description are saved
If gclsError Is Nothing Then
Set gclsError = New CError
gclsError.Number = Err.Number
gclsError.Message = Err.Description
End If

'Once the error number and description are captured,
'suppress all other errors
On Error Resume Next

With gclsError
'Additional properties set
.Module = sModule
.Procedure = sProc
.File = sFile
.EntryPoint = bEntryPoint

'Method to write the error out to a file
.WriteToLog

If Not .UserCanceled Then
'If it's at the entry point or in debug, display the error
If .ShouldShowMessage Then
Application.ScreenUpdating = True
MsgBox .Message, vbCritical, gsAPPTITLE
Set gclsError = Nothing
Else
'Rethrow the error in the calling procedure
On Error GoTo 0
Err.Raise .Number, .FullSource, .Message
End If

bReturn = .DebugMode
Else
'End silently and kill the object
bReturn = False
Set gclsError = Nothing
End If
End With

HandleError = bReturn

End Function

This isn’t an exact replacement for the one in the book. It only uses the Rethrow method, so it won’t be a good solution if you need to clean up after an error. My goal was not to duplicate it exactly, but rather to kill some time during one of the less relevant MVP Summit sessions. Here are a couple of highlights:

I wrote a write-once property for the Message property. Later, I changed the main function to only write the Message property when a new CError object is created so it’s redundant.

Public Property Let Message(ByVal sMessage As String)

If Len(Me.Message) = 0 Then msMessage = sMessage

End Property

Writing to the log file uses some other custom properties that are basically string builders.

Public Sub WriteToLog()

Dim lFile As Long

On Error Resume Next

lFile = FreeFile

Open Me.LogFile For Append As lFile
Print #lFile, Format$(Now(), "dd mmm yy hh:mm:ss"); Me.LogEntry
If Me.EntryPoint Then
Print #lFile,
End If
Close lFile

End Sub

I modified the standard Let Number property to use a default “User Cancel” message.

Public Property Let Number(ByVal lNumber As Long)

mlNumber = lNumber
If lNumber = ErrorType.UserCancel Then
Me.Message = msUSERCANCEL
End If

End Property

One of the things I like about using class modules is turning Boolean logic into easy-to-understand English. I could have coded

If .DebugMode Or .EntryPoint Then

but I much prefer to see

If .ShouldShowMessage Then

and to put that Boolean logic in the property

Public Property Get ShouldShowMessage() As Boolean

ShouldShowMessage = Me.DebugMode Or Me.EntryPoint

End Property

I get the benefit of using and reusing ShouldShowMessage wherever I want and if the logic changes, I change it only in one place. I only use it once and probably won’t use it anywhere else, but beyond that I just like that the intent is embedded in the code so the reader doesn’t have to try to figure it out unless they want to.

And here’s some fake code to see if it works.

Sub Main()

Dim lResp As Long

Const sSOURCE As String = "Main()"

On Error GoTo ErrorHandler

lResp = MsgBox("Cancel?", vbYesNo, gsAPPTITLE)
If lResp = vbYes Then
Err.Raise ErrorType.UserCancel, sSOURCE
Else
Sub_Procedure
End If

Exit Sub

ErrorHandler:
If HandleError(msMODULE, sSOURCE, , True) Then
Stop
Resume
End If

End Sub

Sub Sub_Procedure()

Dim i As Long

Const sSOURCE As String = "Sub_Procedure()"

On Error GoTo ErrorHandler

i = Sub_Function(1) 'no error here
i = Sub_Function(0) 'this will create a divide by zero

Exit Sub

ErrorHandler:
If HandleError(msMODULE, sSOURCE) Then
Stop
Resume
End If

End Sub

Function Sub_Function(lDenom As Long) As Long

Dim i As Long

Const sSOURCE As String = "Sub_Function()"

On Error GoTo ErrorHandler

i = 1 / lDenom 'When zero is passed in, an error is raised

Exit Function

ErrorHandler:
If HandleError(msMODULE, sSOURCE) Then
Stop
Resume
End If

End Function

Thanks to Bob Phillips for telling me to use an Enum instead of a constant: ErrorType.UserCancel vs. glUSERCANCEL.

You can download ErrorClass.zip

Userform Dependent Listboxes

I often have a requirement to display Parent-Child-Grandchild relationships in a userform. That usually takes the form of listboxes where lesser listboxes are populated based on selections of greater listboxes. The other day I created a generic one. I was thinking that it would be nice to plop this into a project and replace some variable names. Maybe it would eliminate some of the drudgery of creating userforms. I question whether it will be better than just starting from scratch, but time will tell. In the mean time, here’s what I did.

Sub Main()

Dim clsParents As CParents
Dim ufRelations As URelations

Set clsParents = New CParents
clsParents.FillFromRange Sheet1.Range("A2:B17")

Set ufRelations = New URelations
Set ufRelations.Parents = clsParents

ufRelations.Initialize
ufRelations.Show

Unload ufRelations
Set ufRelations = Nothing

End Sub

The top level class, CParents, is held in a variable and passed to the userform via a Public Property. Every CParent, CChild, and CGrandchild can be accessed through that one top level collection class. The Intialize method calls the FillParents procedure and does nothing else. There’s a FillParents, a FillChildren, and a FillGrandchildren procedure that populate the respective listboxes. They all follow pretty much the same pattern.

Private Sub FillParents()

Me.lbxParents.List = Me.Parents.List

If Me.lbxParents.ListCount > 0 Then
Me.lbxParents.ListIndex = 0
End If

End Sub

The List property of the listbox is assigned the List property of the class, which returns a zero based array specifically to fill the listbox. Then, as long as there’s something there, the first parent is selected (ListIndex = 0). That selection triggers the lbxParents_Change event.

Private Sub lbxParents_Change()

If Me.lbxParents.ListIndex >= 0 Then
Set Me.ActiveParent = Me.Parents.ParentByDescription(Me.lbxParents.Value)
Else
Set Me.ActiveParent = Nothing
End If

FillChildren

End Sub

The userform class has two properties, ActiveParent and ActiveChild, that should hold a reference to the class instance matching what’s selected in the listbox. In this code, if something is selected, ActiveParent is assigned, otherwise it’s set to Nothing. Then FillChildren is called. Notice my use of Me.lbxParents.Value as I have something to say about that later.

Private Sub FillChildren()

Me.lbxChildren.Clear

If Not Me.ActiveParent Is Nothing Then
If Me.ActiveParent.Children.Count > 0 Then
Me.lbxChildren.List = Me.ActiveParent.Children.List
Me.lbxChildren.ListIndex = 0
End If
End If

End Sub

I’m sure you can see the pattern: Set the List property of the control to the List property then select the first one in the list. That triggers a Change event that calls the next level down. I like for something to always be selected in a listbox. That is, I never want to listbox with a ListIndex of -1. To my amazement, there are people who don’t agree with me. They prefer a Null state and I prefer to limit the Null states as much as possible.

The obvious reason is that it simplifies the code. If you can count on a certain state, it means less checking down the line. Another reason, which may be the same reason, is that the code that populates the listboxes initially is the same code that accounts for changes to the listbox. I know the code works when I initialize because I’m exercising it.

I’m not going to show you the rest of the code because it’s not much different than what I’ve already shown. You can see it all in the download at the bottom of this post if you like. But I do want to discuss one other issue: Using the Value property of the lisbox. Here’s the change event for the Children listbox

Private Sub lbxChildren_Change()

If Me.lbxChildren.ListIndex >= 0 Then
Set Me.ActiveChild = Me.ActiveParent.Children.ChildByDescription(Me.lbxChildren.List(Me.lbxChildren.ListIndex))
Else
Set Me.ActiveChild = Nothing
End If

FillGrandchildren

End Sub

In the change event for the parent listbox, I used the Value property to locate the selected parent. Here I’m using something different. The Value property of lbxParents worked every time I ran the code. The Value property of lbxChildren worked about 25% of the time. I thought I knew everything there was to know about the Value property, but clearly I don’t. I understood that Value would return the text in the BoundColumn of the ListIndex row. In 75% of the cases, it was returning an empty string. The errors only occurred in the Initialize procedure. Once the form was up and running, it never failed. When I put a break point in the code to debug it, it worked more often (the uncertainty principle in action). To fix the problem, I used the construct above. Using the List(ListIndex) method failed 0% of the time. I don’t have an explanation, but I’ll be forever nervous about using Value.

If I really want this to be a drop-in module, I need to make one major change. I need to make all of the listboxes with a hidden first column for the ID of the object. In this example, I use the Description property to find the correct object instance but I wouldn’t do that in real life if I didn’t have to. I have the feeling I don’t “reuse” code as much as other people. I’m happy to use some APIs or error handling code by dropping it in. But most of the code I write from scratch – until it doesn’t work, then I go see how I did it before. There are some advantages to writing from scratch, such as doing it better than I did it before. And of course there are advantages to reusing, such as reliable, tested code. Hooking up controls on a userform has to be one of my least favorite activities, so I will be happy if I can find some reusable code framework to minimize it.

You can download ParentChildUserform.zip

P.S. I started using the Public folder of my Dropbox account to host downloads. It’s easier than uploading via ftp and creating a link. I can’t think of any downside to that. A little less control I guess.

Extending Built-in Classes

I’m catching up on Doug Glancy’s blog, yoursumbuddy, and in particular Building a Workbook Table Class. I wondered if it would work better inside the workbook class rather than in its own. Most classes in Excel don’t come with a user interface, but the Workbook class does – the ThisWorkbook module. In that module, you can create your own properties and methods as I’ve done here.

In the ThisWorkbook module

Private mcolTables As Collection

Private Sub Initialize()

If mcolTables Is Nothing Then
Set mcolTables = New Collection
End If

End Sub

Public Sub RefreshTables()

Dim sh As Worksheet
Dim lo As ListObject

Initialize

For Each sh In Me.Worksheets
For Each lo In sh.ListObjects
On Error Resume Next
mcolTables.Add lo, lo.Name
On Error GoTo 0
Next lo
Next sh

End Sub

Public Property Get Table(vItm As Variant) As ListObject

Set Table = mcolTables(vItm)

End Property

Public Property Get TableCount() As Long

TableCount = mcolTables.Count

End Property

Public Property Get Exists(vItm As Variant) As Boolean

Dim lo As ListObject

On Error Resume Next
Set lo = mcolTables(vItm)
On Error GoTo 0

Exists = Not lo Is Nothing

End Property

I was trying to replicate what Doug did, but it’s not a perfect match. I made the Item property a Table property. Item obviously doesn’t work in this context because you’d expect an Item to be a Workbook class. But I’ve gotten away from using Item in custom class modules altogether. Here’s what the standard module code looks like

Sub TestTableClass()

Dim i As Long
Dim lo As ListObject

With ThisWorkbook
.RefreshTables

Debug.Print "Number of tables in book:", .TableCount

For i = 1 To .TableCount
Debug.Print "Table(" & i & ") name:", .Table(i).Name
Next i

For i = 1 To .TableCount
Set lo = .Table(i)
Debug.Print lo.Name & Space(1) & lo.Parent.Name & "!" & lo.DataBodyRange.Address
Next i

Debug.Print "There is a Table1:", .Exists("Table1")
Debug.Print "There is a Table3:", .Exists("Table3")
End With

End Sub

And the result

There are some disadvantages to extending an existing class rather than making your own. For one, you can’t define the default value and a NewEnum property. And you wouldn’t want to because the existing class already has those defined. But that means that you can’t For Each loop through the collection. Another drawback is the lack of Intellisense. If you use the ThisWorkbook auto-instantiated variable, you get all the Intellisense goodness you want. If you use some other workbook reference (like ActiveWorkbook), you still get the function, but not the Intellisense.

As I look this over, I should have named the Exits property TableExists. I also should clear out the collection when I refresh like Doug did.

Populating Class Properties

Depending on the requirements, I’ll choose a method for populating my custom collection classes using from data from a worksheet.

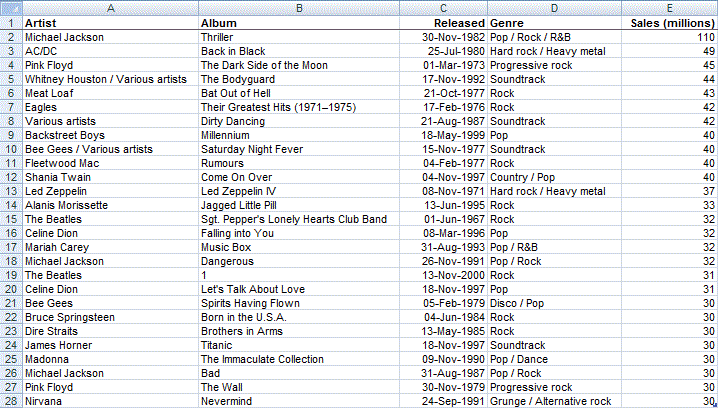
In this example, I’m using a list of the best selling albums of all time.

My Album class has properties as follows:

The code in my main routine is:

Filling the collection is just a matter of reading each row and popping the contained values into the right property.
The difficulty is knowing which columns relate to what properties. It’s a mapping problem – mapping columns to properties.

I could make an assumption about the positions of the columns and assume each is a known index.

I don’t really like this because I’ve been taught and have tried to follow the approach that offsets/indices like these should be defined as constants.
I’ll modify my FillFromSheet code.

Seems roughly better, but this too has problems. It can be a pain when you want to change the column order or insert a new column. You’d have to go through the code and update all of the numbers. While this is ok for 5, as I have here, changing out 50 columns is a chore.

So, I use an Enum block to determine column positions. At the top of the class module:

And another modification to my FillFromSheet code:

That works well. If I rearrange my columns on the worksheet, the only code change needed is a swap of items in the Enum block – a painless and quick update!

But that’s only if the changes to column order are in my control. What if an end user changes the column order? Do I really want them poking around in my Enum code too? I’d usually stop now and decide that if the end user starts screwing with column positions, it’s fair enough that the code should break. However, if I wanted to go the extra mile, I’d have to find the column index by searching for the text in the column headers.

Excel 2007 (and 2003 to an extent) has a feature called Tables, otherwise known as ListObjects.

My code in the main routine changes to:

… and the code in my collection class is:

In the preceding code I created a collection of key-value pairs. The key is the column label, the value is column index. I use that as a lookup when populating my properties.

That’s just a few approaches to reading a table of values into a collection. I’m interested in feedback. How do you map column positions to properties?