The difference between numbers and text is a concept that most Excel beginners don’t grasp. It’s not very intuitive. But to work with computers, you must think like a computer. To a computer, numbers are numbers and strings are strings regardless of what they look like.
How about an example. Let’s say you’re preparing data to fill out a form. Oh, I don’t know, just some random form like a Utah Excise Tax Return. You might have data that looks like this:
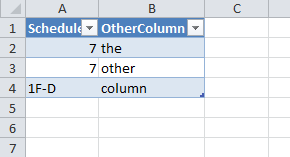
Experienced Excel users will immediately notice that the 7s are right justified, indicating they are numbers, and the 1F-D is left justified, indicating it’s a string. Everything in the Schedule column should be a string. The key test is: Do I perform mathematical operations on it. If so, it should be a number. If not, then it’s simply a label whose characters happen to be digits instead of letters.
Under most circumstances, this doesn’t really matter. Of course there’s no way I could stand to see two types of data in the same column, but normal people would have no problem with it. And the few that would have a problem would just change the alignment without changing the data type. There are, however, at least two situations where it can cause problems: long numbers and leading zeros. If you enter a 16-digit credit card number into Excel, it will truncate the last digit because Excel can only handle 15 digits of precision. If you enter a number like 04712495135 into a cell, the first zero will be gone as soon as you press enter.
The first thing you should do is to format your Table columns with the proper number format. That is, any columns that should be text should be formatted as text so the new entries are automatically considered text. It’s easy enough to do after the fact. And honestly I’m usually creating a table from data that already exists, so I can’t format a ListColumn before it exists. When you already have numbers in a text column, you need to do one extra step before you format (or after, it doesn’t matter the order).
Select the column and choose Text to Columns from the Data tab.
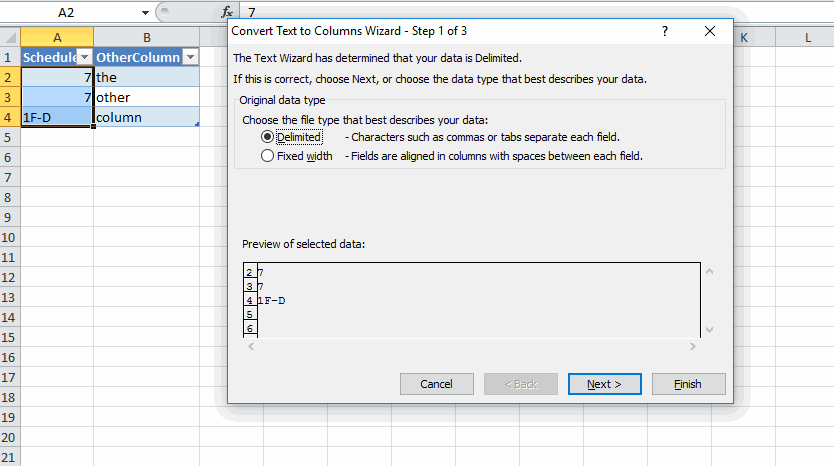
Choose delimited and click Next. Choose a delimiter that doesn’t exist anywhere in the data. I usually keep Tab checked for two reasons: 1) It’s pretty rare to have tabs in a cell and 2) Tab is the default and I’m speeding through this process pretty quickly (Alt+A, E, Alt+N, Alt+N, Alt+T, Alt+F).

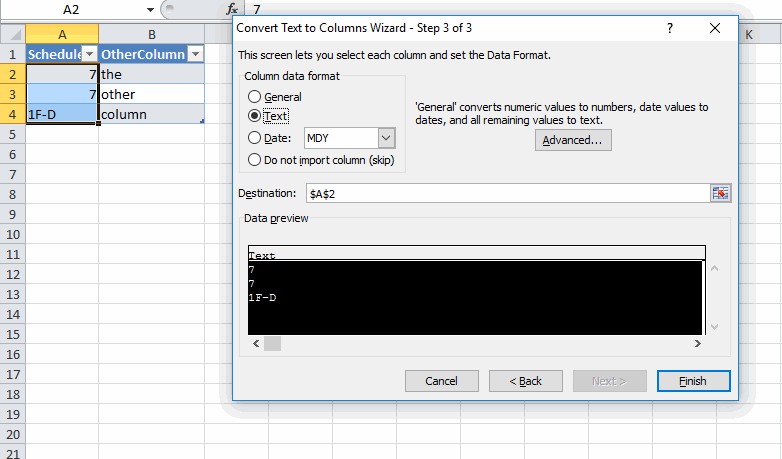
Finally, tell the wizard that the column is Text and click Finish.
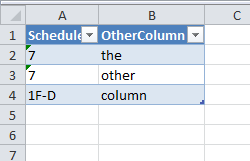
If you did it right (and haven’t changed your Excel options to hide certain errors), you’ll see some green triangles next to the “numbers” indicating that Excel is warning you that you have text that looks suspiciously like numbers.
I’ve been working on an excise tax project lately that requires me to use other peoples workbooks and a lot of exported data. I run these steps several times a day so I decided it was time to automate it.
|
1 2 3 4 5 6 7 8 9 10 11 12 13 14 15 16 17 18 |
Public Sub ConvertColumnToText() Dim lo As ListObject Dim lc As ListColumn gclsAppEvents.AddLog "^+%t", "ConvertColumnToText" Set lo = ActiveCell.ListObject If Not lo Is Nothing Then Set lc = lo.ListColumns(ActiveCell.Column - lo.ListColumns(1).Range.Column + 1) With lc .DataBodyRange.TextToColumns .DataBodyRange, xlDelimited, xlTextQualifierDoubleQuote, False, False, , , , , , Array(1, 2) .DataBodyRange.NumberFormat = "@" End With End If End Sub |
wouldn’t this be sufficient ?
Sub M_snb()
On Error Resume Next
Intersect(ActiveCell.EntireColumn, ActiveCell.ListObject.Range).TextToColumns , 1, , , 0, 0, 0, 0, 0, , Array(1, 2)
End Sub
That 1F-D smells like an export to me.
Otherwise, a useful writeup ….
Yes, that
Intersectis much cleaner and better. I struggled with how to get theListColumnof theActivecell, but I shouldn’t have. The only thing I would change isso as not to include the header or footer.
This will create a second table, but it has the advantage of not needing to use the tedious Text to Columns wizard, and you can store it in an XLSX file, not an XLSM file which some people are suspect of (rightly so.)
Using PowerQuery in Get & Transform you can just refresh the output table whenever you have entered new data. This puts the quotes around the column of numbers connected. My source table only had numbers in one column.
let
Source = Excel.CurrentWorkbook(){[Name=”Table1″]}[Content],
#”Added Custom” = Table.AddColumn(Source, “StringConversion”, each “”””&Text.From([Data])&””””, type text),
#”Removed Columns” = Table.RemoveColumns(#”Added Custom”,{“Data”})
in
#”Removed Columns”
The way I do it (just saved in my personal macro workbook with a keyboard shortcut):