Here’s a nice article Comments are More Important than Code by Jef Raskin on documenting your code.
The thorough use of internal documentation is one of the most-overlooked ways of improving software quality and speeding implementation.
Here’s a nice article Comments are More Important than Code by Jef Raskin on documenting your code.
The thorough use of internal documentation is one of the most-overlooked ways of improving software quality and speeding implementation.
Hi, I’m the dot operator. You may remember me from such VBA statements as object.property and object.method.
Okay, enough of that. When you see a dot operator in a Dim statement, you’re seeing it in the form of library.object. For instance, if you’re automating Outlook, you may use:
Outlook isn’t an object, it’s the name of the library to which you are early binding. MailItem is the name of an object in that library. Another common one is an ADO Recordset:
You don’t need to call out the library for your program to compile, but you may need to for it to run properly. The problem that you may run into is when you dimension a variable as an object that exists in two different libraries. Each library has a priority and if you specify an object from multiple libraries, the object from the library with the highest priority will be used. That’s not a problem if the library you intend to use has the highest priority, but that’s not something you can depend on.
Go to the VBE and Tools > References and you’ll see a Priority label with up and down buttons. You can change the priority of the libraries that are selected. On my wife’s Office 2003 installation, the default libraries in order of priority are:
If I exit the References dialog and open the Object Browser (F2), I also see something called stdole. I have no idea what this is.
In general, I specify the library if it’s not a default library. If you were to examine my code, you would probably find exception after exception to this rule. I should have written that I try to specify non-default libraries. I almost never specify the MSForms library and it’s not default. MSForms gets added when you add a userform. It contains a Textbox object and there’s also a Textbox object in the Excel object library (from the Drawing toolbar, I believe). That’s one that I really should specify.
Jamie recently metioned in a newsgroup post that he sometimes includes the Excel library in his Dim statements. In Excel VBA, this isn’t necessary because Excel is always the highest priority library (unless the user changes it). However, if you want to port your code to VB6 or some other VBA, you will save yourself time by including the Excel library. Unless I specifically intend to port the code, I leave it off. But I think it’s a good point, and it really costs nothing to specify the Excel library. If nothing else, I’d learn what was in the Excel library vs. the VBA library.
EEE#21: Excel User Defined Functions That Incorporate MapPoint Functionality
By David Hager
–Note: Excel 2003 and MapPoint 2004 were used in the development of this technique and its use with other versions has not been tested.–
The integration that Microsoft provides between Excel and MapPoint for importing and exporting data provides a powerful method for visual data analysis. As it turns out, there is another way to obtain information from MapPoint to Excel that is not as well-known.
User-defined functions (UDF) are used in Excel worksheets is the same way that native Excel functions are used. The VBA code for an Excel UDF is written in a standard module in the Excel VBE and called by entering the function in a formula in a worksheet cell. In order to incorporate MapPoint automation in an Excel UDF, open the Visual Basic Environment (VBE) by using the Alt-F11 keys. Then, under Tools|References check the Microsoft MapPoint 11.0 Object Library (North America).
A simple example of an Excel UDF that incorporates MapPoint functionality is shown below.
It is quite rare to find an example where the VBA code for an Excel UDF successfully instantiates an application. In this case, an instance of MapPoint is created with the statement
that allows the Excel UDF access to a valuable source of location information.
The FindResults method works in the same way that the Place/Data tab in the dialog box opened from Edit|Find of the MapPoint main menu does. The Item(1) property returns the best choice based on the available information. As an example, type the following in an Excel worksheet.
A1: Beaumont, Tx
A2: Houston, Tx
A3: =StraightLineDist(A1, A2)
The result returned in cell A3 is 77.11092, which is the number of miles as the crow flies between Beaumont and Houston Texas as calculated by the DistanceTo method.
In order to improve performance of the StraightLineDist function, the statement
can be used in the code to limit function calls to only those times when the input data is changed. It might be also advantageous to set the MapPoint objects to nothing in order to remove them from memory.
The next example returns the distance for a multiple point route and contains an element that is perhaps unique among UDF s.
The iMPType variable is the type of route to be returned:
0 = Travel using the quickest route
1 = Travel using the shortest route
2 = Travel on preferred roads as set in the Preferred Roads dialog box
The ParamArray WPoints() statement allows for an arbitrary number of waypoint function arguments along the route.
By entering the following formula, the distance for the quickest round trip route from Houston is returned (882.89018 miles).
=MPRouteDist(0,A1, A2,A3,A4,A1)
where:
A1: Houston, Tx
A2: Dallas, Tx
A3: San Antonio, Tx
A4: Corpus Christi, Tx
This function actually makes changes on the active MapPoint map (not visible) and a prompt appears asking to save those changes unless the statement
objMap.Saved = True
is included in the code. This writer does not know of another example where an Excel UDF modifies another application. This unusual behavior serendipitously provides a simple way to generate route maps from Excel. If the following formula is entered without the objMap.Saved = True statement in the code, the route map from Houston to Dallas is generated and can be saved. Thus, generation of route maps from MapPoint is now as easy as entering an address in a worksheet cell.
=MPRouteDist(0,A1, A2)
In summary, Excel UDFs provide easy access to the rich store of information in MapPoint and these examples just scratch the surface of what is possible. For example, I have made Excel UDFs that draw geometric shapes around MapPoint locations. This and other challenges are left to the reader.
David Hagar, former Excel MVP, used to distribute an electronic letter called the Excel Experts E-Letter or EEE. Until recently, the last EEE was published in 2001. David recently wrote EEE#21 and it sparked a conversation between JWalk and me.
JWalk currently stores the archives of the EEEs at the Spreadsheet Page. I was trying convince him to give me all the Spreadsheet Page content and used the EEE as an example. It’s great content that isn’t getting much exposure and could be repackaged and republished to a whole new audience. So JWalk sent an email to David on my behalf and I got permission to republish them.
I’ll be starting with #21 later today. Look for more in the coming weeks. And thanks to David and JWalk for making this material available.
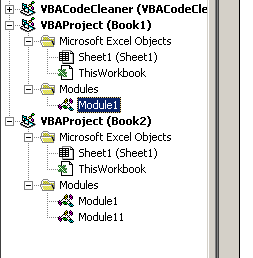
Ross of Methods In Excel fame points out some interesting programming choices by the softies at Microsoft. Start with two VBA Projects each containing Module1. Copy one of the modules to the other project and Excel appends a 1 to the end of the name to ensure it’s unique.
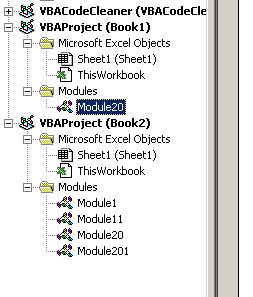
Now change the first Module1 to Module20. Copy that module to other project and then copy it again. The second copy will produce Module201, not Module21 as you might expect.
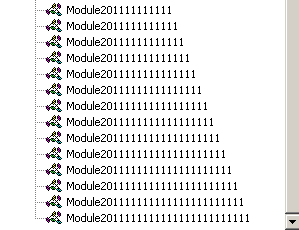
While this certainly isn’t earth shattering, I wonder why they made the choices they did. They have to account for existing sheet names and appending a 1 is certainly one way to do it. But it seems to unnecessarily increase the name of the module which surely will cause problems at some point. It’s not like they’re guaranteed to have a unique name just by appending a 1. They still have to put it in a loop, ala
This loop would be no more complicated by incrementing the existing numerical suffix and it would avoid any module name length issues. Well, it would a little more complicated but not by much. They’re just using the same algorithm here as they do to keep worksheet names unique, and you may be aware that that didn’t work out too well.
They could say, in their defense, that I can do this without a crash
To which I would promptly blame Ross for bringing it up.
I’m trying to make good on one of my New Year’s resolutions. Namely, to stop using so many cell formats and start using more styles. Generally, I’m happy using the styles because I find myself needing the exact same format over-and-over. Or I’ll find that I need to change a certain format and can do it all in one shot. Nice.
I absolutely hate the dialog in Excel, though. It doesn’t fit well with my keyboard-centric dogma. Like any good Excel user, I thought about writing my own style managing utility. But I’ve been burned before. I’d spend a lot of time putting one together, post it here, and the first comment would be “Oh, I have one already and it’s way better than yours.”. And it would be.
This time I thought it would be prudent to see if there’s anything good out there before I set out to write my own. If you use styles and have a utility that makes it easier, leave a comment. Thanks.
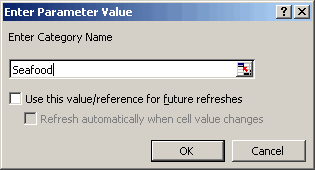
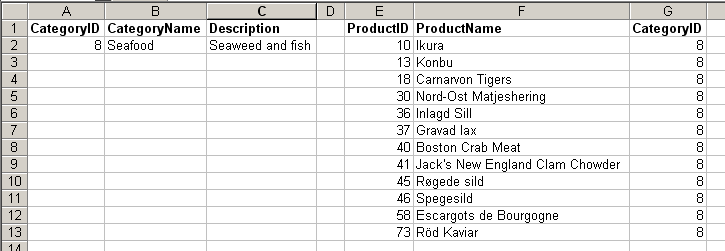
In Parameters in External Data Queries, Nick Hodge shows how to change a query table based on input from a cell. In this example, one parameterized query will be based on another parameterized query. That is, when you change one, they both change.
Start with two query tables on the same worksheet. These two tables are the Categories and Products tables from Northwind.mdb. The Categories query table will have a prompt-type parameter in which a user can enter the desired category name to show the description for that category. The Products query table will have a cell-based parameter that shows all the products for the selected category.

The CommandText properties for these query tables look like
The first query table’s parameter was changed to show a meaningful prompt. The second table’s parameter was changed to point the Category ID cell in the first table.
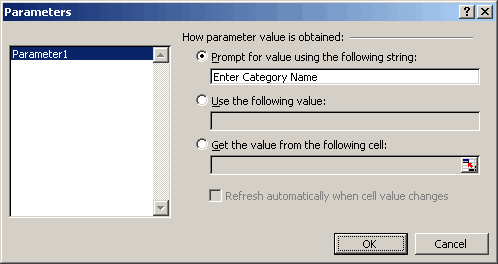

When the first table is refreshed, the user is prompted for a category name. The second table will be refreshed to show all the products for that category automatically.
Hector needs a formula that has me stumped. Of course, there are constraints: You can’t use a UDF and you can’t use any helper columns.
He has a range of values like this:
| A | B | C | D | E | F | |
| 1 | P1 | P2 | P3 | P4 | P5 | |
| 2 | T1 | 13 | 7 | 13 | 1 | 14 |
| 3 | T2 | 10 | 11 | 6 | 13 | 14 |
| 4 | T1 | 9 | 12 | 2 | 15 | 14 |
| 5 | T2 | 14 | 13 | 11 | 13 | 2 |
| 6 | T1 | 11 | 1 | 4 | 15 | 14 |
| 7 | T2 | 8 | 9 | 12 | 1 | 10 |
| 8 | T1 | 6 | 3 | 12 | 10 | 6 |
| 9 | … | |||||
| 10 | P1 | P2 | P3 | P4 | P5 | |
| 11 | T1 | |||||
| 12 | T2 |
Here’s the right answer
| A | B | C | D | E | F | |
| 10 | P1 | P2 | P3 | P4 | P5 | |
| 11 | T1 | 24 | 25 | 25 | 30 | 30 |
| 12 | T2 | 24 | 25 | 26 | 27 | 28 |
The formula is the sum of the two largest values from a range. The range is all the values in the column whose row header is the same as the row header by the formula (col A) AND all columns to the left. Ex: C11 is the sum of B2 and C4 – the two highest values in cols B & C with T1 in the row.
My brain hurts from thinking about this. I convinced myself it could be done, but now I don’t think so.
P.S. Thanks to John and Rob for the css tables.