Navigating and Selecting Cells via the Keyboard

In honor of International Keyboard Shortcut Day, here are some tips for navigating around and selecting ranges via the keyboard.

Arrows
The arrow keys are how you navigate cell-to-cell with your keyboard. Earth shattering revelation, isn’t it?

Ctrl = End
Holding down the

key while using the arrow keys is the same as the

key. For purposes of

, cells are either blank or their not blank. Let’s start with a column of cells with something (anything) in them as in column C below.
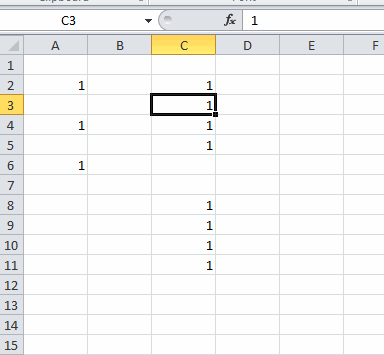
C2:C5 are all filled and are contiguous. C6:C7 are both blank. C8:C11 are filled and contiguous and everything below that is blank.

If you’re on C2 and press

you go to the last cell in the contiguous range, or C5. Similarly, if C3 is selected,

takes you to C5 – the last cell in the contiguous range. Conversely, if you’re in C4 or C5 and press

you go to the top of the contiguous range – C2.

The general rule is this: If you’re on a blank cell, you go to the next cell that’s non-blank (or the end of the spreadsheet). If you’re on a non-blank cell, you go to the cell just before the next blank cell (like going from C3 to C5 described above). If you’re on a non-blank cell and the next cell in the direction you’re heading is blank (ex: C5 and you’re going down (C6 is blank)), then you’ll go to the next non-blank cell (ex: C5 down to C8).

It works the same in Column A. If you’re in A1, A3, or A5,

takes you to the cell below it (the next non-blank cell). If you’re in A2 or A4, you go to the next non-blank cell because you’re in a non-blank cell and the next cell is blank.

The reality is that you really don’t need to know all that. Just hit

until you get to the right neighborhood, then use the arrow keys with

to hone in your target.

Extending the Selection

The

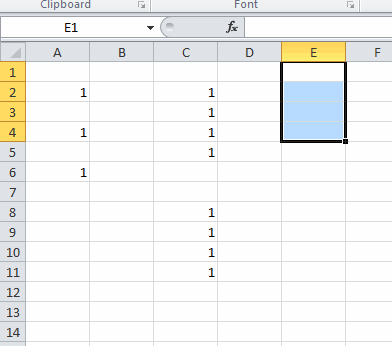
key is used to extend the selection. If, for example, you’re in E1 and you hold the

key while arrowing down, the selected range becomes E1:E2, E1:E3, E1:E4, etc. In the below screenshot, cell E1 was selected. The

key was held down and the down arrow was pressed three times.
Now you can combine

and

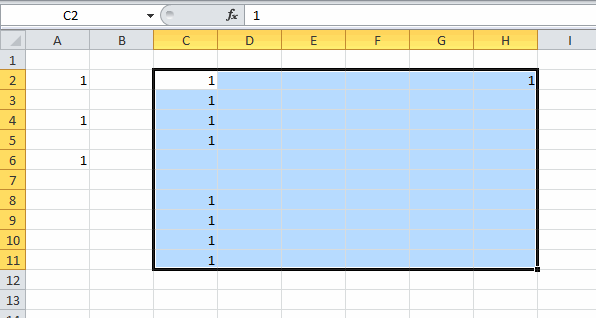
to select large ranges quickly. The following keystrokes selected the range you see below, staring in C2: Hold down

and press

.

Happy keyboarding.

International Keyboard Shortcut Day


Did you know that International Keyboard Shortcut Day is the first Wednesday in November? Considering I just made that up, I’ll bet you didn’t. But I hereby proclaim it so.

Mission
IKSD was created to spread awareness that you can become more efficient by knowing and practicing keyboard shortcuts.

How to Celebrate
From 2:30PM to 3:30PM your local time on the first Wednesday in November, don’t use your mouse for any computer activity. There are three levels of participation:

Novice: You’re intrigued by the promise of efficiency, but skeptical the investment will pay off. To observe the day, you’ll move your mouse to the opposite side of your keyboard for that one hour.

Journeyman: You’ve already learned quite a few shortcuts and you just need the discipline to apply them. To observe the day, you’ll use the keyboard in every program except in your browser for that one hour.

Fanatic: You don’t need any convincing that this is the greatest thing since electronic spreadsheets. To observe the day, you will disconnect your mouse for that one hour.

History
I thought of this on my way to work this morning when I (finally) started listening to Chandoo’s shortcut podcast.

Committing to one hour of keyboard only computing is an investment. As with any investment, there will be costs up front. This will be the most unproductive hour of your year. Everything will take longer than it should as you struggle to find the keyboard way of doing things. But it will pay off. During that hour you will learn one shortcut that will stick and it will pay dividends for rest of your life.

Don’t forget to tell your friends.

Autohotkey for WordPress Blogs

I’ve added some autohotkey dealies for when I’m writing blog posts. If you’re blog isn’t about Excel and/or doesn’t use the CodeColorer plugin, they won’t be of much use to you.

The first one expands brackets so I can paste in VB code. The second does the same but for inline vb code.

The third and fourth take common abbreviations and expand those so the definition appears when you hover over them. More of those to come, I’ll bet.

Awesome.

More AutoHotkey Sugar

Ken Puls, the Excel Guru, sent me some nice AHK stuff and I’m trying to put a post together to share it with you. But it’s not happening so far. In the mean time, I didn’t want you to have to wait for these gems that I’ve been enjoying.

Definition and Last Position in the VBE

If you right click on a procedure call in the VBE and choose Definition, it takes you to that procedure. If you then right click and choose Last Position, it takes you back. If you’re like me, the thought of right clicking is abhorrent to you. Instead, I use the context menu key, but alas there’s a problem. It takes a few microseconds for that menu to show up. So while I press menu+D, all I’m really doing is inserting the letter ‘d’ in my procedure call.

As any good keyboard hound knows, you can use Shift+F2 and Ctrl+Shift+F2 to accomplish the task without the context menu delay. That’s great except that my sausage fingers don’t bend that way. Shift+F2 isn’t bad, but Ctrl+Shift+F2 is too much work for something I use as much as this. Without further ado

^d::
Send +{F2}
Return
^l::
Send ^+{F2}
Return

Now Ctrl+D gives me the definition and Ctrl+L takes me back. Sometimes hotkeys take a little getting used to. It’s easy to forget they’re there. This one, however, took about five seconds to become a natural part of my VBE workflow.

Switching tabs in Access

There’s so much about Access that isn’t keyboard friendly that it sickens me. But the worst is switching tabs. Ctrl+F6 cycles forward through the tabs and Ctrl+Shift+F6 cycles backward. Never you mind that Ctrl+Tab does that job in every other Windows program every released. Ever.

#IfWinActive ahk_class OMain
^Tab::
Send ^{F6}
Return
^+Tab::
Send ^+{F6}
Return

AHK’d!

Changing Field Size in Access

Speaking of crappy Access keyboarding, how about changing the field properties as you create a table? Sucks, huh? Here’s the scenario: I’m entering a field and changing the Data Type to Number. If I want a Long Integer, I’m good because that’s the default. If I want a Double, however, I have to press F6 to get to the Field Properties and change the field size to Double. Then, instead of Shift+F6 to back, I have to F6 five times to cycle through all of the windows/panes/screen areas. That’s just stupid. So

+F6::
Send {F6 5}
Return

That works for me because I don’t vary my Access window. If you hide your Navigation pane, or have some other configuration than me, you might have to change that 5 to something else.

Windows APIs

Ken has a nifty API generator that I’ll be posting about later. While mine is a little more pedestrian, I think it offers some advantages. I have a separate hotstring for every API that I care about. Here’s one

::declaregetopenfilename::
SendInput !to!i{Enter}
(
+3If VBA7 Then
Public Declare PtrSafe Function GetOpenFileName Lib "comdlg32.dll" Alias _
"GetOpenFileNameA" (pOpenfilename As OPENFILENAME) As Long

Public Type OPENFILENAME
lStructSize As Long
hwndOwner As LongPtr
hInstance As LongPtr
lpstrFilter As String
lpstrCustomFilter As String
nMaxCustFilter As Long
nFilterIndex As Long
lpstrFile As String
nMaxFile As Long
lpstrFileTitle As String
nMaxFileTitle As Long
lpstrInitialDir As String
lpstrTitle As String
flags As Long
nFileOffset As Integer
nFileExtension As Integer
lpstrDefExt As String
lCustData As Long
lpfnHook As LongPtr
lpTemplateName As String
End Type

+3Else

Public Declare Function GetOpenFileName Lib "comdlg32.dll" Alias _
"GetOpenFileNameA" (pOpenfilename As OPENFILENAME) As Long

Public Type OPENFILENAME
lStructSize As Long
hwndOwner As Long
hInstance As Long
lpstrFilter As String
lpstrCustomFilter As String
nMaxCustFilter As Long
nFilterIndex As Long
lpstrFile As String
nMaxFile As Long
lpstrFileTitle As String
nMaxFileTitle As Long
lpstrInitialDir As String
lpstrTitle As String
flags As Long
nFileOffset As Integer
nFileExtension As Integer
lpstrDefExt As String
lCustData As Long
lpfnHook As Long
lpTemplateName As String
End Type
+3End If
)
SendInput !to!i{Enter}

That’s a big one. I type declaregetopenfilename in a module and this little honey appears. One of the advantages of this method, verbose though it is, is that the API is mostly intact in the AHK file. That makes it really easy to edit if the need were to arise. Making a new API hotstring is as easy as setting up declareapiname, pasting Jan Karel’s code, and changing a few things.

The first thing you have to change is the # signs have to be change to +3 or they won’t come across. The other thing is a little more subtle. Did you notice that I send Alt+TO, Alt+I, Enter before and after the API stuff? That turns off, then back on, the Auto Indent feature in the VBE. AHK sees all these tabs in my string and it dutifully returns them. That means that every line is indented one too many times from the line above it. Cumulatively. By the time you get to the last line, there’s 30 tabs in there.

By turning Auto Indent off and back on, I can keep my API looking clean in the AHK file, which I like.

Updating the For Next AutoHotkey in the VBE

Last month I posted about some AHK scripts I was starting to use to make the VBE a little less gross every day. There were some awesome comments. I took Hubisan’s comment and ran with it through a few iterations. First, let’s go to the video.

I use a program called CamStudio. For some reason it’s blurry for the first 30 seconds. I really need to get Techsmith’s Camtasia. But it gets the point across for now.

I’m seriously digging the AHK stuff. Here’s the script:

I put in comments so hopefully you can follow along. All I’ve done is copy Hubisan’s code, so if I took something nice and made it total crap it’s because I don’t know what I’m doing.

Bob Phillips made a good point in the last post about how he doesn’t prefer the automation. The automation gets in the way sometimes and typing the code slows things down so you can use your brain a little more. Good points, I thought, but I still like the automation. I can relate to the point that it gets in the way sometimes. In a previous iteration, I would type For i and it would put Next i, plus a blank line, plus a tab. That means when I’m done with the For statement, I have to arrow down. I don’t want to arrow down. I want to hit enter, then tab. So I made the automation fit the way I want to work and now I’m very happy with it.

Adding a New Worksheet to the End of the Workbook

I can think of five ways to add a new worksheet to a workbook. There may be more, but I can only think of five.

  1. Alt + i + w – this is the way I do it now. I’m trying to get away from the 2003 keyboard shortcuts, but this one remains.
  2. Alt + h + i + s – this is what I should be using because it’s on the Ribbon, but it’s also one extra key.
  3. Click the Insert Worksheet “tab” to the right of all the real sheets.
  4. Use the Shift + F11 keyboard shortcut for the Insert Worksheet “tab” that inexplicably behaves differently than clicking the tab.
  5. Right clicking on a sheet tab and choosing Insert… and going through the dialog box.

Only one of these five methods inserts the worksheet to the right of the active sheet, kind of. #3, the mouse only one, inserts a worksheet at the end of all sheets. All the other methods, including Shift + F11, insert a worksheet to the left of the active worksheet. I’m not much of a clicky guy as you know, preferring the keyboard. But sometimes I want the new worksheet to be at the end. So what’s a guy to do? Acquiesce and reach for the mouse? I don’t think so.

I have an add-in called UIHelpers.xlam. In that add-in is a CAppEvents class for controlling application level events. One event that I’m now using is the Application_WorkbookNewSheet event. It listens for when a new sheet is added to any workbook.

If the new sheet is the penultimate sheet, move it to the end. When I’m on the last sheet and insert a new sheet, more often than not I want the new sheet to be to the right. There are a few times when that’s not true and I’ll have to move them. But this will cut down on manually moving worksheets significantly.

AutoHotkey in the VBE

I downloaded AutoHotkey recently for something not Excel related. Well, it was kind of Excel related so I guess I’ll tell the story. I’ve been using the Save As feature of my Kwik Open add-in and really enjoying the lack of folder navigation. But it has sewn the seeds of discontent. When I’m doing a Save As in other programs, like a PDF viewer, I don’t get the keyboard love. I got AHK so I could quickly jump to some of my favorite folders without leaving the keyboard.

But then I got to thinking about other ways I could use this tool. One of my pet peeves about the Visual Basic Editor (and there are many) is that typing “endif” will auto-expand to “End If”, but typing “endwith” just sits there like an insolent child. I thought maybe I could fix that with AHK. And I could. But that wasn’t enough. Check out these two AHK scripts I wrote.

#IfWinActive ahk_class wndclass_desked_gsk
::with::With{Enter}End With{Enter}{up 2}{end}
:*:thenn::Then{Enter}{Enter}End If{Enter}{up 2}t

The first line tells it to only work in the VBE window and it comes with a windows spy utility to find out the ahk_class of whatever window you like. The second line monitors for when you type the word “with”. When you do that, it replaces it with With and End With – even better than expanding endwith. Then it moves the cursor back up to the With line so you can continue coding. If you type “with” inside a comment, it’s trouble. So that’s something to work on.

The third line looks for when you type “then” and press Enter. It replaces it with an If block and puts the cursor in the middle, ready for more code.

Watch the video to see it in action. I’m not sure why the video is blurry at the start nor do I know how to fix it.

As you might guess, I’m going to love this.