Aaron Blood over at XL-Logic has some interesting challenges. One of them caught my eye, and here’s my stab at it.
It’s the ‘Advanced Range Detection‘.
What Aaron has to say:
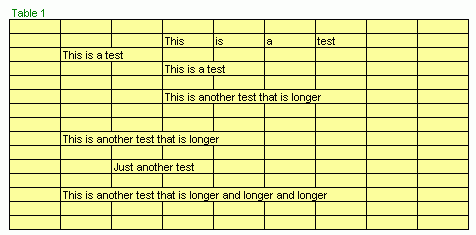
I want to process the above range (Table 1) with a macro so all the text is highlighted. Easy enough right?
So I create a macro to find the text cells and change the background color to green.
…
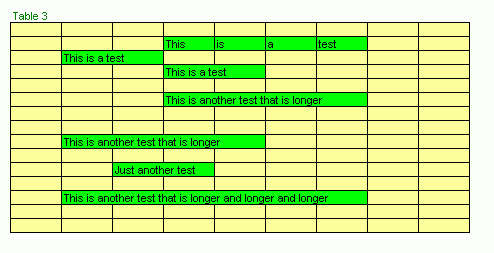
The problem is, in Table 2 above, I want the green background applied to the entire sentenceu or at least just the cells the that the sentence carries into. The challenge is to create a macro that can do the highlighting so it appears like Table 3 below. Good Luck!
You can download the file here.
Here’s what my code produces:

Note: I wrote and tested the code in Excel 2003. It should work ok in 2000 and XP, but I’m not sure about the way those two versions handle the pixel count at the left of each cell, so the end result may vary from the image. However, there’s a TOLERANCE constant that may be adjusted, as well as a version specific function that can be modified to account for the difference between them.
Have any comments on the code ? improvements ? other ways to attack this problem ? I’d like to hear them. For example, I showed the file to Stephen Bullen to ask him about one thing, and he suggested a different approach using a userform and a label (which produces a slight different result on the measure of the string… not sure why though…), but avoids all the API calls that my code uses.
I was about to suggest GetTextExtentPoint32 but it appears you’re already using it.
I dont think you’re going to get an elegant solution to this one.
The only other way I can think of right now would be to save the column width, “autofit” the column, save the new width then restore.
PS. appears your link is relative – needs to have the http bit at the beginning.
link to download
All these different text elements are inconsistent. Since the charting object model has no .width and .height property on many of a chart’s text elements, I’ve tried various approaches that put the text into some container, including a plain text box, a worksheet cell, a textbox on a user form, and then measure the container. None of the methods are particularly close.
The best technique is Andy Pope’s: Move the text element all the way to the right of the chart (chart.charttitle.left = chart.chartarea.width), then subtract its new .left position (and the .left property of the chartarea) from the chartarea.width. Same approach for the height of the text element.
This hardly helps with the problem at hand, though.
This is what I came up with when I saw Aaron’s challenge eariler this year.
It uses a similar approach to that which Stephen suggested. A textbox on the worksheet rather than a userform and label.
Sub AdvancedRangeDetection()
Dim shpTester As Shape
Application.ScreenUpdating = False
Set shpTester = ActiveSheet.Shapes.AddTextbox(msoTextOrientationHorizontal, 1, 1, 2, 2)
‘ HiliteTable Range(“B5:J19?), shpTester
HiliteTable Range(“A1:G23?), shpTester
shpTester.Delete
Set shpTester = Nothing
Application.ScreenUpdating = True
End Sub
Sub HiliteTable(rngTable As Range, Tester As Shape)
Dim rngTemp As Range
For Each rngTemp In rngTable
If rngTemp.Text “” Then
With Tester
.Left = rngTemp.Left
.Top = rngTemp.Top
.Width = rngTable.Width
With .TextFrame
.MarginBottom = 0
.MarginLeft = 0
.MarginRight = 0
.MarginTop = 0
With .Characters
With .Font
.Name = rngTemp.Font.Name
.Size = rngTemp.Font.Size
.Bold = rngTemp.Font.Bold
.Italic = rngTemp.Font.Italic
End With
.Text = rngTemp.Text
End With
.AutoSize = True
.AutoSize = False
End With
.Height = rngTemp.Height – 1
Range(.TopLeftCell.Address & “:” & .BottomRightCell.Address).Interior.ColorIndex = 4
End With
End If
Next
End Sub
I was not aware of Andy’s routine but I also have macros to format adjacent cells, both using the column auto width and textbox. My textbox method looks similar to Andy’s, though it also caters for mixed font formats in differenct characters, cell indents (roughly!), and wrapped/shrink. It doesn’t cater for cell padding which appears to vary between versions.
Following is a simplified version to format a “Selection” using textbox method. Normally would give user various options, such as clear / not clear existing Fills. It only formats text cells. Does not format non empty adjacent cells (‘cos text won’t run into these).
Option Explicit
Sub FillLongText()
Dim bMixed As Boolean
Dim c As Long, i As Long
Dim wd As Single
Dim w As Single
Dim idntSpace As Single
Dim vA(0 To 8)
Dim rng As Range, cel As Range
Dim tb As Shape
Dim sty As Font
Set rng = Selection
‘reset colour of all cells that are #36
‘normally a separate user request to do this
For Each cel In Selection
If cel.Interior.ColorIndex = 36 Then
cel.Interior.ColorIndex = xlNone
End If
Next
On Error Resume Next
‘text cells only
Set rng = rng.SpecialCells(xlCellTypeConstants, 2)
On Error GoTo 0
If rng Is Nothing Then Exit Sub
Set tb = ActiveSheet.Shapes.AddTextbox(1, 10#, 10#, 10#, 50#)
tb.Visible = False
tb.Line.Weight = 0#
With tb.TextFrame
.AutoSize = True ” important
.AutoMargins = False
.MarginLeft = 0#
.MarginRight = 0#
End With
Set sty = ActiveWorkbook.Styles(“Normal”).Font
With tb.TextFrame
.Characters.Text = “11111111111111111111111?
.Characters.Font.Name = sty.Name
.Characters.Font.Size = sty.Size
.Characters.Font.FontStyle = “Regular”
End With
“approx’ way to get width of a single indent
“(must be better way!)
idntSpace = (tb.Width / 15)
For Each cel In rng
c = 0
With cel
vA(0) = CStr(.Value)
With .Font
vA(1) = .Name
vA(2) = .Size
vA(3) = .Bold
vA(4) = .Superscript
vA(5) = .Subscript
vA(6) = .Italic
End With
vA(7) = .IndentLevel * idntSpace
” if following true will only format this cell
vA(8) = .WrapText Or .ShrinkToFit Or Len(cel(1, 2))
End With
If Len(vA(0)) = 0 Then
c = 0
ElseIf vA(8) Then
c = 1
Else
With tb.TextFrame.Characters.Font
.Name = vA(1)
.Size = vA(2)
.Bold = vA(3)
.Italic = vA(6)
.Superscript = vA(4)
.Subscript = vA(5)
End With
tb.TextFrame.Characters.Text = vA(0)
bMixed = False
For i = 1 To 6
If IsNull(vA(i)) Then bMixed = True
Next
If bMixed Then
‘if any Mixed font formats set each character
For i = 1 To Len(vA(0))
With tb.TextFrame.Characters(i, 1).Font
.Name = cel.Characters(i, 1).Font.Name
.Size = cel.Characters(i, 1).Font.Size
.Bold = cel.Characters(i, 1).Font.Bold
.Italic = cel.Characters(i, 1).Font.Italic
.Superscript = _
cel.Characters(i, 1).Font.Superscript
.Subscript = cel.Characters(i, 1).Font.Subscript
End With
Next
End If
wd = tb.Width + vA(7)
w = cel.Width
c = 1
Do While w
Theare appears to be a limit on the amount of code that can be posted! Here’s the rest:
But first
Dim vA(0 To smily
should read
dim vA(zero to eight)
wd = tb.Width + vA(7)
w = cel.Width
c = 1
Do While w
must be a problem with the lessEqual sign causing termination of post. If following does not reach
“End Sub” I give up!
Do While w lessEqual wd
c = c + 1
If Len(cel(1, c)) Then
”something already in this cell
c = c – 1
Exit Do
Else
w = w + cel(1, c).Width
End If
Loop
End If
If c Then cel.Resize(1, c).Interior.ColorIndex = 36
Next
tb.Delete
Set tb = Nothing
End Sub
Pink Floyd
Advanced Range Detection