Creating and deploying Managed COM add-ins with VB.NET 2005 – Part V

Creating and deploying Managed COM add-ins with VB.NET 2005 – Part V
This is the fifth post on the subject and You can find the earlier post at the following links:
Part I – Introduction
Part II – Connection
Part III – Notes Tool -Workbooks
Part IV – Notes Tool – Worksheets

For all code posted here I have intentionally tried to avoid a) the core .NET-approach and b) the use of classes. Instead I have tried to focus on clarity and to use a simple classic VB/VBA -approach.

Notes Tool – The Functions
Below is all the functions and subs that are in a standard module (Notes.vb).

‘Namespaces used in the module:
Imports Domino ‘To access the objects in the Domino class.
Imports Excel = Microsoft.Office.Interop.Excel ‘To access Excel’s objects.
Imports System.Windows.Forms ‘To use the Messagebox objects.
Imports System.IO ‘To handle files.
Imports System.Diagnostics ‘Open URL and show helpfile (.CHM)

Module NotesMod
    ‘Friend makes the variables available for the whole project.
   Friend Const g_CONST_TITLE As String = “Send e-mail with Lotus Notes”
    ‘Excel variables.
   Friend g_xlApp As Excel.Application
    Friend g_xlRng As Excel.Range
    Friend g_xlcell As Excel.Range
    Friend g_xlwsSheet As Excel.Worksheet
    Friend g_xlwbBook As Excel.Workbook

    Sub Show_Help()
        ‘Show the helpfile.
       Process.Start(My.Application.Info.DirectoryPath & “Notes_Tool.chm”)
    End Sub

    Sub Visit_Link()
        ‘Visit my english site.
       Process.Start(“http://www.excelkb.com”)
    End Sub

    ‘Function to add the selected worksheets to a new workbook.
   Function Create_Save_Workbook(ByVal stBook As String, _
                                  ByVal stName As String, _
                                  ByVal alSheets As ArrayList) As Boolean
        Dim stSheetItem As String
        ‘If the file already exist then delete the file.
       If File.Exists(stName) = True Then File.Delete(stName)
        ‘Prevent the screen from flickering and surpress the message when deleting the worksheet.
       With g_xlApp
            .ScreenUpdating = False
            .DisplayAlerts = False
        End With
        ‘Add a new workbook with only one worksheet.
       Dim xlNewBook As Excel.Workbook = g_xlApp.Workbooks.Add( _
                                          Excel.XlWBATemplate.xlWBATWorksheet)
        ‘Grab the selected workbook from the form.
       g_xlwbBook = CType(g_xlApp.Workbooks(stBook), Excel.Workbook)
        ‘Copy the worksheets to the new workbook.
       For Each stSheetItem In alSheets
            If Not (g_xlwsSheet Is Nothing) Then g_xlwsSheet = Nothing
            g_xlwsSheet = CType(g_xlwbBook.Worksheets(stSheetItem.ToString), Excel.Worksheet)
            g_xlwsSheet.Copy(After:=xlNewBook.Worksheets(1))
        Next stSheetItem
        ‘Delete the first worksheet in the new workbook.
       If Not (g_xlwsSheet Is Nothing) Then g_xlwsSheet = Nothing
        g_xlwsSheet = CType(xlNewBook.Worksheets(1), Excel.Worksheet)
        g_xlwsSheet.Delete()
        ‘Save the created workbook.
       xlNewBook.Close(SaveChanges:=True, Filename:=stName)
        ‘Make objects available for the Garbish Collector.
       If Not (g_xlwsSheet Is Nothing) Then g_xlwsSheet = Nothing
        If Not (xlNewBook Is Nothing) Then xlNewBook = Nothing
        If Not (g_xlwbBook Is Nothing) Then g_xlwbBook = Nothing
        ‘Restore settings.
       With g_xlApp
            .DisplayAlerts = True
            .ScreenUpdating = True
        End With
        ‘Set the status for the function to the calling sub.
       Create_Save_Workbook = True
    End Function

    ‘Function to create e-mail, add attachments and send.
   Function Create_Email_Notes(ByVal stPriority As String, _
                                ByVal stSubject As String, _
                                ByVal oSendTo As Object, _
                                ByVal oSendCopy As Object, _
                                ByVal stMessage As String, _
                                ByVal bFlag As Boolean, _
                                Optional ByVal stFile As String = “”, _
                                Optional ByVal oFiles As Object = “”) As Boolean
        ‘Create and instantiate the Lotus Notes session.
       Dim notSession As New Domino.NotesSessionClass
        CType(notSession, Domino.NotesSession).Initialize(“”)
        ‘Open the local mail database.
       Dim notMailDb As Domino.NotesDatabase = _
        CType(notSession, Domino.NotesSessionClass).GetDbDirectory(“”).OpenMailDatabase
        ‘Grab the profile that holds the signature which will be added to the outgoing e-mail.
       Dim notProfile As Domino.NotesDocument =  _
       CType(notMailDb.GetProfileDocument(“CalendarProfile”), Domino.NotesDocument)
        ‘Grab the signature, which only can be done with signatures in plain text.
       Dim stSignature As String = CStr(notProfile.GetFirstItem(“Signature”).Text)
        ‘Create the outgoing e-mail.
       Dim notDoc As Domino.NotesDocument = _
        CType(notMailDb.CreateDocument, Domino.NotesDocument)
        ‘Create the body space in the outgoing e-mail.
       Dim notItem As Domino.NotesRichTextItem = _
        CType(notDoc.CreateRichTextItem(“Body”), Domino.NotesRichTextItem)
        ‘Create the attachment space in the outgoing e-mail.
       Dim notAttach As Domino.NotesRichTextItem = _
        CType(notDoc.CreateRichTextItem(“STFILE”), Domino.NotesRichTextItem)
        ‘Declare the variable for attached file(s).
       Dim notEmbedded As Domino.NotesEmbeddedObject

        If bFlag Then
            ‘Add the created Excel file as attachment to the outgoing e-mail.
           notEmbedded =   _
            CType(notAttach.EmbedObject(EMBED_TYPE.EMBED_ATTACHMENT, _
            “”, stFile), Domino.NotesEmbeddedObject)
        Else
            ‘Add the selected Excel files as attachments to the outgoing e-mail.
           Dim oItem As Object
            For Each oItem In CType(oFiles, Array)
                notEmbedded =   _
               CType(notAttach.EmbedObject(EMBED_TYPE.EMBED_ATTACHMENT, _
                “”, CStr(oItem)), Domino.NotesEmbeddedObject)
            Next
        End If
        Try
            ‘Populate the outgoing e-mail’s main properties.
           With notDoc
                .AppendItemValue(“Form”, “Memo”)
                .AppendItemValue(“Subject”, stSubject)
                .AppendItemValue(“SendTo”, oSendTo)
                .AppendItemValue(“CopyTo”, oSendCopy)
                .AppendItemValue(“DeliveryPriority”, stPriority)
                With notItem
                    .AppendText(stMessage & vbCrLf & vbCrLf)
                    .AppendText(stSignature & vbCrLf & vbCrLf)
                End With
                .SaveMessageOnSend = True
                .Send(True, “”)
            End With
            ‘Set the status for the function to the calling sub.
           Create_Email_Notes = True
        Catch ex As Exception
            MessageBox.Show(ex.ToString)
            ‘Set the status for the function to the calling sub.
           Create_Email_Notes = False
        Finally
            ‘Place variables to be handled by the Garbage Collector (GC).
           notEmbedded = Nothing
            notAttach = Nothing
            notItem = Nothing
            notProfile = Nothing
            notDoc = Nothing
            notMailDb = Nothing
            notSession = Nothing
        End Try
    End Function
End Module

I’m not a person that get excited over code but I must admit that I’m pleased to have managed to get a workable solution with early binding to the Domino Class on the .NET platform. As far as I can see it shouldn’t be a problem to convert it to a classic VB function.

In the next post I will discuss ‘shimming’ managed COM add-ins and some important technical aspects.

Kind regards,
Dennis
Creating and deploying Managed COM add-ins with VB.NET 2005 – Part IV

Creating and deploying Managed COM add-ins with VB.NET 2005 – Part IV
This is the fourth post on the subject and You can find the earlier post at the following links:
Part I – Introduction
Part II – Connection
Part III – Notes Tool -Workbooks

For all code posted here I have intentionally tried to avoid a) the core .NET-approach and b) the use of classes. Instead I have tried to focus on clarity and to use a simple classic VB/VBA -approach.

The Notes Tool – Handle worksheets
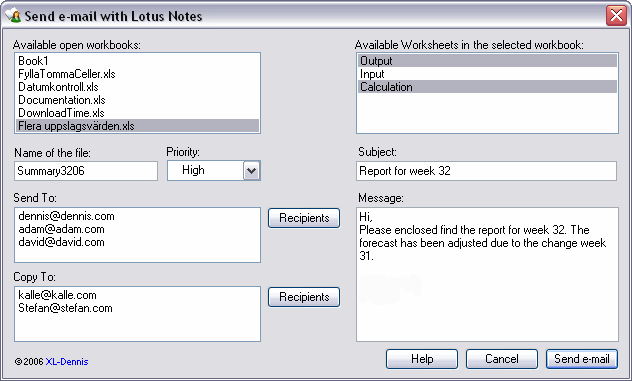
The way the tool handles worksheets is similar to how it handles workbooks. Therefore only code behind the form that is unique for worksheets is presented. Below is the form that that provides end users with an interface to populate required parameters:

Notes Worksheets

The code
Make sure that the following namespaces exist in the form:

Imports Excel = Microsoft.Office.Interop.Excel
Imports System.Windows.Forms
Imports System.IO ‘To handle files.

The following snippet code is part of the Load event for the form:

            ‘Populate the listbox of open workbooks.
           For Each g_xlwbBook In g_xlApp.Workbooks
                Me.ListBox_Workbooks.Items.Add(g_xlwbBook.Name)
            Next

The below event is used to populate the list of worksheets:

Private Sub ListBox_Workbooks_SelectedIndexChanged(ByVal sender As System.Object, ByVal e As System.EventArgs) Handles ListBox_Workbooks.SelectedIndexChanged
        Try
            ‘Clear the list.
           Me.ListBox_Worksheets.Items.Clear()
            ‘The selected workbook.
           g_xlwbBook = _
            g_xlApp.Workbooks( _
            Me.ListBox_Workbooks.SelectedItem.ToString())
            ‘Populate the list of worksheets.
           For Each g_xlwsSheet In g_xlwbBook.Worksheets
                Me.ListBox_Worksheets.Items.Add(g_xlwsSheet.Name.ToString)
            Next
        Catch ex As Exception
            MessageBox.Show(ex.Message, g_CONST_TITLE)
        Finally
            If Not (g_xlwsSheet Is Nothing) Then g_xlwsSheet = Nothing
            If Not (g_xlwbBook Is Nothing) Then g_xlwbBook = Nothing
        End Try
    End Sub

The following code makes sure that only letters and numbers are used for the wanted filename:

Private Sub TextBox_TextFile_KeyPress(ByVal sender As Object, ByVal e As System.Windows.Forms.KeyPressEventArgs) Handles TextBox_TextFile.KeyPress
        If Not Char.IsLetterOrDigit(e.KeyChar) Then
            e.Handled = True
        End If
End Sub

Below is a snippet code for the Send e-mail Button:

       Try
            ‘Subfolder to store created attached workbooks.
           Const stFolder As String = “c:LotusAttachments”
            ‘Check if the subfolder exists or not. If not then create it.
           If Not (Directory.Exists(stFolder)) Then
                Directory.CreateDirectory(stFolder)
            End If
            ‘The With statement is considered to be a good practice
           ‘however here it’s not possible to use it for the Me-object.
           ‘Retrieve the subject for the e-mail.
           Dim stSubject As String = Me.TextBox_Subject.Text
            ‘Retrieve the message of the e-mail.
           Dim stMsg As String = Me.TextBox_Message.Text
            ‘Retrieve the priority of the e-mail.
           Dim stPriority As String = LTrim(Me.ComboBoxPriority.Text)
            ‘Retrieve the wanted name of the file to be created and add the path.
           Dim stFileName As String = stFolder & “” & _
                                       Me.TextBox_TextFile.Text & “.xls”
            ‘Retrieve selected workbook’s name.
           Dim stwbBook As String = Me.ListBox_Workbooks.SelectedItem.ToString
            ‘Grab the list of selected worksheets.
           Dim alWsheets As New ArrayList
            alWsheets.AddRange(CType(Me.ListBox_Worksheets.SelectedItems, ICollection))
            ‘Grab the list of recipients of Send To.
           Dim oSendTo(Me.ListBox_SendTo.Items.Count – 1) As Object
            Me.ListBox_SendTo.Items.CopyTo(oSendTo, 0)
            ‘Grab the list of recipients of Copy To.
           Dim oCopyTo(Me.ListBox_CopyTo.Items.Count – 1) As Object
            Me.ListBox_CopyTo.Items.CopyTo(oCopyTo, 0)
            ‘Call a function in a standardmodule to create and save the workbook.
           If Create_Save_Workbook( _
            stwbBook, stFileName, alWsheets) = True Then
                ‘Call a function in a standardmodule to reate and send the e-mail.
               If Create_Email_Notes( stPriority, stSubject, oSendTo, _
                oCopyTo, stMsg, True, stFileName) = True Then _
                    MessageBox.Show _
                     (“The e-mail was successfully created and has been sent.”, _
                    g_CONST_TITLE, MessageBoxButtons.OK)
            End If
        Catch ex As Exception
            MessageBox.Show(ex.Message, g_CONST_TITLE)
        Finally
            Me.Close()
        End Try

In the next post the functions etc in the standard module are presented which ends the presentation of the Notes Tool.

Kind regards,
Dennis

Creating and deploying Managed COM add-ins with VB.NET 2005 – Part III

Creating and deploying Managed COM add-ins with VB.NET 2005 – Part III

This is the third post on the subject and You can find the earlier post at the following links:
Part I – Introduction
Part II – Connecting

For all code posted here I have intentionally tried to avoid a) the core .NET-approach and b) the use of classes. Instead I have tried to focus on clarity and to use a simple classic VB/VBA -approach.

The Notes Tool – Handle workbooks
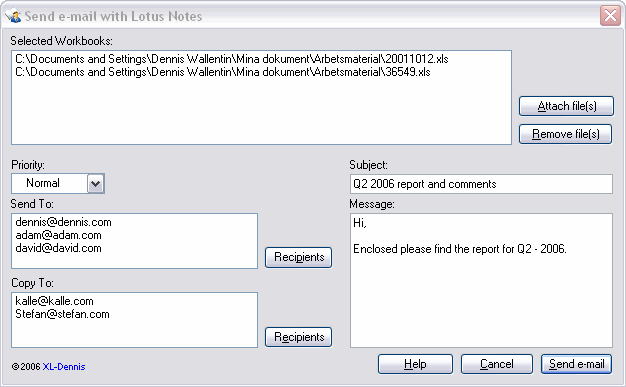
With this post I will start to cover the tool itself which target on sending workbooks or worksheets as attachments to outgoing e-mails with Lotus Notes. The first option is to send workbooks as attachments and below is the form that provides end users with an interface to populate required parameters:

Notes Workbooks

The code
The following code is part of the above form where only the most vital parts are showed.

‘The following namesspaces are required for the code behind the form.
Imports Excel = Microsoft.Office.Interop.Excel
Imports System.Windows.Forms

When the form is initialized the following procedure populates some items of the form:

Private Sub frmwbook_Load(ByVal sender As System.Object, ByVal e As System.EventArgs) Handles MyBase.Load
        Try
            ‘Create the collection of items for the priority status.
           ‘I have not discovered any smooth way to align items in a combobox…
           Dim Priority() As String = _
                            New String() {”    Low”, ”    Normal”,  ”    High”}
            With Me.ComboBoxPriority
                ‘Populate the combobox with the collection.
               .Items.AddRange(Priority)
                ‘Select ‘Normal’ as default value.
               .SelectedIndex = 1
            End With
            ‘Title
           Me.Text = g_CONST_TITLE
        Catch ex As Exception
            MessageBox.Show(ex.Message)
        End Try
    End Sub

Below is the code for adding workbooks and we also need to add the ‘OpenFileDialog’ control to the form:

Private Sub ButtonAttachFiles_Click(ByVal sender As System.Object, ByVal e As System.EventArgs) Handles ButtonAttachFiles.Click
        Try
            ‘Let the users select wanted Excel files
           ‘to be attached to the outgoing e-mail.
           With Me.OpenFileDialog_Workbooks
                .Title = “Select workbook(s) to send as attachment(s) to e-mail”
                .Multiselect = True
                .Filter = “Excel files (*.xls)|*.xls|Excel files (*.xls)|*.xls”
                If .ShowDialog() = Windows.Forms.DialogResult.OK Then
                    Me.ListBox_Files.Items.AddRange(.FileNames)
                End If
            End With
        Catch ex As Exception
            MessageBox.Show(ex.Message)
        End Try
    End Sub

To remove workbooks the following procedure is used:

Private Sub ButtonRemoveFiles_Click(ByVal sender As System.Object, ByVal e As System.EventArgs) Handles ButtonRemoveFiles.Click
        Dim iCounter As Integer
        For iCounter = Me.ListBox_Files.SelectedItems.Count – 1 To 0 Step -1
            Me.ListBox_Files.Items.Remove(Me.ListBox_Files.SelectedItems(iCounter))
        Next iCounter
    End Sub

To add recipients the following procedure is used. A similar code is used to add the list of recipients for ‘Copy To’.

    Private Sub ButtonAddFromRangeSendTo_Click(ByVal sender As System.Object, ByVal e As System.EventArgs) Handles ButtonAddFromRangeSendTo.Click
        Try
            ‘The RefEdit object is not available in .NET
           ‘so instead the Inputbox is used.
           ‘The Excel variables are declared in a standardmodule.
           g_xlRng = CType(g_xlApp.InputBox( _
           “Please select the range that contain the list of recipients as Copy To:”, _
                                 g_CONST_TITLE, , , , , ,   8), Excel.Range)
            g_xlcell = CType(g_xlRng.Cells, Excel.Range)
            Try
                ‘Add recipients to the list of Send To.
               If Not g_xlRng.Columns.Count > 1 Then
                    With Me.ListBox_SendTo
                        .Items.Clear()
                        For Each g_xlcell In g_xlRng
                            If Not (g_xlcell.Value) Is Nothing Then _
                                          .Items.Add(g_xlcell.Value)
                        Next g_xlcell
                    End With
                Else
                    MsgBox(“The list of recipients can only be in one column.”, _
                                      MsgBoxStyle.Information, g_CONST_TITLE)
                    Exit Sub
                End If
            Catch ex As Exception
                MessageBox.Show(ex.ToString, g_CONST_TITLE)
            End Try
        Catch ex As Exception
            ‘Leave empty – it takes care of the cancel for the inputbox.
       Finally
            ‘Release the objects.
           If Not g_xlcell Is Nothing Then g_xlcell = Nothing
            If Not g_xlRng Is Nothing Then g_xlRng = Nothing
        End Try
    End Sub

The following code is associated with the Send e-mail button:

Private Sub ButtonSendEmail_Click(ByVal sender As System.Object, ByVal e As System.EventArgs) Handles ButtonSendEmail.Click
        ‘Check that all entries are done before continuing the process.
       If Me.ListBox_Files.Items.Count = 0 Then
            MsgBox(“Please add at least one Excel file to be sent with the e-mail.”, _
            MsgBoxStyle.Information, g_CONST_TITLE)
            Me.ButtonAttachFiles.Focus()
            Exit Sub
        ElseIf Len(Me.TextBox_Subject.Text) = 0 Then
            MsgBox(“Please enter a subject.”, MsgBoxStyle.Information, g_CONST_TITLE)
            Me.TextBox_Subject.Focus()
            Exit Sub
        ElseIf Me.ListBox_SendTo.Items.Count = 0 Then
            MsgBox(“Please add at least one reciepent to send the e-mail to.”,  _
            MsgBoxStyle.Information, g_CONST_TITLE)
            Me.ButtonAddFromRangeSendTo.Focus()
            Exit Sub
        ElseIf Len(Me.TextBox_Message.Text) = 0 Then
            MsgBox(“Please add a comment to the e-mail.”, _
            MsgBoxStyle.Information, g_CONST_TITLE)
            Me.TextBox_Message.Focus()
            Exit Sub
        End If
        Try
            ‘Retrieve the subject for the e-mail.
           Dim stSubject As String = Me.TextBox_Subject.Text
            ‘Retrieve the message of the e-mail.
           Dim stMsg As String = Me.TextBox_Message.Text
            ‘Retrieve the priority of the e-mail.
           Dim stPriority As String = LTrim(Me.ComboBoxPriority.Text)
            ‘Grab the list of workbooks.
           Dim oFiles(Me.ListBox_Files.Items.Count – 1) As Object
            Me.ListBox_Files.Items.CopyTo(oFiles, 0)
            ‘Grab the list of recipients of Send To.
           Dim oSendTo(Me.ListBox_SendTo.Items.Count – 1) As Object
            Me.ListBox_SendTo.Items.CopyTo(oSendTo, 0)
            ‘Grab the list of recipients of Copy To.
           Dim oCopyTo(Me.ListBox_CopyTo.Items.Count – 1) As Object
            Me.ListBox_CopyTo.Items.CopyTo(oCopyTo, 0)
            ‘Create and send the e-mail, calls a function in a standardmodule.
           If Create_Email_Notes( _
            stPriority, stSubject, oSendTo, oCopyTo, stMsg, False, , oFiles) _
            = True Then
            MessageBox.Show(“The e-mail was successfully created and has been sent.”, _
                g_CONST_TITLE, MessageBoxButtons.OK)
            End If
        Catch ex As Exception
            MessageBox.Show(ex.Message, g_CONST_TITLE)
        Finally
            Me.Close()
        End Try
    End Sub

By adding a LinkLabel control to the form we can add a Web-style link to the form.

In the next post I will cover the solution for worksheets in detail.

Kind regards,
Dennis

Creating and deploying Managed COM add-ins with VB.NET 2005 – Part II

Creating and deploying Managed COM add-ins with VB.NET 2005 – Part II
This is the second post about the subject and please see the previously post at the following URL: Part1 – Introduction
For all code posted here I have intentionally tried to avoid a) the core .NET-approach and b) the use of classes. Instead I have tried to focus on clarity and to use a simple classic VB/VBA -approach.

What is the Shared add-in?
In my opinion the following quote defines the Shared add-in a good way:
“The Extensibility Wizard creates a Visual Basic .NET class library project along with a Connect class that implements the IDTExtensibility2 interface. The skeleton code that implements the empty members of IDTExtensibility is also generated. This project has references to Extensibility and Office assemblies. The build settings of the project have Register for COM Interop selected. Along with the class library project, the wizard generates a setup project that you can use to deploy the COM add-in on other computers.” – See How To Build an Office COM Add-in by Using Visual Basic .NET

The wizard also provide a step to determine the loadbehavior where load on startup of Excel is the default value, i e the value of 3 (1 = Connect + 2 = Bootload (Load on Excel startup).

Debug configuration
Before starting to debug we must make sure that we use Excel by changing the default setting of ‘Start external program’ under the Debug Tab and point to the Excel.exe file. The easiest way to do it is to right click on ‘My project’ in the Solution Explorer windows and then select the Debug tab.

The code for connection to Excel and creating the commandbar
Below is the code in the ‘Connect’-class module where only the vital parts are showed:

‘Make sure that all the wanted references have been set up before doing the imports.
Imports Excel = Microsoft.Office.Interop.Excel ‘To access Excel’s objects.
Imports Office = Microsoft.Office.Core ‘To access Office’s objects.
Imports System.Windows.Forms ‘To access the MessageBox.
Imports Extensibility ‘The IDTExtensibility2 interface.
Imports System.Runtime.InteropServices ‘Defines the GuidAttribute and ProgIdAttribute and to release objects.

<guidattribute (“D5BD9535-51A5-444E-BB23-B83F93C4FB30”), ProgIdAttribute(“NotesTool.Connect”)> _
Public Class Connect

    Implements Extensibility.IDTExtensibility2
    Private Const CONST_TAG As String = “Lotus E-Mail”
    Private Const CONST_PARA_WBOOK As String = “Book”
    Private Const CONST_PARA_WSHEET As String = “Sheet”
    Private Const CONST_PARA_HELP As String = “Help”
    Private Const CONST_PARA_ABOUT As String = “About”
    Private oLotusCommandBar As Office.CommandBar
    Private oBtn As Office.CommandBarButton
    ‘To handle the variable’s click event.
   Private WithEvents cbLotusBtn As Office.CommandBarButton

    Public Sub OnDisconnection(ByVal RemoveMode As Extensibility.ext_DisconnectMode, ByRef custom As System.Array) Implements Extensibility.IDTExtensibility2.OnDisconnection
        Try
            ‘Remove the temporarily custom commandbar.    
           If Not (oLotusCommandBar Is Nothing) Then oLotusCommandBar.Delete()
        Catch ex As Exception
            MessageBox.Show(ex.ToString, g_CONST_TITLE)
        Finally
           ‘Place variables to be handled by the Garbage Collector (GC).    
           oLotusCommandBar = Nothing
            cbLotusBtn = Nothing
            g_xlcell = Nothing
            g_xlRng = Nothing
            g_xlwsSheet = Nothing
            g_xlwbBook = Nothing
            g_xlApp = Nothing
         End Try
    End Sub

    Public Sub OnConnection(ByVal application As Object, ByVal connectMode As Extensibility.ext_ConnectMode, ByVal addInInst As Object, ByRef custom As System.Array) Implements Extensibility.IDTExtensibility2.OnConnection
        Try
            ‘Make sure that the temporarily custom commandbar does not exist.
           If Not (oLotusCommandBar Is Nothing) Then oLotusCommandBar.Delete()
            ‘Cast the main object – declared in a standard module.
           xlApp = CType(application, Excel.Application)
            ‘Create the temporarily commandbar.
           oLotusCommandBar = CType(xlApp.CommandBars.Add(Name:=CONST_TITLE, _
                                                    Position:=Office.MsoBarPosition.msoBarTop, _
                                                    Temporary:=True), Office.CommandBar)
            With oLotusCommandBar
                ‘Add a new button.
               oBtn = CType(.Controls.Add( _
                                            Office.MsoControlType.msoControlButton), _
                                            Office.CommandBarButton)
                ‘Add values to the created new button.
               With oBtn
                    .BeginGroup = True
                    .Caption = “Send Workbooks”
                    .FaceId = 1086
                    .Parameter = CONST_PARA_WBOOK
                    .Style = Office.MsoButtonStyle.msoButtonIconAndCaption
                    .Tag = CONST_TAG
                    .TooltipText = “Send selected workbooks as attachments.”
                End With
                ‘Add an additional new button.
               oBtn = CType(.Controls.Add( _
                                            Office.MsoControlType.msoControlButton), _
                                            Office.CommandBarButton)
                ‘Add values to the created new button.
               With oBtn
                    .BeginGroup = True
                    .Caption = “Send Worksheets”
                    .FaceId = 8
                    .Parameter = CONST_PARA_WSHEET
                    .Style = Office.MsoButtonStyle.msoButtonIconAndCaption
                    .Tag = CONST_TAG
                    .TooltipText = “Send selected worksheets as attachments.”
                End With
                ‘Add an additional new button.
               oBtn = CType(.Controls.Add( _
                                   Office.MsoControlType.msoControlButton), _
                                   Office.CommandBarButton)
                ‘Add values to the created new button.
               With oBtn
                    .BeginGroup = True
                    .FaceId = 984
                    .Caption = “Help”
                    .Parameter = CONST_PARA_HELP
                    .Style = Office.MsoButtonStyle.msoButtonIconAndCaption
                    .Tag = CONST_TAG
                    .TooltipText = “View the help for the tool.”
                End With
                ‘Add an additional new button.
               oBtn = CType(.Controls.Add( _
                                   Office.MsoControlType.msoControlButton), _
                                   Office.CommandBarButton)
                ‘Add values to the created new button.
               With oBtn
                    .BeginGroup = True
                    .FaceId = 611
                    .Caption = “About”
                    .Parameter = CONST_PARA_ABOUT
                    .Style = Office.MsoButtonStyle.msoButtonIconAndCaption
                    .Tag = CONST_TAG
                    .TooltipText = “About the tool.”
                End With
                ‘Make the commandbar visible.
               .Visible = True
            End With
            ‘Set the WithEvents to hook the created buttons, i e all buttons use the same Click event.
           cbLotusBtn = oBtn
        Catch ex As Exception
            MessageBox.Show(ex.ToString, g_CONST_TITLE)
        Finally
            ‘Release object.
           If Not (oBtn Is Nothing) Then oBtn = Nothing
        End Try
    End Sub

    Private Sub cbLotusBtn_Click(ByVal Ctrl As Microsoft.Office.Core.CommandBarButton, ByRef CancelDefault As Boolean) Handles cbLotusBtn.Click
        Try
            ‘Find out which button the user clicked on.
           Select Case Ctrl.Parameter
                Case CONST_PARA_WBOOK
                    Dim frmwbook As New frmwbook
                    ‘By using the method ShowDialog instead of Show makes the
                   ‘form part of the active window.
                   frmwbook.ShowDialog()
                    If Not (frmwbook Is Nothing) Then frmwbook = Nothing
                Case CONST_PARA_WSHEET
                    Dim frmwsheet As New frmwsheet
                    frmwsheet.ShowDialog()
                    If Not (frmwsheet Is Nothing) Then frmwsheet = Nothing
                Case CONST_PARA_HELP
                    Try
                        Show_Help()
                    Catch ex As Exception
                        MessageBox.Show(ex.ToString, g_CONST_TITLE)
                    End Try
                Case CONST_PARA_ABOUT
                    Dim frmabout As New frmAbout
                    frmabout.ShowDialog()
                    If Not (frmabout Is Nothing) Then frmabout = Nothing
            End Select
        Catch ex As Exception
            MessageBox.Show(ex.ToString, g_CONST_TITLE)
        End Try
    End Sub
End Class

How to get the XP Windows styles for controls?
Despite the fact that I’m consider this to be ‘whistle & bells’ I respect customers who ask for it as it’s to be considered as a de facto standard. In classic VB (see Ivan Moala’s nice sample) and in VB.NET 2002/2003 the standard solution is to use a manifest. With VB.NET 2005 MSFT added a method to the Application object, which seems to not work with managed COM add-ins. My workaround is to use the Application object of the System.Windows.Forms namespace, which seems to work well. The following snippet code should be added to the OnConnection event and in the ‘Try’ part:

            System.Windows.Forms.Application.EnableVisualStyles()
            System.Windows.Forms.Application.DoEvents()

The created commandbar
The following image shows the commandbar after the above code has been executed:

Notes Tool

Comments: Compared with classic VB the above code does not differ so much.

Comments and suggestion on improvements are as usual most welcome. In the next post we will take a closer look on the Notes Tool.

Kind regards,
Dennis

Creating and deploying Managed COM add-ins with VB.NET 2005 – Part I

Creating and deploying Managed COM add-ins with VB.NET 2005 – Part I

I thought it would be of common interest to take a closer look into what VB.NET 2005 can offer when it comes to creating and deploying COM add-ins for Excel.

The evaluation will be in view of the following aspects:
– Creating a managed COM add-in
– Deploying a managed COM add-in

In order to create a useful tool I decided to challenge how to work with the Domino object class by using early binding to control Lotus Notes. The tool itself will make it possible to attach workbooks or worksheets to outgoing e-mails with Lotus Notes.

What does ‘Managed’ stand for?
All solutions that require the Common Language Runtime (CLR – part of the .NET Framework) are considered managed, which include all solutions developed with any tool in the Visual Studio.NET suite and with Visual Studio Tools for Office System (VSTO). Solutions developed with classic VB 6.0 and Excel’s VBA are unmanaged solutions.

Since Excel per se is an unmanaged environment we are, from a strictly technical point of view, about to create a managed solution which is supposed to be implemented on an unmanaged platform.

Anyway, for those of You who want to know more about the CLR the following URL provides a good introduction: The Common Language Runtime

Required tools and configuration
In order to create the COM add-in the following tools are required:

– Microsoft .NET Framework 2.0 and later *)
– The professional version of MS Visual Basic.NET 2005 and later in order to use the Shared Add-in template.
(Edit: It’s also available in the standard edition of VB.NET 2005. I don’t know if this template is available or not in the Express edition. It can be done without the template but that is beyond the scope of this post.)
– The Primary Interop Assemblies (PIA) for Microsoft Office 2003 *)
– Microsoft Excel 2003 and later *)
– Lotus Notes 7.01 and later in order to use the sample tool *)

*) Also required on the target computers in order to get the COM add-in to function properly.

Two important settings in VB.NET are:
Option Explicit On (Status by default)
Option Strict On (Not by default which force explicit narrowing conversions and also force early binding)

Comments:
Compared with classic VB we have a quite large overhead to deal with on the client’s machine due to the requirements. In order to install the PIA for Office 2003 it requires that the .NET Framework is installed first. The .NET Framework is not shipped with Windows XP or with any previously versions. All in all, it will in general require an installation of both of them on the targeting computers.

Option Strict On is the recommended setting to which I agree with.

Unlike with classic VB we can only specify one Excel version the add-in should work with due to the involvement of the PIA (and implicit the existence of the .NET Framework). So if we want to develop an add-in for version 2002 and 2003 of Excel we actually need to develop two similar solutions where we use the version specific PIA in each solution. The same should be valid when it comes to Excel 2000 although there exist no official PIA for this version.

I recently raised a question about this issue at David Gainer’s blog and received an answer that MSFT will make it possible to develop add-ins that work with 2003 and forward.

Of course, this is a seriously limitation for managed add-ins as COM add-ins per se should not be version specific in the first place.

Update Your .NET copy
Before doing anything else it’s recommended that You download and install the following fix:
Add-ins, smart documents, or smart tags that you create by using Microsoft Visual Studio 2005 do not run in Office

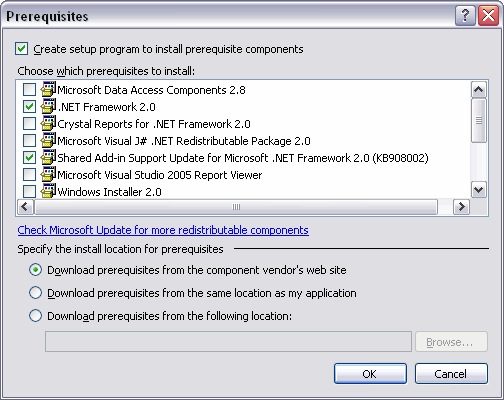
When the project has been created make sure You add the fix to the prerequisites list as the following picture shows:

KB908002

This is easiest done by right clicking on the SetUp project in the Solution Explorer Window and then select the menu option ‘Properties’.

In the next post we will take a closer look into the code to connect to Excel and create the custom commandbar .

Kind regards,
Dennis

Office as A Development platform

In an upcoming article in MSDN Magazine (August 2006) Andrew Whitechapel and Jon Peltonen discuss Office as a development platform from a broad perspective.

What You Need To Know About Using Office As A Development Platform

From my point of view it’s welcoming to take part of a ‘roadmap’ for Office as a development platform although we may not necessarily agree with all the content of it.

However, it’s regretful to take part of articles, books etc from MSFT where VBA, since the introduction of .NET/VSTO, is considered to be a non-professional tool…

Anyway, I hope that You find the article useful.

Kind regards,
Dennis

Measure & Evaluate The Quality of The Data

Measure & Evaluate The Quality of The Data

In view of the emergency trend to retrieve data from ERP systems and other similar central systems into Excel it has become important to discuss the quality of the retrieved data. Since all data is part of one or more decision processes the quality has an impact on the outputs of these processes.

From my point of view there exists a general dilemma with ERP systems and the process of registration the data, especially when it’s done manually. If the registration is dictating then some of the data may not be valid but since it’s required it’s filled in. If the registration is not dictating, i e users are allowed to leave fields empty, then some data will be left out.

When measuring the quality for data from a dictating system it’s very difficult to locate the less obviously errors (they can be inside a predefined range of values but still be wrong) while it’s much easier when data is left out.

In my experience most corporates ERP are dictating when it comes to order data, production data and staff data. For sales data they prefer less dictating reporting but on the other hand relies on that the data is revised and updated on regular basis to reflect the ongoing changes.

For me the purpose for measuring and evaluating the quality of the retrieved data is two folded:

-By presenting the quality of the data to the decision makers they get a better understanding of the viewed data and can better evaluate the performance indicators.

-By continuously measure the data quality focus can be set to improve it and in the long run it becomes a better input in the decision processes.

Of course, it’s always a trade off between what can be done or desirable and the costs involved.

In my experience it seems that we only need basic indicators for the quality as these kind of indicators can be viewed and understand throughout corporates.

How do You measure and evaluate the quality of retrieved data from ERP systems as well as from other central sources?

Kind regards,
Dennis

Ps: Before anyone asks for a case study I’m not able to provide any. Not even with the most simplified approach, as it would violate the present NDAs.

Web based services

Tushar Mehta brings up some interesting aspects on web based services in the Goggle spreadsheet post. Below is his post on the subject:

Over the past 3 years or so, every chance I’ve had I’ve asked people in MS to create a “web based Office-like product” that blurs the lines between existing apps. Instead it would consist of functional components, each of which could be used independent of the others or in conjunction — imagine if you will a OneNote “writing pad” where the “things” you put in wherever you want would be components from today’s overall Office suite — XL, Word, Outlook, PowerPoint, FrontPage, what-have-you.

Of course, since I never had a chance to talk with senior MS managers, it was obvious I was “whistling in the wind.”

When OfficeLive came along I briefly fantasized that someone in MS management had been thinking along the same lines as me. Unfortunately, OfficeLive seems to be another attempt to push SharePoint Services based products.

Now, maybe Google will deliver. I don’t want Writely and Google Desktop and GSheet and GMail and G Calendar and Google’s video site and…and…and… What I want is something way “outside the box.” Imagine a clean slate site where the stuff I can include are functional components: an InMail section here, an IM section there, a hidden reminders “window” that will “pop up” when needed, a ticker to keep an eye on the stock market (and maybe a “quick access to my brokerage to execute a trade” feature), a tiny space to watch streaming news channel (or even a regular TV channel), a space where I can work on a document — a document that contains text organized as I want, numbers in some tabular fashion in that area, a charting module that lets me create the kinds of charts I want (in one discussion with MS, I referred to it as “a police sketch artist for charts”), overall quality that approaches what one sees in magazines…the possibilities are endless…and, of course, all in an collaborative environment.

No, it won’t be free. And, no, I don’t have to buy everything all at once. If I don’t do magazine quality charts, I don’t buy that license. If I don’t do active stock trading, I don’t need the “rapid-access-to-broker” module.

But, what a world it would be!

I would welcome a workable business model that gives us the freedom to subscribe on online web services on demand and for which we pay for when used. Of course, it should include storage options that we can accept and trust in.

When I first heard about Office Live I also thought it would be something like web based Office System but a quick look made me disappointed as it was not even close to it.

MSFT is, as usual nowadays, ‘late to supper’. Their major concern is to please the present and future shareholders and increase the ROI on present platforms. Their upcoming focus will be on DSS, i e Decision Support Systems (the buzzword today is Business Intelligence, BI) . Later this year we will see their contribution to BI, Performancepoint Server (Analysis Service, Balance Scorecard, and a new tool called Biz #).

Google seems to put all their project to some endless beta-status, which may reflect the issue Google seems to have when it comes to find business model(s).

Perhaps a small and new company can push the well established vendors in the right direction with some powerful solution(s)? After all, competition gives us the best situation in the long run.

Another note is that the general opinion seems to be that everything on the Internet should be free. Perhaps it should be true for home users but certainly not for business users!

BTW, when You say ‘Out of the box’ the reply should be ‘What box?’ (OK, I picked that up from Bullen’s et al book) ;)

Kind regards,
Dennis