Changing the current directory

One common question that I see in the newsgroups is “how can I force Application.GetSaveAsFileName or Application.GetOpenFileName to open in a specific directory ?”. The answer to this is use the ChDrive and ChDir functions.

If you want to open the dialog in say “E:My files”, then this code should do it

Sub Test()
   Dim Filename As Variant
   ChDrive “E”
   ChDir “E:My files”
   Filename = Application.GetSaveAsFilename()

   If TypeName(Filename) <> “Boolean” Then
      MsgBox Filename
   End If
End Sub

However, this doesn’t work if your path is in a network folder, like

\SomeServerSomefolder

to do this, you need to use the SetCurrentDirectory API function, which is defined as:

Declare Function SetCurrentDirectory Lib “kernel32” Alias “SetCurrentDirectoryA” (ByVal lpPathName As String) As Long

Now you can change the current path no matter if the path is mapped to a drive or not. You can also extend this example, saving the current path temporarily, to avoid messing with the user’s settings.

Sub TestAPI()
   Dim CurrentPath As String
   Dim Filename As Variant
   
   ‘Store the current path
  CurrentPath = CurDir
   
   ‘Change the path to the one we want
  SetCurrentDirectory “\SomeServerSome Path”
   
   ‘Ask for the file name
  Filename = Application.GetSaveAsFilename()

   If TypeName(Filename) <> “Boolean” Then
      MsgBox Filename
   End If
   
   ‘Change the path back
  SetCurrentDirectory CurrentPath
End Sub
Scrolling a form

While working with userforms, you sometimes end up with more controls than could fit on the screen. Altough you should try to keep the forms simple and uncluttered, well, there are circumstances where this is not possible.

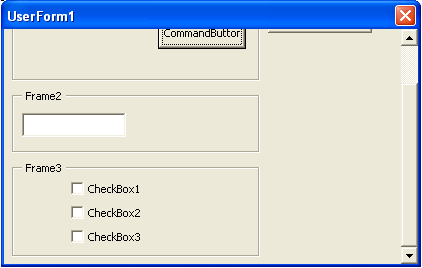
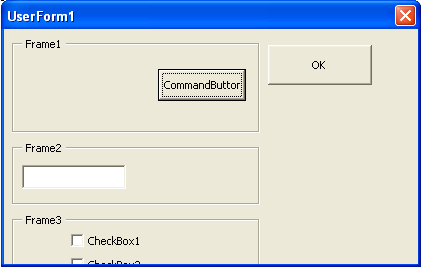
Consider a form with 3 frames, like the following.

Sample userform

As you can see, Frame3 is not completely visible. One possible solution is to use the Userform’s Scrollbars. The first thing that needs to be done is change the properites of the form, to display the vertical scrollbar, so change the

ScrollBars

to

2 – fmScrollBarsVertical

If you run the userform again, the scrollbar will appear, but it won’t work yet. That is because we still need to tell it how much we need to scroll. To do this, we change the ScrollHeightand/or ScrollWidthproperties. This form has a Heightof 200.25, so we need to set the ScrollHeightproperty to a value larger than this. Setting it to 215.25works fine, as you can see in the image.

Sample form with scrollbar

Return the hyperlink

To get the hyperlink of a cell you can use a simple UDF, like this:

Function RETURNHYPERLINK(Rng As Range) As String
   If Rng.Hyperlinks.Count > 0 Then
      RETURNHYPERLINK = Rng.Hyperlinks(1).Address
     
      If Len(RETURNHYPERLINK) = 0 Then
         RETURNHYPERLINK = Rng.Hyperlinks(1).SubAddress
      End If
   End If
End Function

You can then use it in your worksheet like

=RETURNHYPERLINK(A13)

I check for the Address and the SubAddress properties because a hyperlink to a “place in this document” for example is not stored in the Address property (which appears empty), but in the SubAddress.

Connecting to MySQL

Connecting to “non-standard” databases can become quite an interesting task. A while ago I wanted to run some queries on MrExcel’s Message Board, which runs on a PHP / MySQL environment.

Getting the ODBC driver wasn’t a problem, just go here (There used to be a MyOLE driver, but I guess it’s not supported anymore). It was filling the values that was a challenging task.

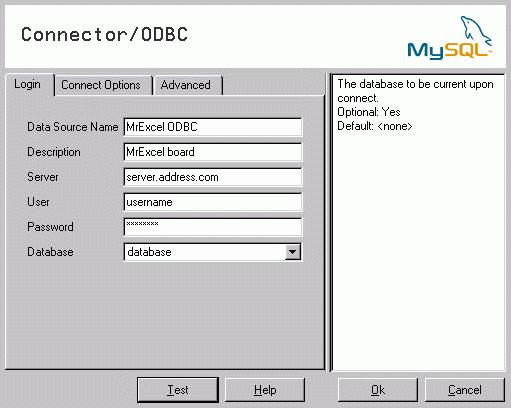
Here’s a screenshot of what the ODBC config page looks like:

MySQL ODBC Config dialog

The server name was kind of easy. It turned out to be the same URL as the ftp address. Then, there was the chase for the username and password. I have to admit that I finally restored to cheating, modifying some of the php pages so they would print them to the page, to see what the database was *really* using, because for some strange reason, the ones that we had were not working.

After that you should be able to get a list of the available databases in that server.

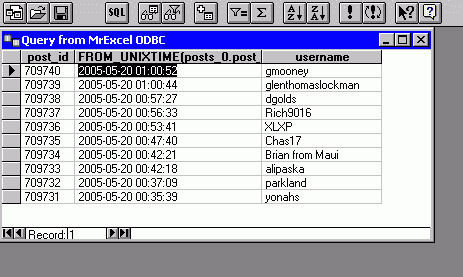
When you have that working you can use it just as you would any other ODBC connection. Here, for example, I got a list of the last 10 posts and who wrote them.

Querying MySQL

Advanced Range Detection

Aaron Blood over at XL-Logic has some interesting challenges. One of them caught my eye, and here’s my stab at it.

It’s the ‘Advanced Range Detection‘.

What Aaron has to say:

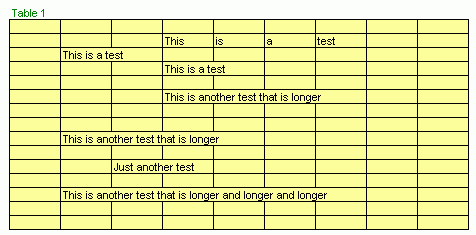
I want to process the above range (Table 1) with a macro so all the text is highlighted. Easy enough right?

So I create a macro to find the text cells and change the background color to green.

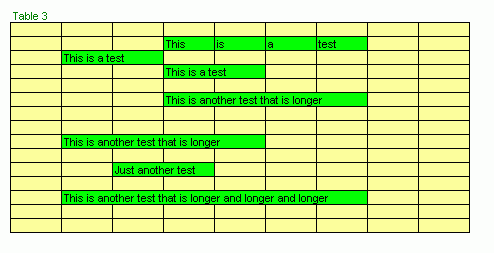
The problem is, in Table 2 above, I want the green background applied to the entire sentenceu or at least just the cells the that the sentence carries into. The challenge is to create a macro that can do the highlighting so it appears like Table 3 below. Good Luck!

You can download the file here.

Here’s what my code produces:

Note: I wrote and tested the code in Excel 2003. It should work ok in 2000 and XP, but I’m not sure about the way those two versions handle the pixel count at the left of each cell, so the end result may vary from the image. However, there’s a TOLERANCE constant that may be adjusted, as well as a version specific function that can be modified to account for the difference between them.

Have any comments on the code ? improvements ? other ways to attack this problem ? I’d like to hear them. For example, I showed the file to Stephen Bullen to ask him about one thing, and he suggested a different approach using a userform and a label (which produces a slight different result on the measure of the string… not sure why though…), but avoids all the API calls that my code uses.

Non VBA Table of contents

Every once in a while there’s a question in the newsgroups on how to create a Table of contents for a workbook. The easiest solution to this is some VBA that loops through the Worksheets() or Sheets() collection, and places that information in the TOC sheet.

There’s another way, using the GET.WORKBOOK() XLM function, and some defined names.

First, insert a sheet (preferably the first sheet in the workbook) and call it Contents.

Now, press Ctrl F3, and define two names, one

BookName

that refers to

=GET.WORKBOOK(16)

and a second one,

Sheets

that refers to

=SUBSTITUTE(GET.WORKBOOK(1),”[“&BookName&”]”,””)

that creates an array of each sheet in the workbook.

And create another name

Now, onto the contents:

In A2, put

=IF(COUNTA(Sheets)>=ROW($A2),INDEX(Sheets,ROW($A2)),””)

and drag it down all the way to say, A50.

Now, the hyperlink in column B gets a little tricky, because the HYPERLINK() function requires us to put the Workbook name in it… kind of strange, but it does, like this

=HYPERLINK(“[BookName.xls]SheetName!Reference”, “FriendlyName”)

Now, why doesn’t just

=HYPERLINK(“SheetName!Reference”, “FriendlyName”)

work ? ask MS that… :-P, anyway, back to the subject… put this in B2 and drag it down:

=IF(LEN(A2),HYPERLINK(“[“&BookName&”]'”&A2&”‘!A1″,”Go to”),””)

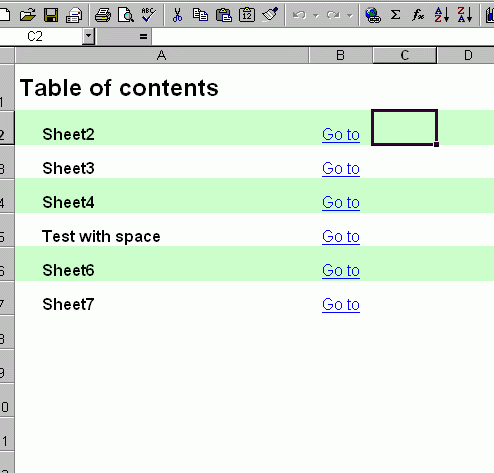
After some quick formatting, I ended up with this:

Table of contents

The main advantage of this method: It updates itself automatically when sheets are renamed, moved, deleted, etc.

The main disadvantage; if your workbook grows larger than the number of cells that you originally used, the Table of contents will display incomplete.

ErrorProvider

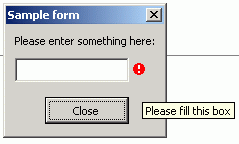
One of the cool things that I’ve found while playing in VB.Net is the ErrorProvider control. It’s a very “clean” way of giving feedback to the users, without having to bother them with messages or “get in the way” popups.

So I created this class that works in VBA, that basically does the same thing. I didn’t implement it completely (for example, the ErrorProvider control in VB.Net allows you to display errors inside a DataGrid, mine doesn’t, at least for now ;-) )

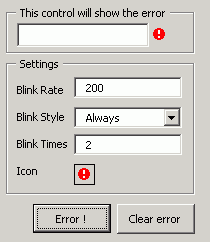
Here’s a couple of screenshots that I created:

ErrorProvider sample form

Sample for ErrorProvider

It shows the four basic properties (one of which is missing in the .Net version) that can be modified:

  • Blink Rate: Amount of milliseconds between blinks.
  • Blink Style: Can be “Always blink”, “Blink if different error” and “Never blink”
  • Blink Times: This is the one missing in .Net. Number of times that the image should blink.
  • Icon: (Double click on the image to change it). Full path of the image to display (for best results, use a 16 x 16 icon)

Now, how to use the class.

Here’s the code behind the sample userform:

Option Explicit

Dim err1 As CErrorProvider

Private Sub btnOK_Click()
   ‘Validate the name
  If Len(txtName.value) = 0 Then
      err1.SetError txtName, “Please fill this box”
   Else
      err1.SetError txtName, “”
      Unload Me
   End If
End Sub

Private Sub UserForm_Initialize()
   Set err1 = New CErrorProvider
   
   With err1
      .BlinkRate = 100
      .BlinkStyle = AlwaysBlink
      .BlinkTimes = 3
      .Icon = ThisWorkbook.Path & “error.ico”
   End With
End Sub

Here is a link to the file. Enjoy !